Transform your living space without breaking the bank! Discover how to craft a stunning and incredibly affordable coffee table using simple wood pallets. This comprehensive DIY guide provides all the details you need to create a unique and functional piece that will elevate your home decor.
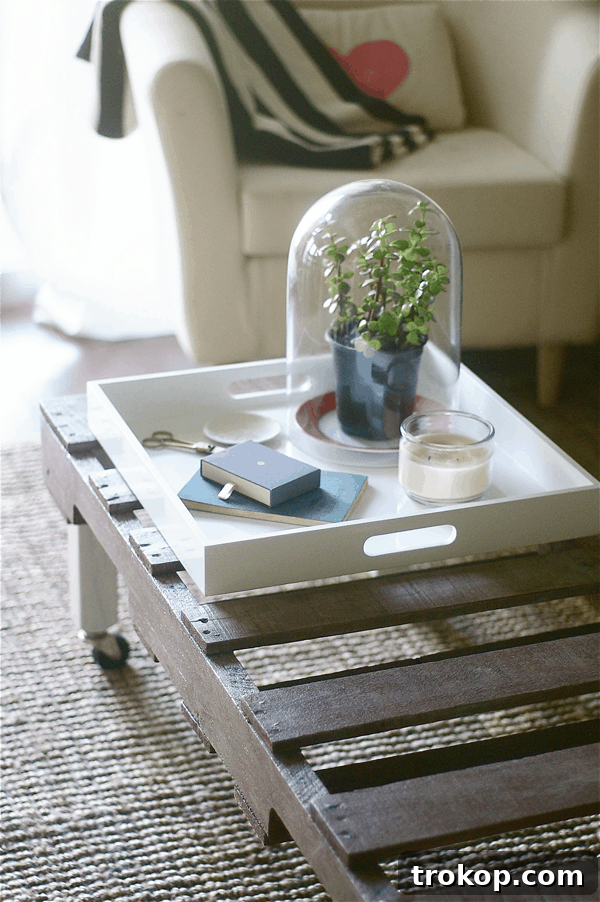
Have you ever noticed the astonishing price tag on some coffee tables? It often feels disproportionate, doesn’t it? While a sofa can sometimes be acquired for a reasonable sum, a simple coffee table can surprisingly rival its cost. For many, especially those on a student budget or just starting out, this seems a little extravagant for a piece of furniture that often ends up adorned with accidental water rings and occasional spills.
Our ingenious and budget-friendly solution? Repurposed wood pallets! This approach not only provides a fantastic way to recycle wood, giving it a new life, but also allows you to design a truly unique piece for your living room. A DIY coffee table project offers both sustainability and significant cost savings.
Sourcing wood pallets can be surprisingly easy. Many large businesses frequently receive shipments on pallets and are often willing to give them away for free, or for a minimal fee. For instance, we were fortunate enough to find a local contact in our apartment complex who sold pallets for a mere $3 each, having used them for transporting grass. These often overlooked resources are a goldmine for creative DIY pallet projects, allowing you to furnish your home with distinct, handmade items without the hefty price tag.
The allure of almost-free furniture sparked countless ideas between my friend Erin and me. Our first joint project: a beautiful and functional coffee table that wouldn’t require a loan or cost as much as fine jewelry.
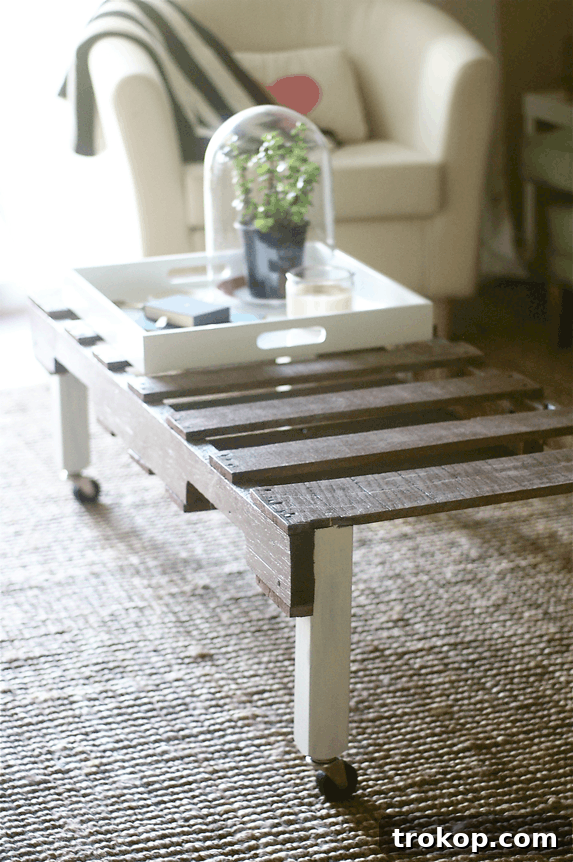
Why Choose a DIY Pallet Coffee Table? The Sustainable & Affordable Solution
Opting for a DIY pallet coffee table is a brilliant choice for several reasons, blending practicality with style. Firstly, the cost savings are undeniable. Brand new coffee tables, especially those of decent quality or unique design, can be incredibly expensive. By using reclaimed wood pallets, you drastically cut down on material costs, making this project exceptionally budget-friendly. This allows you to allocate more of your budget to other home decor elements or simply save money.
Beyond the financial benefits, building your own pallet coffee table is a fantastic way to embrace sustainability. You’re giving discarded materials a new purpose, reducing waste, and lessening your environmental footprint. Each pallet has its own story, and transforming it into a piece of furniture infuses your home with character and a unique, rustic charm that mass-produced items simply can’t replicate. It’s an opportunity for personalization, allowing you to select finishes, leg styles, and dimensions that perfectly match your aesthetic preferences and living space.
Sourcing Your Wood Pallets: Safety and Quality First
Finding the right wood pallets is the first critical step for your DIY project. Often, you can source them for free or at a very low cost. Large retail stores, grocery stores, construction sites, and warehouses frequently have pallets they need to dispose of. Don’t hesitate to ask managers at places like Target, Walmart, Home Depot, Lowe’s, or local grocery stores if they have any pallets available. Online platforms like Craigslist, Facebook Marketplace, or local “Buy Nothing” groups are also excellent resources where people often offer pallets for free pickup.
When selecting pallets, it’s crucial to prioritize safety and quality. Always look for pallets branded with an “HT” symbol, which stands for “Heat Treated.” This stamp signifies that the wood has been treated with heat to prevent pests, rather than harmful chemicals. Avoid pallets marked with “MB” (Methyl Bromide), as these have been chemically treated and are not suitable for indoor furniture, especially in spaces where food or drinks will be placed. You should also steer clear of pallets with visible spills, stains, or strong odors, as these could indicate chemical contamination or mildew.
Once you’ve acquired your pallets, inspect them thoroughly for any broken planks, loose nails, or splinters. It’s a good idea to give them a preliminary cleaning. Use a stiff brush and soapy water to scrub away dirt, dust, and cobwebs, then rinse them well and allow them to dry completely in the sun. This initial preparation ensures you’re working with clean, safe wood and sets the stage for a smooth building process.
Planning Your Pallet Coffee Table Design
Before diving into construction, take some time to envision the final look of your DIY pallet coffee table. Consider the size and shape that best fits your living room. Do you need a large centerpiece or a smaller, more discreet table? Pallets can be easily combined or cut to achieve various dimensions. Think about the overall style you’re aiming for: a rustic, farmhouse aesthetic will embrace the natural, rugged look of the wood, while a more refined finish with smoother edges and elegant legs can lean towards an industrial or even modern design.
The choice of table legs significantly impacts the table’s character. For a rustic appeal, wooden legs, such as stairwell posts cut to your desired height, work wonderfully. If you prefer an industrial vibe, metal pipe legs or hairpin legs can add a chic, modern touch. For maximum versatility, consider adding caster wheels. These not only contribute to an industrial aesthetic but also make your coffee table effortlessly mobile, allowing you to easily rearrange your living room or clean underneath. Carefully selecting your leg style and finish will help ensure your pallet coffee table seamlessly integrates with your existing decor.
Essential Materials and Tools for Your DIY Pallet Coffee Table
To embark on this rewarding DIY pallet coffee table project, gather the following materials and tools. Preparation is key to a smooth and enjoyable building experience:
- Wood Pallet (HT Symbol): Ensure your pallet is heat-treated (HT) and in good condition. You might need one large pallet or several smaller ones depending on your desired table size.
- Fine and Coarse Sandpaper: Essential for smoothing rough surfaces and preventing splinters. An electric sander can significantly speed up this process.
- Stairwell Posts or Wooden Legs of Your Choice: These will form the foundation of your table. Cut them to your preferred height. Alternatively, consider metal legs for a more industrial or contemporary look.
- Wood Stain or Paint in Color(s) of Your Choice: We used American Walnut and Weathered Grey for a worn effect. Experiment with different colors to match your home decor.
- Drill and Appropriate Bits: Needed for pre-drilling holes and, if using, attaching caster wheels.
- Caster Wheels (Optional): If you envision a mobile coffee table that can be easily moved around, select sturdy casters.
- Wood Glue: Provides a strong bond between the legs and the pallet, increasing stability.
- Hammer and Long Nails: For securely fastening the legs to the pallet, working in conjunction with wood glue. Screws can also be used for added strength.
- Polyurethane Spray for Wood: A crucial finishing step to seal and protect your wood against moisture, spills, and wear. A brush-on polyurethane or other clear sealants can also be used.
Step-by-Step Guide: How to Craft Your Pallet Coffee Table
Step 1: Prepare Your Pallet for Perfection
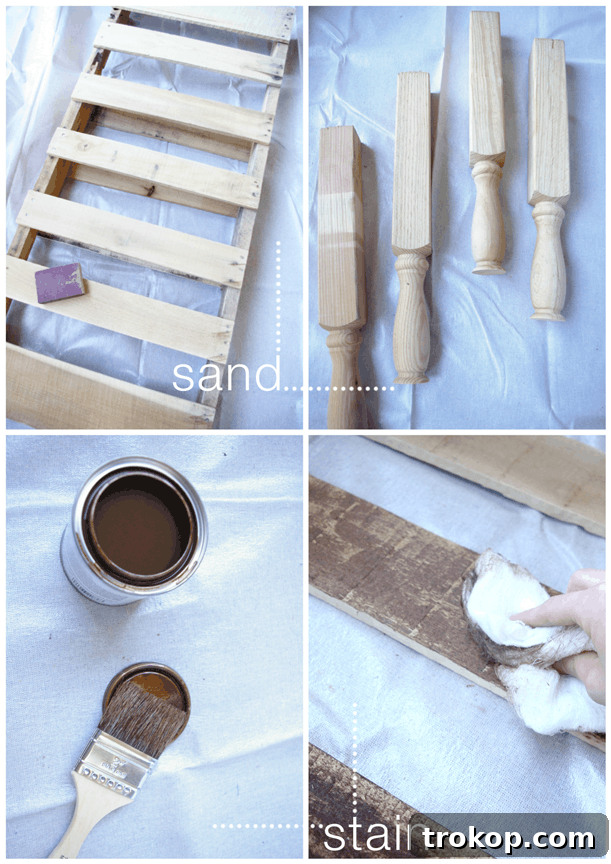
The foundation of a beautiful DIY pallet coffee table lies in proper wood preparation. Begin by thoroughly sanding your pallet. Start with coarse sandpaper to remove any major splinters, rough patches, and deep imperfections. This initial sanding helps to level the surface and prepare it for finer detailing. Once the rough work is done, transition to fine-grit sandpaper. This step is crucial for achieving a smooth, splinter-free finish that’s pleasant to the touch. Pay extra attention to rounding the edges of the pallet boards; this not only enhances safety by preventing bumps and snags but also gives the table a more polished and inviting appearance.
While aiming for smoothness, you might choose to leave a slight texture on the wood surface. This intentional imperfection can maintain a desirable rustic charm, preventing the table from looking “too perfect” and losing its reclaimed character. For efficiency, especially with larger pallets, an electric sander is a game-changer. Remember to always work in a well-ventilated area, preferably outdoors, and wear appropriate safety gear like a dust mask and gloves to protect yourself from wood dust. After sanding, wipe down the pallet to remove any dust particles before proceeding to staining or painting.
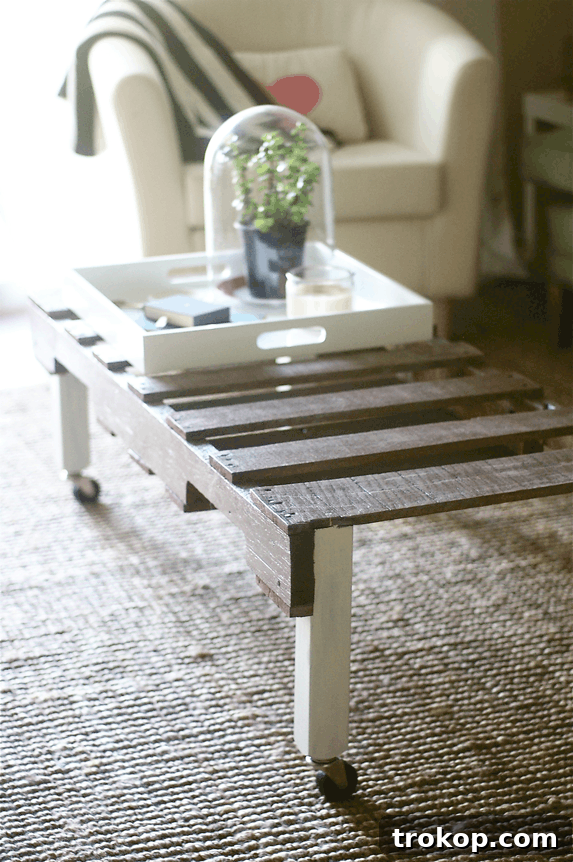
Next, it’s time to add color and character to your wood. Before committing to a full application, always experiment with your chosen wood stains or paints on a scrap piece of wood or an inconspicuous part of the pallet. This allows you to gauge how the color will look once absorbed. For our project, we initially applied an American Walnut stain, then layered a Weathered Grey stain over it to achieve a beautifully aged and worn aesthetic. The layering technique creates depth and mimics natural weathering.
Consider the legs of your table as well. We decided to paint our table legs white instead of staining them. This choice created a lovely contrast with the stained pallet top and blended seamlessly with our predominantly white living room furniture. The combination of a rustic, stained top and clean, white legs resulted in a visually appealing and balanced design. Allow all stained or painted surfaces to dry completely according to the manufacturer’s instructions before moving on to assembly.
Step 2: Securely Attach Your Table Legs
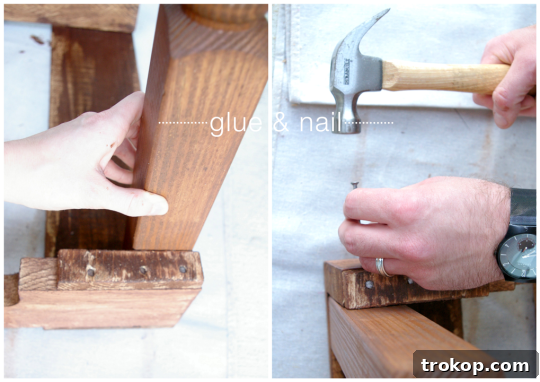
With your pallet prepped and stained, it’s time to assemble the table by attaching the legs. For maximum stability and durability, we recommend a two-pronged approach: wood glue and nails. Apply a generous dab of strong wood glue to the top end of each table leg, where it will meet the underside of the pallet. Position the legs at each corner of the pallet, ensuring they are evenly spaced and aligned. Once in place, firmly hammer long nails into each side of the leg, driving them into the pallet for extra security. For even greater strength, you can also use wood screws after pre-drilling pilot holes to prevent splitting. Allow the wood glue to dry and set completely, typically for several hours or overnight, before putting any weight on the table.
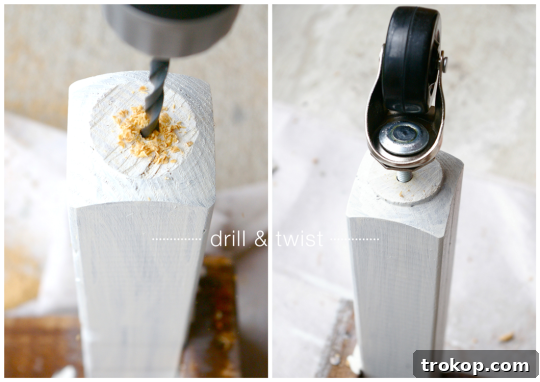
If you’ve opted for a mobile coffee table, this is the stage to install your caster wheels. Once the glue on the legs is fully dry and cured, flip your table over. Select a drill bit that is slightly smaller than the threaded stem of your caster wheels, but large enough to allow the wheel to twist securely into the leg. Drill a pilot hole into the bottom center of each leg. Then, simply twist the caster wheels firmly into these pre-drilled holes until they are snug and stable. This addition will give your coffee table effortless mobility, making it easy to move for cleaning or redecorating.
Step 3: Protect and Seal for Lasting Beauty
The final, essential step in crafting your DIY pallet coffee table is to seal and protect the wood. This protective layer is vital for safeguarding your table against daily wear and tear, including those inevitable spilled drinks or accidental marks. We recommend applying several coats of polyurethane spray for wood. Polyurethane creates a durable, clear finish that resists moisture and provides a hard surface. Apply thin, even coats, allowing each coat to dry completely according to the product’s instructions before applying the next. This typically takes a few hours per coat. Multiple coats will offer superior protection and a more resilient finish. Once the final coat is dry, your beautiful, custom-made pallet coffee table is ready to be enjoyed!
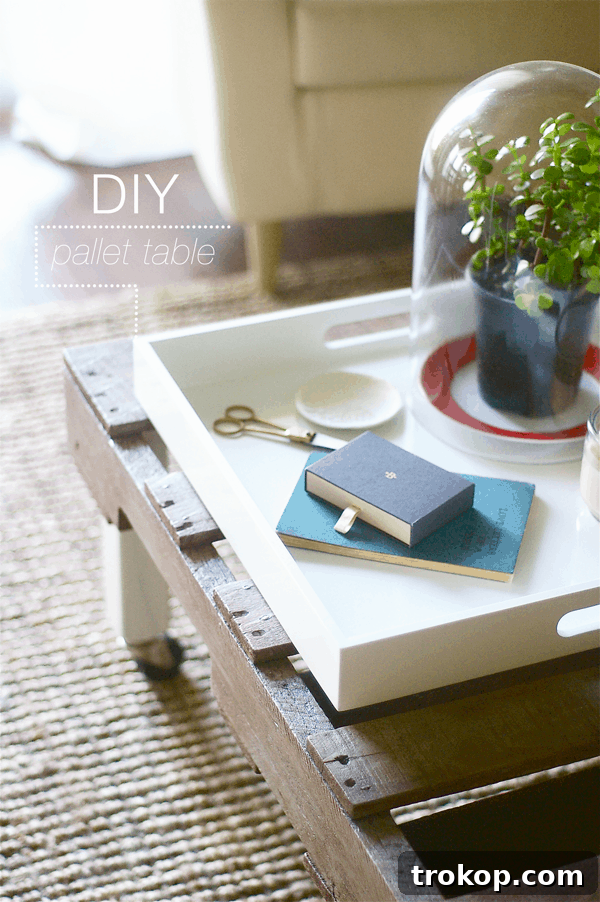
Styling Your New Pallet Coffee Table
Now that your DIY pallet coffee table is complete, it’s time for the fun part: styling! The beauty of a pallet coffee table is its versatility. For a cohesive look, consider placing a large decorative tray on top to corral smaller items like remote controls, candles, or coasters. This helps protect the wood surface while adding a touch of elegance. Integrate natural elements such as potted succulents or a small vase of fresh flowers to bring life and freshness to your living room.
Books, magazines, or small decorative sculptures can further personalize your table, reflecting your unique style and interests. The rustic texture of the pallet wood provides a wonderful contrast to metallic accents, glass items, or soft textiles, allowing you to create layers of visual interest. Whether your aesthetic is farmhouse, industrial, bohemian, or eclectic, your pallet coffee table serves as a charming and functional centerpiece ready to be adorned to perfection.
Beyond the Coffee Table: More Inspiring Living Room DIY Projects
Our DIY pallet coffee table project highlights how simple and rewarding it can be to create functional and beautiful pieces for your home without extensive tools or experience. If you’re looking for more quick weekend projects to further spruce up your living room and add personalized touches, explore some of our favorite DIY ideas below. These projects are designed to be accessible and make a big impact on your home’s aesthetic.
- Simple Scrap Wood Projects for Your Home — Don’t let those wood scraps go to waste! Get inspired by these amazing and simple scrap wood projects that are perfect for your next creative endeavor. From decorative accents to small organizers, there are endless possibilities.
- Creative DIY Pillow Ideas — Tired of generic pillow options? Discover a world of customization with these creative DIY pillow ideas. Learn how to sew, stencil, or embellish your way to unique cushions that perfectly complement your decor.
- DIY Canvas Art — Personalize your walls with meaningful art. This tutorial shows you how to transform your favorite photos or designs into stunning canvas prints, adding a bespoke touch to any room.
- Homemade Reed Diffuser — Keep your home smelling fresh and inviting with this incredibly easy 5-minute DIY reed diffuser. It’s a natural, budget-friendly way to create a pleasant ambiance without harsh chemicals.
- DIY Pallet Bookshelf — Utilize extra pallet wood to create a charming rustic bookshelf or floating shelves, perfect for displaying books, plants, or cherished mementos. This project extends the life of pallets and adds valuable storage.
- Upcycled Pallet Wall Decor — Transform individual pallet planks into unique wall art or decorative signs. With a bit of paint and creativity, you can add personalized quotes, designs, or a gallery wall feature that enhances your living room’s character.
Project Summary: DIY Pallet Coffee Table with Wheels
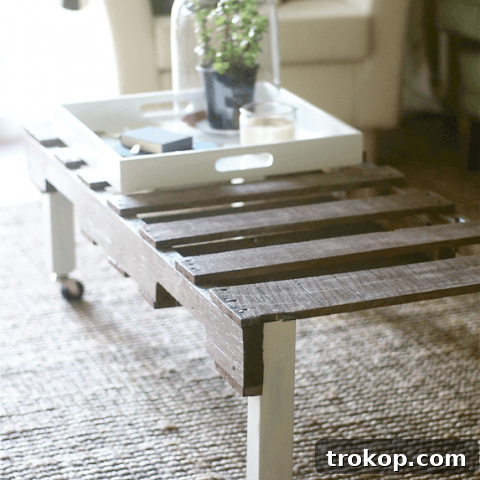
DIY Pallet Coffee Table with Wheels
An affordable DIY project that repurposes wood pallets into a creative and functional coffee table for your living room.
Prep Time: 2 hours 30 minutes
Drying Time: 4 hours
Total Project Time: This project requires approximately 2 hours 30 minutes of active work, plus adequate drying time between coats and for glue to cure.
Course: DIY
Category: Coffee Table, Furniture
Estimated Cost: ~$115 (This is an estimate and can vary based on material sourcing)
Equipment
- Coarse sandpaper
- Fine sandpaper
- Drill and bit
- Wood glue
- Hammer and long nails
Materials
- 1 Wood pallet (ensure HT stamp for safety)
- 1-2 cans or containers of wood stain/paint (color(s) of your choice)
- 4 Table legs (wooden posts or metal, cut to desired height)
- 4 Caster wheels (optional, for mobility)
- Polyurethane spray sealant for wood
Instructions
- Sand your pallet: Begin with coarse sandpaper to smooth out major imperfections, then follow with fine sandpaper for a silky finish. Pay close attention to rounding the edges for safety and aesthetics.
- Stain or paint the wood: Apply your chosen wood stain or paint to the pallet and table legs. Experiment with layering stains for a unique look, or paint the legs a contrasting color. Allow all pieces to dry completely.
- Attach the table legs: Apply wood glue to the top of each leg where it meets the pallet. Position the legs and secure them with long nails hammered into each side for extra stability. Allow the glue to cure thoroughly.
- Install caster wheels (optional): If adding wheels, drill pilot holes into the bottom of each leg using an appropriate drill bit. Twist the caster wheels firmly into place until secure.
- Seal and protect: Apply several thin, even coats of polyurethane spray over the entire wood surface, allowing ample drying time between each coat. This step protects your table from spills and wear.
Keywords: diy pallet coffee table, wood pallet furniture, affordable home decor, upcycled coffee table, living room furniture, handmade coffee table