

As the days grow longer and the sun shines brighter, patio season calls to us, inviting us to emerge from our winter cocoons and transform our outdoor spaces into personal havens. There’s no better way to enhance that sense of peace and relaxation than with the gentle, melodic whispers of a homemade wind chime. Imagine unwinding on your balcony or in your backyard, a refreshing drink in hand, as a beautifully crafted wind chime serenades you with its delicate tunes. It’s more than just decor; it’s an experience, a subtle symphony orchestrated by nature itself, bringing a unique charm and a touch of personal flair to your outdoor sanctuary.
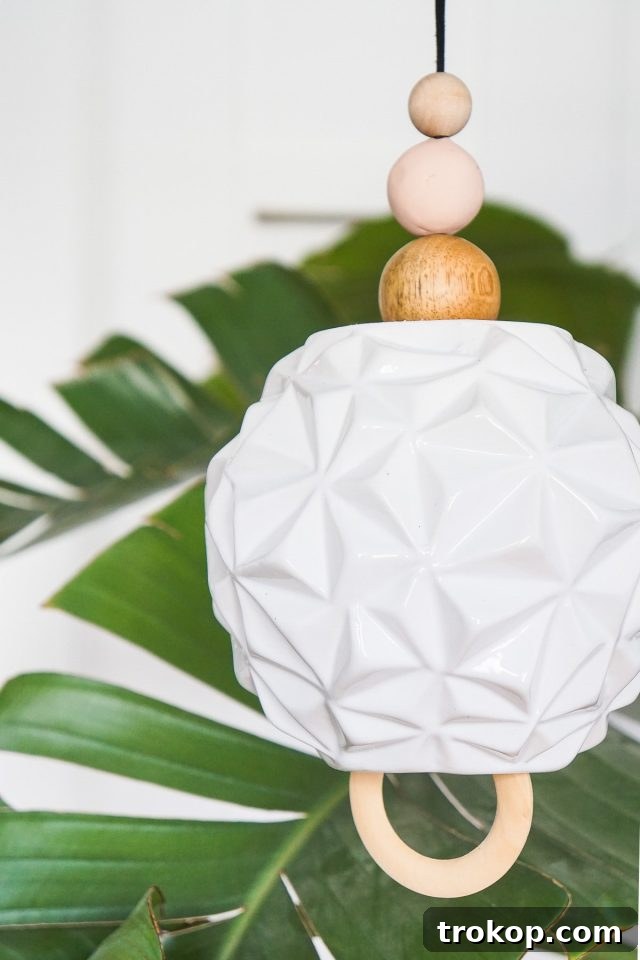
The inspiration for this particular DIY wind chime project came from a truly enchanting outdoor wedding I recently attended. The couple had adorned their altar with a captivating collection of wind chimes, their soft, harmonious chirping creating a magical background soundtrack throughout the ceremony. It was an incredibly unique and utterly charming detail that left a lasting impression. Naturally, this delightful experience sparked a creative urge within me, inspiring me to craft a set of bespoke wind chimes to adorn my own patio this year. This project isn’t just about making something; it’s about bringing that same sense of wonder and personalized beauty to your everyday outdoor living.
This wind chime project is surprisingly easy to execute, yet it delivers a significant visual and auditory impact. The core concept revolves around the simple art of stringing and tying various materials of your choice onto a sturdy piece of cording. This allows for immense creativity and customization, ensuring your final piece is a unique reflection of your style. Whether you prefer a minimalist design or something more elaborate, the process is straightforward, culminating in a beautiful decor item that truly comes alive when the wind blows, filling your outdoor area with soothing sounds and eye-catching movement.
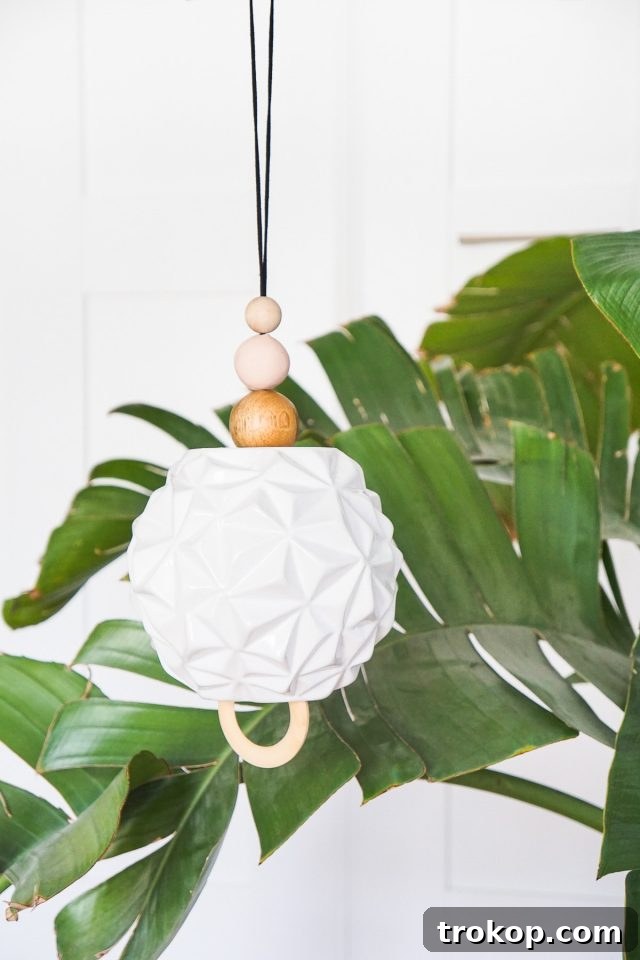
Table of Contents
Essential Tools and Materials for Your Modern DIY Wind Chime
Embarking on this charming DIY wind chime project is mostly straightforward, with the most technically challenging step being the drilling of a small hole in the base of your chosen vase. However, even this can be simplified! You might opt to purchase an outdoor vase that already features a drainage hole at the bottom, saving you a step. If drilling is necessary, don’t be intimidated; it’s a simple task that requires just a few basic tools. A diamond drill bit, readily available at any local hardware store, combined with an electric drill, will make quick work of creating the perfect opening for your chime. Selecting the right materials is key to both the aesthetic and longevity of your wind chime, especially if it will be exposed to the elements.
- Electric drill: A standard cordless or corded electric drill will suffice.
- Diamond drill bit: Essential for drilling through ceramic or glass without cracking. Make sure it’s the appropriate size for your cording.
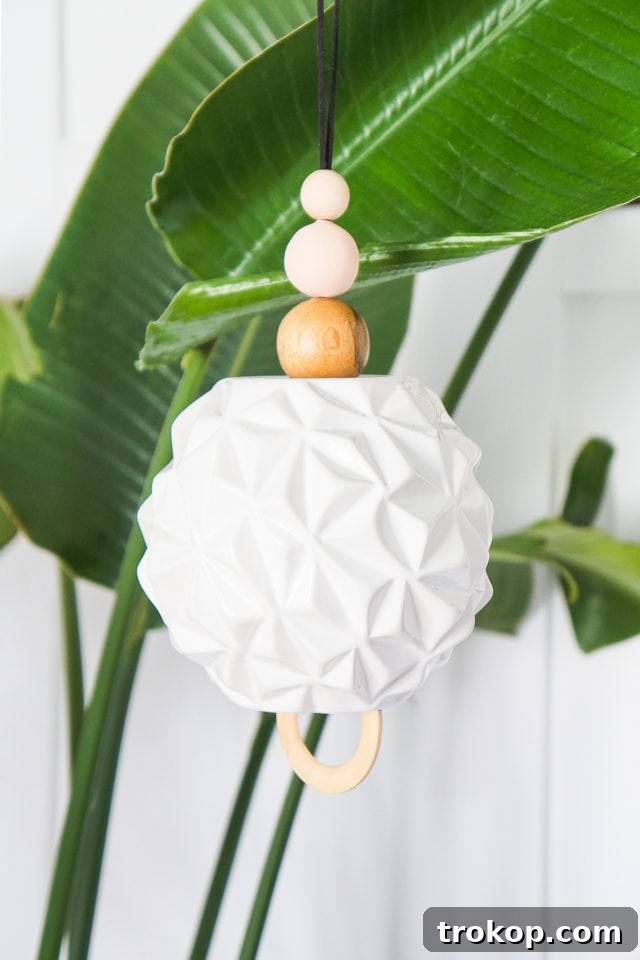
- Round textured vase: The centerpiece of your wind chime. Consider a plastic planter for a shatterproof, weather-resistant outdoor wind chime, or a ceramic vase for a more rustic or elegant look.
- Cording: We recommend using faux suede cording for its tactile appeal and good drape. However, for maximum durability and weather resistance, a strong, weather-proof string or fishing line is an excellent alternative.
- Wooden and clay round beads in various sizes: These provide the primary “chime” elements and add visual interest. Experiment with different sizes and materials for varied sounds and textures.
- Wooden Ring (approx. 2 inches): This serves as the anchor for hanging your wind chime and is crucial for allowing the beads to strike the vase, creating sound.

Crafting Your Modern DIY Wind Chime: A Step-by-Step Guide
Creating your own modern wind chime is a rewarding process that allows for both precision and creativity. Follow these detailed steps to bring your design to life, ensuring a beautiful and functional piece of outdoor decor. The key is patience, especially during the drilling process, and careful attention to knot tying for secure construction.
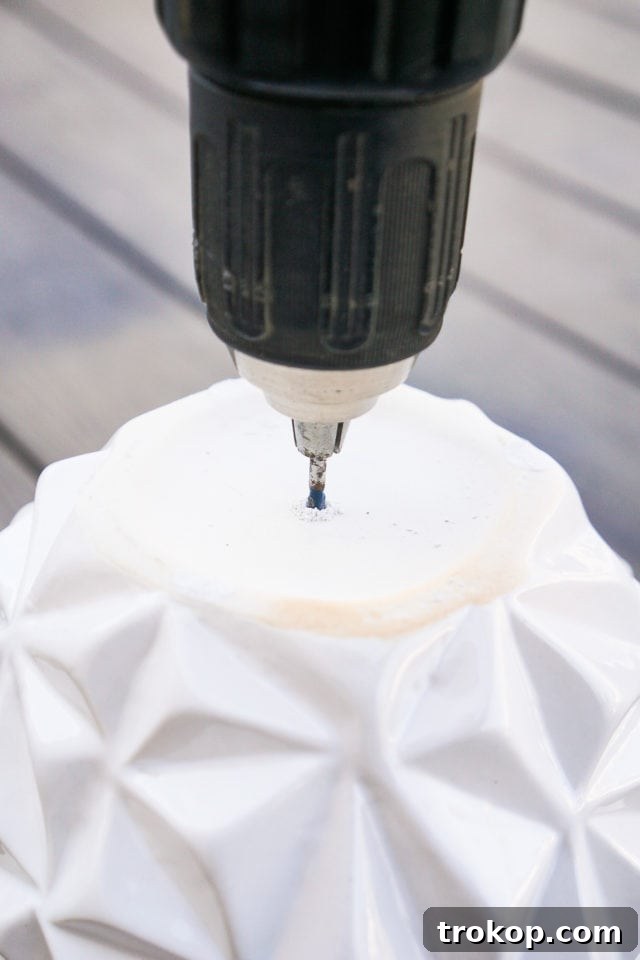
- Drilling the Vase Hole: If you’re using a ceramic or glass vase, this step requires care. Secure your electric drill with a diamond drill bit. Position the bit at the bottom center of the vase. Apply only light, consistent pressure as you drill, allowing the drill to do most of the work. This gentle approach is crucial to prevent the vase from cracking. For added protection and to help keep the ceramic intact, you can place a piece of masking tape over the area you intend to drill. Drill slowly and steadily until the hole is completely through.
- Threading the Cording Through the Vase: Take your chosen cording and fold it neatly in half. Carefully thread the folded end up through the hole you just drilled at the bottom of the vase. Pull it through until a significant length of the cording is visible from the mouth of the vase.
- Securing the First Bead and Wooden Ring: At the mouth of the vase, select one of your round beads. Thread this bead onto the cording, positioning it approximately 6 inches from the end of the folded cording. Immediately below this bead, tie a secure double knot. This knot is vital as it will hold the bead in place, creating a resting point for the vase. The vase will effectively “sit” on this bead, allowing it to hang freely and resonate when struck. Next, take the very end of the cording (the 6-inch portion) and tie it firmly onto your 2-inch wooden ring with another double knot. Ensure that the bead you just secured sits perfectly at the mouth of the vase. This precise placement is what enables the chime effect when the wind moves the wooden ring.
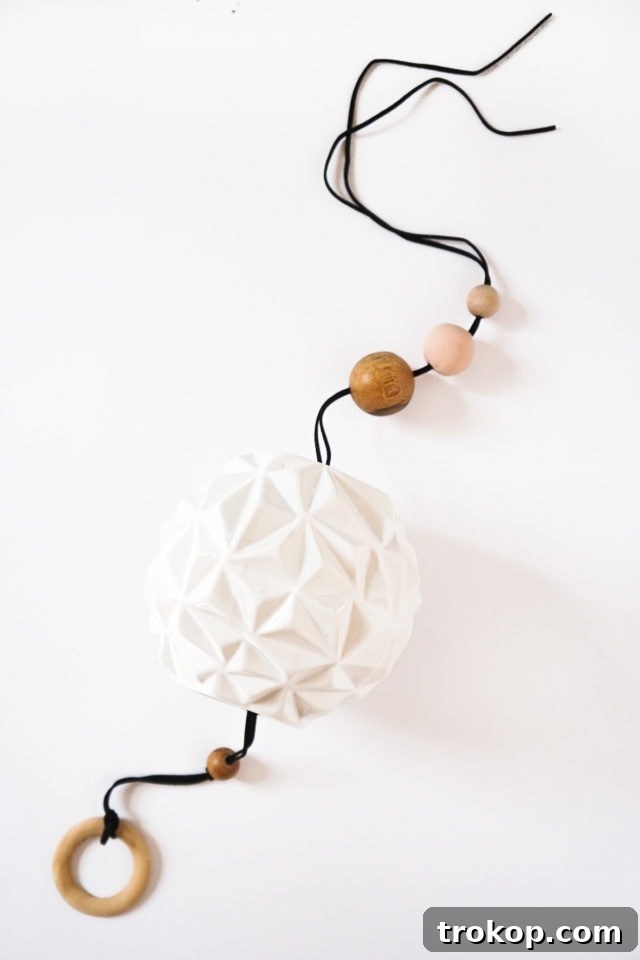
- Adding Decorative Beads and Hanging: Now, turn your attention to the opposite, longer end of the cording. Thread three more beads onto this section. These beads will serve as additional decorative elements and will also contribute to the sound of your wind chime as they interact with each other and the vase. Once all your beads are threaded, you’re ready to hang your creation. Find a suitable spot, such as a sturdy tree branch, a pergola beam, or a hook securely fastened under the eave of your roof. Double knot the cording ends around your chosen anchor point, ensuring it is secure. Step back and let the gentle breeze do its magic—listen as your personalized wind chime begins to sing its soothing melodies!
Unlock Your Creativity: Ideas for Crafting a Custom Wind Chime
While this article offers a modern, elegant approach to the classic wind chime, the beauty of DIY lies in endless customization. Your wind chime can be a canvas for your personal style, a repository for cherished memories, or simply a vibrant splash of color for your outdoor space. Don’t feel limited to the materials suggested; let your imagination soar and explore a multitude of items to create a truly unique acoustic and visual masterpiece. The possibilities are boundless when you start thinking outside the box, transforming ordinary objects into extraordinary elements of your chime.
Consider infusing your wind chime with sentimental pieces, like old keys, a locket, or small trinkets from meaningful travels. For a burst of cheer on even the cloudiest days, opt for brightly colored materials or apply a fresh coat of spray paint to give existing items a new lease on life. Flea markets, antique shops, and even your own garage are treasure troves for finding incredibly unique materials. Imagine the delicate clinking of vintage silver spoons, or the earthy tones of found pebbles. Here are some inspiring ideas to get your creative juices flowing:
- Glass rocks: Smooth, colorful glass rocks catch the light beautifully and create a soft, resonant sound when they touch.
- Glass shells or seashells: Natural seashells offer unique shapes and a delicate, whispering sound. Glass shells can mimic this with added durability and color.
- Terra cotta pieces: Broken terra cotta pots, carefully smoothed, provide a rustic look and a deeper, more earthy tone.
- Collected bottle caps: A fun, eco-friendly option, bottle caps can be flattened, painted, and strung for a quirky, metallic sound.
- Spray painted recycled cans: Small, clean aluminum cans can be transformed with vibrant spray paint and cut into interesting shapes.
- Faux pearls: For a touch of elegance and a subtle shimmer, faux pearls add sophistication to any design.
- A piece of driftwood: Incorporating a gnarled piece of driftwood as a hanger or a central element can give your chime a beautiful shabby chic or coastal feel.
- Vintage cake pans: Small, decorative vintage cake pans can produce surprisingly lovely, resonant tones and add a charming retro aesthetic.
Don’t underestimate the power of a little spray paint! A simple can of paint can go a long way in unifying disparate elements or adding a pop of vibrant color to old, dull objects. Furthermore, when dealing with smaller, lighter pieces, consider using fishing line. Its thin yet strong nature makes it ideal for securely attaching delicate items to your finished project without being overtly visible. Experiment with different lengths of cording for varying levels of sound and visual appeal.

Wind chimes truly are a delightful addition to any outdoor space, aren’t they? The way they capture the breeze and translate it into melody is simply captivating. If you’re seeking a wider range of chime tones beyond what wooden beads offer, consider swapping out the wooden ring or even the beads for other materials. Copper tubing, for instance, can produce deep, resonant tones, while sea glass creates a softer, ethereal sound with a beautiful visual appeal. The beauty of a DIY project is that you are the artist, the engineer, and the composer all in one. Tailor your chime to your auditory preferences and visual desires, creating a truly unique piece that sings to your soul.
In case you’re looking for more fantastic project ideas to enhance your outdoor living experience, here are a few of my favorite DIYs from the archives. Each project is designed to be accessible and rewarding, adding functional beauty and fun to your outdoor area:
- Easy Patio Lighting Idea: How to Make a Battery-Operated Outdoor Light – Illuminate your evenings with custom, hassle-free lighting.
- Outdoor Movie Night Ideas – Transform your backyard into a cinematic retreat for memorable evenings.
- An Easy DIY Succulent Wall Planter – Add a touch of green artistry to your walls with minimal effort.
- A DIY Ring Toss Yard Game – Perfect for entertaining guests or enjoying a playful afternoon outdoors.

Detailed Instructions for Our Signature DIY Wind Chime
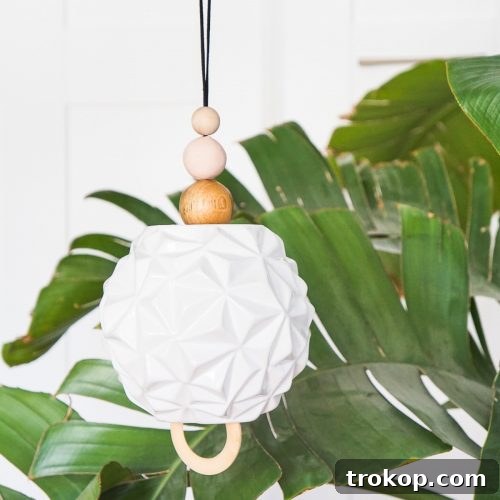
Easy Modern DIY Wind Chime
A super quick and easy DIY project to create your very own customized wind chime!
Print Project Guide
Total Time: 30 mins
Category: Outdoor DIY
Equipment
- Cordless Drill
- 1/8” diamond drill bit (or suitable size for your cording)
Materials
- 1 round textured vase (Consider a plastic vase for a shatterproof wind chime if exposed to weather.)
- 70 inch cording
- 4 wooden and clay round beads (in various sizes to create different sounds and visual appeal)
- 1 2” wooden Ring
Instructions
- Prepare the Vase: Using an electric drill fitted with a diamond drill bit, carefully drill a hole through the bottom center of your vase. Apply light pressure and allow the drill to do the work to prevent cracking. For ceramic vases, placing masking tape over the drill area can help maintain integrity.
- Thread the Main Cording: Fold the cording in half to find its midpoint. Thread this folded end up through the drilled hole at the bottom of the vase, pulling it through until both ends emerge from the vase’s mouth.
- Secure the Chime Bead: At the mouth of the vase, thread one round bead onto the cording, positioning it about 6 inches from the end of one of the cording strands. Tie a firm double knot just below this bead to secure it in place. This bead will serve as the base for the vase to rest upon, enabling it to chime effectively.
- Attach the Wooden Ring: Take the same 6-inch end of the cording (from the previous step) and tie it securely onto the 2-inch wooden ring using a double knot. Ensure that the bead secured in step 3 sits precisely at the mouth of the vase, allowing the wooden ring to swing freely and strike the vase.
- Add Hanging Beads and Display: On the opposite, longer end of the cording, thread the remaining three beads. Once all beads are in place, your wind chime is ready to be hung. Locate a sturdy anchor point, such as a tree branch or a hook under an eave, and double knot the cording ends around it. Now, simply wait for the wind to blow and enjoy the beautiful, custom sounds of your new wind chime!
Notes
- For our project, we used faux suede cording, which offers a soft texture. However, for outdoor wind chimes exposed to various weather conditions, a weather-proof cording material, such as nylon or polyester, would be a more durable choice.
- When selecting decorative elements, especially if your wind chime will hang in an uncovered outdoor area, prioritize materials that are shatterproof and resistant to harsh weather to ensure longevity and safety.
Estimated Cost: $30 (approximate, depending on material choices)
Keywords: DIY, easy, how to, modern, outdoor, quick, wind chime, handmade decor, patio project, garden craft

More Fun Outdoor DIY’s
Continue Reading
Continue Reading
Continue Reading
Continue Reading
Continue Reading
Continue Reading