
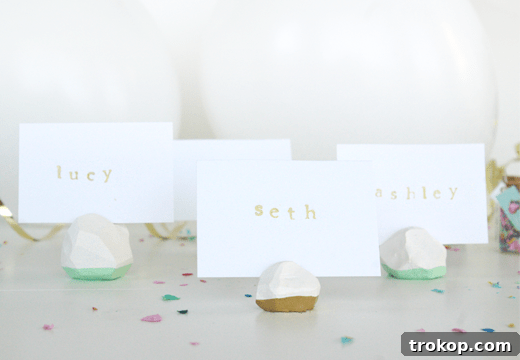
DIY Geometric Place Card Holders: Crafting Elegance for Your Table
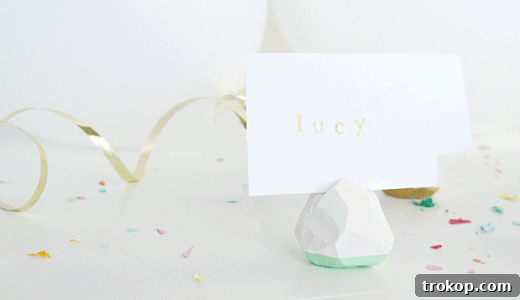
Elevate your table settings with a touch of modern sophistication using these stunning DIY Geometric Place Card Holders. Crafted from versatile oven-bake or air-dry clay, these holders are not only incredibly customizable but also serve as the perfect accessory for showcasing your table name cards, guest seating cards, or even pre-printed place cards you already have. Their striking geometric forms and contemporary design promise to add a unique, handmade charm to any event, from intimate dinners to grand celebrations.
Embracing the Geometric Trend in Your Decor
The allure of geometric shapes has captivated the design world, bringing a fresh, clean, and modern aesthetic to everything from fashion to home decor. Their crisp lines and captivating angles offer a timeless appeal that can complement a variety of styles, from minimalist chic to industrial contemporary. While geometric patterns are widely popular, finding unique ways to incorporate them into your personal style or event decor can be a delightful challenge. I’ve always been drawn to these dynamic forms, but I sought a creative application that felt distinctive and less conventional than the usual offerings.
Initially, my mind wandered to creating larger-scale geometric planters, imagining them as striking centerpieces. However, the vision for something more intimate yet equally impactful led me to these charming place card holders. Perhaps it was the promise of a quicker, more gratifying craft project – a delightful blend of creativity and practicality. This project beautifully combines the sharp, modern lines of geometric design with the tactile pleasure of working with clay, resulting in pieces that are both functional and artistic.
The Enduring Appeal of the Dipped Aesthetic
Beyond the geometric craze, I also find myself continually drawn to the “dipped” trend. There’s something inherently stylish about the clean line where one color transitions dramatically into another, creating a striking visual contrast. Whether it signals an obsessive streak or simply a keen eye for lasting trends, I couldn’t resist fusing these two beloved aesthetics. The result is a collection of place card holders that boast not only intricate geometric facets but also a chic, color-dipped base that adds another layer of modern elegance. This combination allows for endless creative possibilities in color schemes, enabling you to perfectly match your event’s palette or simply indulge in your favorite hues.
Ready to infuse your next gathering with this unique blend of modern design and handmade charm? Here’s how you can craft your very own geometric place card holders using oven-bake clay and a splash of paint. And if you’re ever feeling a touch of creative fatigue, remember that the option to simply support fellow crafters is always there!
 How to Make Easy Geometric Place Card Holders
 How to Make Easy Geometric Place Card Holders
Essential Materials for Your Clay Project
Oven-bake clay or Air-dry clay: Choose a high-quality clay that is easy to manipulate and holds its shape well. Oven-bake clay offers durability once cured, while air-dry clay provides a simpler, no-bake option.
Clay knife/Exacto knife: A sharp, smooth-edged knife is crucial for making clean, precise cuts and creating defined facets on your geometric shapes. A craft knife or an Exacto knife works perfectly.
Wax paper or a non-stick surface: This is essential for preventing the clay from sticking to your work surface and for easy cleanup. It also helps prevent dust and lint from adhering to your clay.
Paint color of choice: All-purpose acrylic paint is ideal for dipping. Select colors that complement your event theme or personal aesthetic. Metallic paints like gold or silver can add a touch of glamour.
Wet/dry sandpaper (optional): If you desire a perfectly smooth finish on your clay pieces before painting, fine-grit wet/dry sandpaper can be used. This is especially useful for refining edges and surfaces.
Water (for sanding): When using wet/dry sandpaper, water helps to reduce dust and provides a smoother sanding experience.
Step-by-Step Guide to Crafting Your Holders
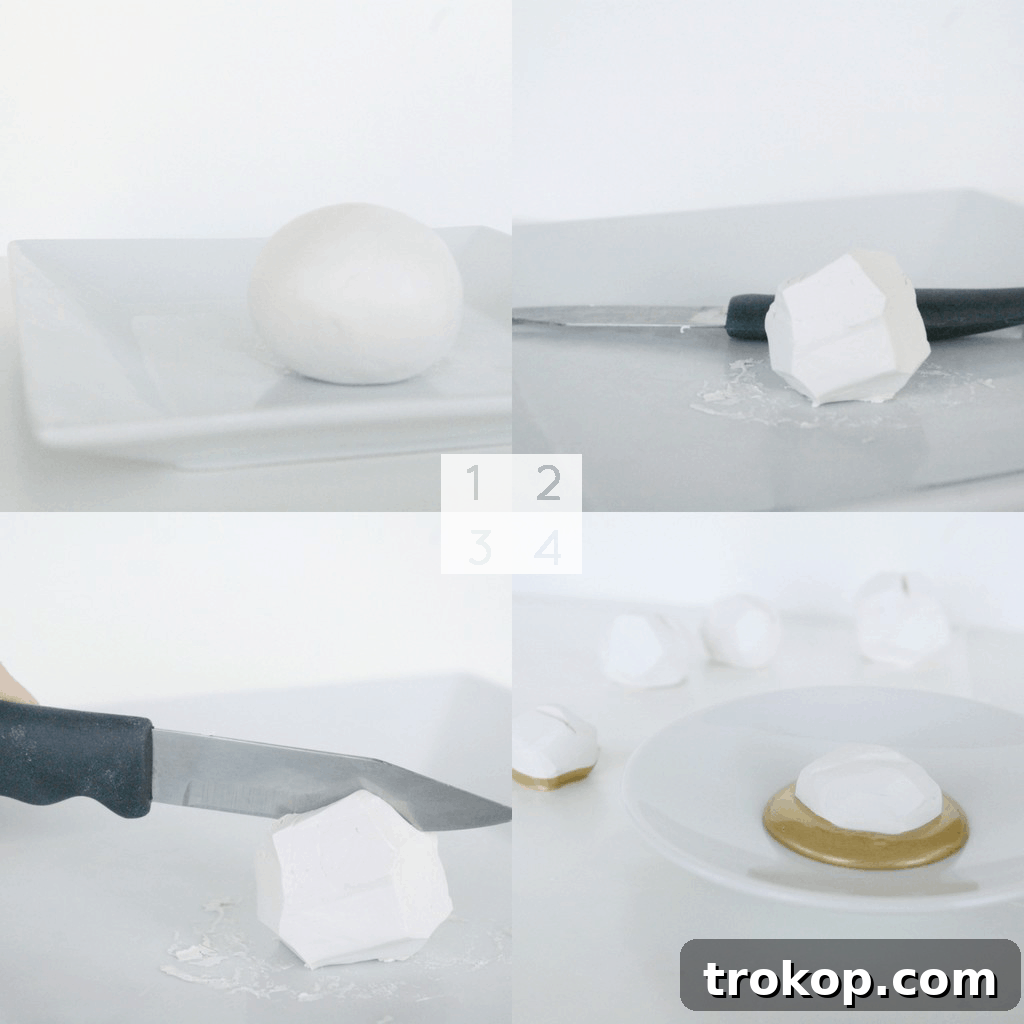
1 | Prepare Your Clay: Form Smooth, Even Balls
Begin by conditioning your clay according to the package instructions to make it pliable. Then, roll the clay into smooth, equally sized balls. The size is entirely up to your preference; for reference, I aimed for balls approximately two inches in diameter. The key here is consistency in size for a uniform look among your finished holders. Work on your wax paper surface to keep the clay clean and prevent sticking.
2 | Sculpt the Geometric Facets: Cutting with Precision
With your clay ball in hand, use a smooth-edged clay knife or Exacto knife to begin carving out random sections and facets from its surface. There’s no strict rule here – the beauty of geometric design is in its irregularity. Rotate the ball, making cuts at different angles and depths to create a multi-faceted, gem-like appearance. Aim for a balance of larger, flat surfaces and smaller, angular cuts. Remember, each piece will be unique, adding to its handmade charm.
3 | Cure Your Clay: Baking for Durability
Once you’re satisfied with the geometric forms, it’s time to cure the clay. If you’re using oven-bake clay, carefully arrange your sculpted pieces on a baking sheet lined with parchment paper. Follow the specific baking instructions provided by your clay manufacturer regarding temperature and baking time. This step is crucial for hardening the clay and ensuring the durability of your place card holders. If you’re using air-dry clay, simply let them dry completely in a well-ventilated area, which can take 24-72 hours depending on thickness and humidity.
4 | Finishing Touches: Sanding and Dipped Paint Elegance
For those who appreciate a flawlessly smooth finish, this optional step is a game-changer. After your clay pieces have cooled (if baked) or fully dried, use wet/dry sandpaper to gently smooth out any rough edges or imperfections. I recommend wetting the sandpaper slightly to minimize dust and achieve a finer finish. Once your pieces are perfectly smooth, it’s time for the “dipped” effect! Pour your chosen all-purpose paint into a shallow dish. Carefully dip the bottom portion of each geometric piece into the paint, creating a clean, crisp line. You can experiment with different dipping depths. Allow the paint to dry completely, following the paint manufacturer’s recommendations for drying time. Consider adding a second coat for richer color, or a clear sealant for added protection and shine.
Personalizing Your Geometric Creations
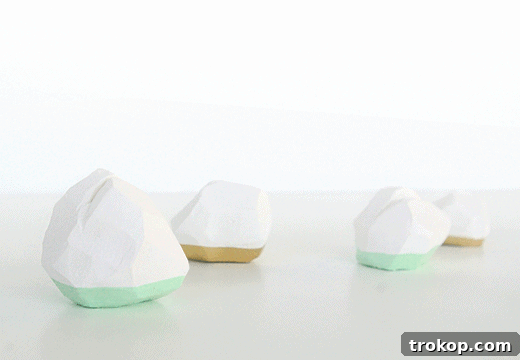
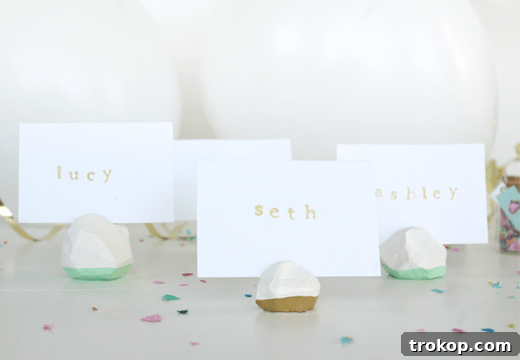
I am absolutely enamored with the striking combination of mint and gold right now, and it brings such a fresh and elegant vibe to these holders! But the true beauty of this DIY project lies in its endless customization possibilities. Imagine bold blacks and whites for a minimalist affair, vibrant primary colors for a playful celebration, or soft pastels for a romantic wedding. You could even incorporate metallic accents in silver or copper, or try different dipping techniques like multiple color blocks or a marbled effect. These holders aren’t just for place cards; their versatility extends far beyond! They can serve as charming photo holders, tiny decorative sculptures for your shelves, or even be adapted into unique jewelry pieces like earrings or pendants. The foundational technique of sculpting and finishing clay opens up a world of creative exploration. What colors would you choose? Is this a project you’re eager to try and make your own?
Beyond Geometry: More Creative DIY Place Card Holder Ideas
At our core, we’re always dreaming up new ways to set a beautiful table, so we’re certainly no strangers to innovative place card holder concepts! While these geometric clay holders offer a distinctly modern appeal, the world of DIY table settings is vast and full of charming possibilities. You can repurpose everyday items, embrace seasonal themes, or craft something entirely unique to reflect your personal style and event. The aim is always to add a thoughtful, personalized touch that makes your guests feel special.
Here are a few more of my favorite past projects and creative ideas for crafting your own distinctive name card holders:
- Faceted Easter Egg Place Card Holders: Perfect for spring gatherings, these add a playful yet refined touch to your Easter brunch table with their pastel hues and geometric cuts.
- Clay DIY Geometric Place Card Holders: (Like the ones we just made!) A modern classic that’s endlessly customizable for any season or celebration.
- DIY Mini Mountain Photo Holders: Easily repurposed, these charming mountain-shaped holders can display guest names or even small photos, adding a rustic yet artistic element to your decor.
- DIY Watercolor Candy Ribbon Place Card Holders: An unexpected and delightful idea where edible treats double as beautiful, colorful place cards.
- Simple Pumpkin Leaf Place Card Holders: Ideal for autumn feasts and Thanksgiving, these natural elements bring organic warmth and a touch of seasonal elegance to your table.
- DIY Colorblock Easter Table Name Cards: Combine bold color blocking with simple designs for a vibrant and cheerful Easter table.
- Cork Holders: Repurpose wine corks by making a small slit in the top to hold a card. Simple, eco-friendly, and perfect for wine enthusiasts.
- Mini Terracotta Pots: Paint small terracotta pots and fill them with a sprig of rosemary or a tiny succulent, then tuck the name card into the soil.
- Seashell Holders: For beach-themed events, use larger seashells with a natural groove or add a tiny dab of hot glue to secure a card.
- Pinecone Holders: A classic for winter or rustic themes, simply tuck a card into the scales of a small pinecone.
Fair warning: some of these beloved projects are genuine “oldies but goodies” from our archives! It’s truly fascinating to reflect on how much the world of blogging and digital content creation has evolved over the years. Looking back at early photography methods can sometimes feel like peeking into ancient history, yet the joy and satisfaction of a well-executed DIY project remain timeless. These handmade touches continue to be a cherished way to add character and warmth to any occasion, proving that creativity transcends fleeting trends.