
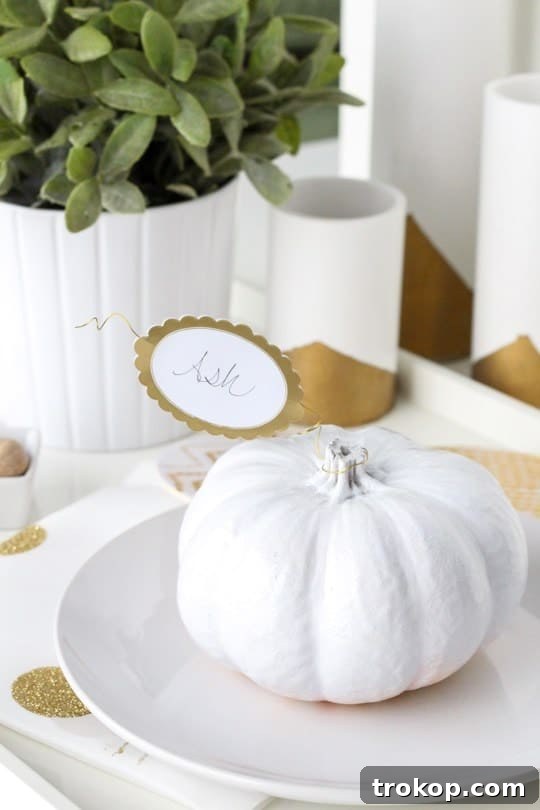
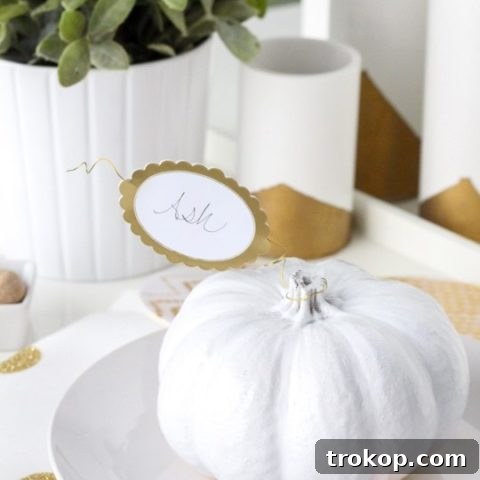
Transform your holiday table in minutes with these charming DIY Simple Pumpkin Leaf Place Card Holders! Whether you’re hosting a spooky Halloween gathering or a heartwarming Thanksgiving feast, these personalized accents add a touch of elegance and thoughtful detail to any fall celebration.
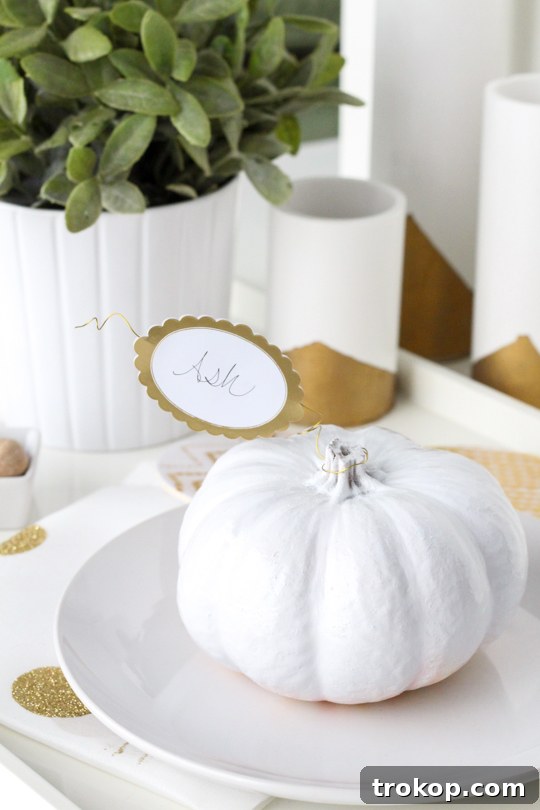
We all understand the rush of preparing for parties and holidays. The dream of a perfectly styled table often clashes with the reality of a busy schedule. But what if we told you that stunning, personalized decor doesn’t have to take hours? As passionate creators of beautiful spaces, we’ve learned the art of crafting impressive elements with minimal effort, ensuring your focus remains on enjoying the moment and the company of your guests.
This commitment to effortless elegance brings us to today’s featured project: incredibly simple yet utterly captivating DIY Pumpkin Leaf Place Card Holders. These are not just functional; they are conversation starters, designed to make each guest feel uniquely welcomed. Imagine creating a bespoke table setting in under five minutes per piece – it’s entirely possible, and we’re here to show you how!
The beauty of this project lies in its adaptability. Planning a chic Halloween soiree? Opt for dark, moody colors and perhaps a touch of eerie glam. Preparing for a cozy Thanksgiving dinner? Embrace crisp whites, warm golds, and natural textures. The choice is entirely yours, allowing these place card holders to perfectly complement your festive vision.
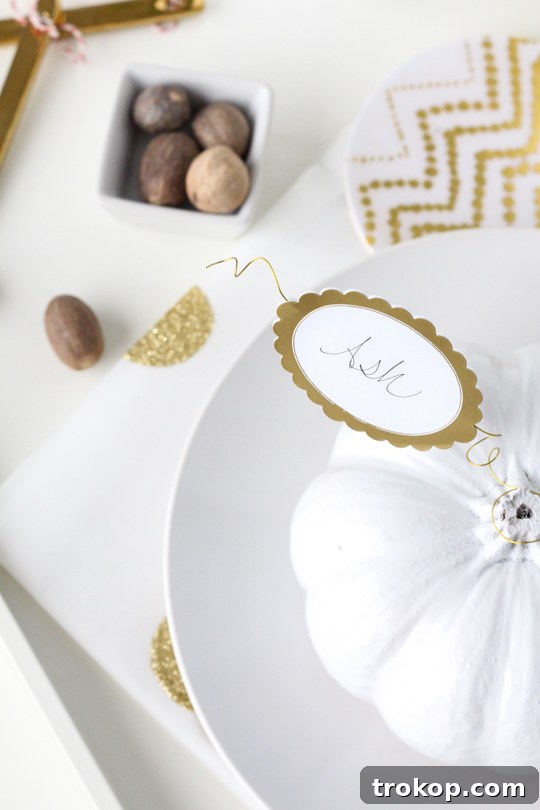
Table of Contents
Materials and Supplies Needed for DIY Pumpkin Place Card Holders
Creating these charming place card holders requires just a few readily available and affordable items. You likely have some of these lying around your home, and the rest can be easily found at any craft or dollar store. Gathering your materials beforehand ensures a smooth and quick crafting process.
- Decorative Frame Labels or Gift Tags: These will serve as the canvas for your guests’ names. We used Martha Stewart’s “Vintage Gilt Frame” sticker labels for their classic appeal, but any elegant gift tags or even simple cardstock cutouts will work beautifully. Consider the size and shape to ensure names are clearly visible. Choosing labels that complement your table setting’s color scheme and overall aesthetic is key. You could also opt for plain white tags and decorate them yourself with fall-themed stamps or calligraphy.
- Gold Floral Wire: You’ll need about a 5-inch (12-13 cm) piece for each place setting. This flexible yet sturdy wire is perfect for shaping into a delicate curl. Gold wire adds a touch of autumnal richness and sophistication, mimicking a metallic vine or leaf. However, feel free to experiment with other colors like copper for a warmer tone, silver for a cooler look, or even colored craft wire to match a specific party theme. The key is its pliability for easy shaping.
- Mini Pumpkins: These adorable, small pumpkins are the foundation of your place card holders. They are widely available during the autumn months, from grocery stores to farmers’ markets and craft shops. You can choose traditional vibrant orange pumpkins, elegant white “ghost” pumpkins, or even small gourds for varied textures. Their natural stems provide a convenient anchor point for your wire design. Look for pumpkins with sturdy, intact stems for the best results.
- Pencil or Pen: This everyday item is essential for creating the signature curled shape of the floral wire. A standard pencil, a thin marker, or even a small dowel will provide the perfect cylindrical form for wrapping the wire. For a rustic touch, you could even use a clean, sturdy twig.
- Wire Cutters: A pair of basic wire cutters will allow you to precisely snip the floral wire to your desired length. While sturdy scissors might work in a pinch, dedicated wire cutters will provide a cleaner cut and prevent damage to your scissors.
Once you have all your materials gathered, you’re ready to dive into the simple crafting steps!
How to Make DIY Pumpkin Place Card Holders: Step-by-Step Guide
Crafting these elegant pumpkin place card holders is a surprisingly quick and satisfying project. Designed with simplicity in mind, each step is straightforward, ensuring you can create a beautiful set for your entire guest list in minimal time. Follow these instructions to bring your festive table decor to life:
-
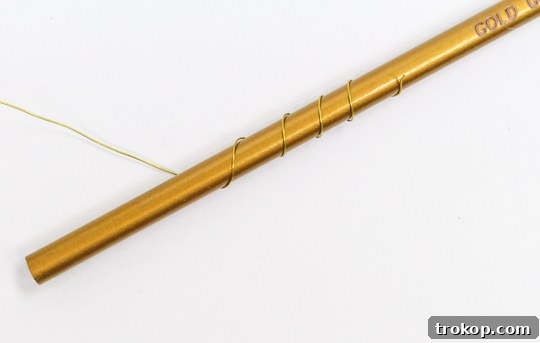
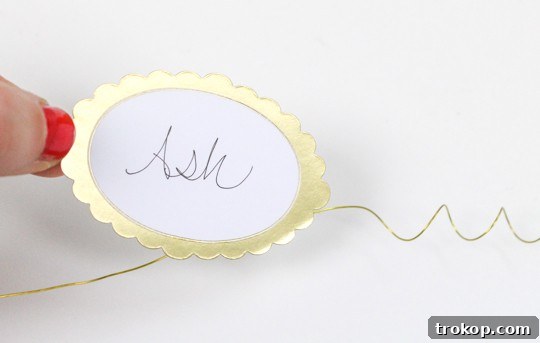
Shape the Floral Wire: Begin by taking one 5-inch strand of gold floral wire. Grasp one end of the wire and, starting about halfway down its length, tightly wrap the wire around a pencil or pen. Continue wrapping until about half of the wire length is curled into a tight coil. The goal is to create an appealing spiral that will resemble a delicate leaf or vine. Leave the other half of the wire straight; this section will be used to attach the name card and secure it to the pumpkin. Don’t worry if the curl isn’t absolutely perfect – a little organic imperfection adds to the handmade charm.

-
Attach the Name Labels: Next, prepare your name labels. Write each guest’s name clearly on two identical frame stickers or gift tags. For a cohesive look, ensure your handwriting style or font choice is consistent across all cards. Now, take one of your prepared, curled floral wire pieces. Carefully place one name label onto one side of the straight, uncurled section of the wire. Align the second identical name label precisely over the first, sandwiching the wire in between. Press the stickers firmly together to ensure they adhere well and secure the wire. This clever technique creates a double-sided place card, making it easy for guests to find their seat from any angle around the table.
-
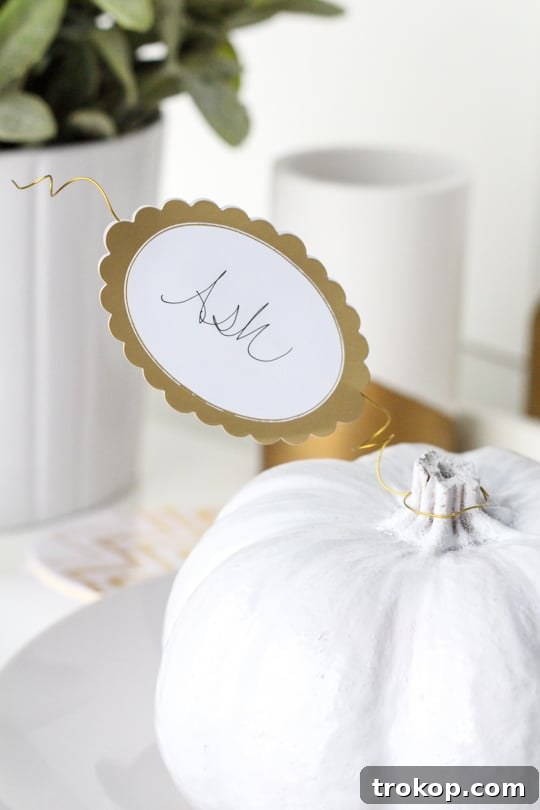
Secure to the Mini Pumpkin: With your name card now attached to the wire, it’s time to bring your creation together. Gently take the straight end of the wire (the part extending from the bottom of your name card) and carefully twist it around the natural stem of your mini pumpkin. Wrap it securely enough so that the name card stands upright and stable, but avoid twisting too tightly, which could damage the pumpkin stem. Once the wire is firmly attached, you can subtly adjust the curled “leaf” section of the wire, giving it a final gentle twirl or shaping it slightly to achieve your desired aesthetic. This completes the charming “gold stem” look and ensures your place card is prominently displayed.
-
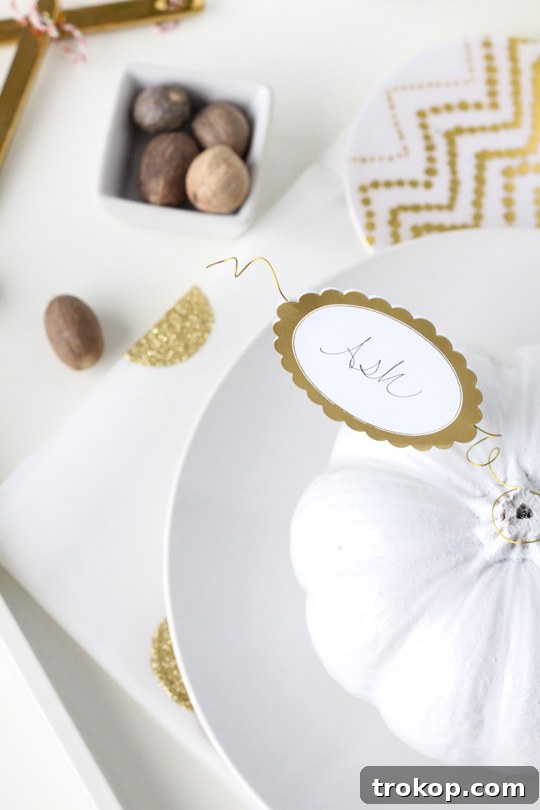
Final Touches and Table Arrangement: Once all your pumpkin place card holders are complete, position them at each guest’s setting. Enhance the overall table ambiance by incorporating other thoughtful decor items that complement the fall theme. Think scattered autumn leaves, small flameless candles for a warm glow, rustic acorns, pinecones, or even fragrant sprigs of fresh rosemary or eucalyptus. These additional elements will tie your tablescape together, creating a sophisticated and inviting atmosphere. Your guests will undoubtedly appreciate the personalized effort and the charming details, completely unaware of how quickly and easily these beautiful accents came to life!
This simple process proves that stunning holiday decor doesn’t require hours of crafting. With these DIY pumpkin place card holders, you can create a memorable and personalized table setting that will delight your guests.
Personalize Your Pumpkin Place Cards for Any Occasion
The true genius of these DIY pumpkin place card holders lies in their remarkable versatility. While they are undeniably perfect for classic autumn holidays, their design is so adaptable that you can easily customize them to suit a myriad of themes, color palettes, and seasonal celebrations. Let’s explore how to make them uniquely yours for various occasions:
- For a Chic Halloween Dinner: Embrace the mysterious and sophisticated side of Halloween. Instead of traditional orange, opt for mini white pumpkins for a ghostly elegance. Pair them with black floral wire and dramatic, dark-colored labels – think charcoal grey, deep purple, or even metallic silver. Use an elegant script font for names to add a touch of Gothic charm. You could even add tiny, subtle accents like a small black feather, a tiny plastic spider, or a scattering of glitter for an extra eerie-chic touch.
- For an Elegant Thanksgiving Feast: Create a warm and inviting atmosphere that celebrates gratitude and abundance. White or cream-colored mini pumpkins are ideal for a refined look. Combine them with classic gold floral wire and elegant ivory or kraft paper labels. A beautiful calligraphy font or a sophisticated serif font for names will elevate the presentation. Incorporate natural elements like dried cranberries, cinnamon sticks, or small sprigs of fresh herbs (like rosemary) at each place setting to tie into the harvest theme and add delightful aromas.
- For a Rustic Fall Dinner Party: Perfect for a casual yet charming gathering, mix and match different shades of mini pumpkins – oranges, whites, and even variegated varieties. Use a blend of gold and copper wires for a rich, earthy metallic palette. Labels made from kraft paper or natural-toned cardstock would fit perfectly. Complement the place cards with rustic table decor such as burlap runners, wooden chargers, scattered autumn leaves, small gourds, or even a few collected chestnuts for an organic, cozy feel.
- Beyond the Autumn Season: Don’t limit the ingenuity of this design to just fall! With a few creative modifications, the core concept can be adapted for other times of the year.
- Winter Wonderland: Use small silver or white painted baubles as the base, paired with silver wire and frosty blue or white labels for a magical Christmas or winter solstice table.
- Spring Garden Party: Choose small decorative bird nests, painted ceramic eggs, or even polished river stones as your base. Use green or pastel-colored floral wire and vibrant, floral-patterned labels to evoke a fresh, blooming garden feel.
- Summer Soiree: Small citrus fruits (like limes or mandarins), seashells, or even brightly painted small rocks can serve as the base. Pair with colorful wire (e.g., bright blue or fuchsia) and playful, summery labels.
Consider adding a small, personalized touch to the back of each place card – a tiny doodle, a thank you note, or a quote. This small gesture can make a big impact on your guests, showing them just how much thought you’ve put into their experience.
Easy Ideas for DIY Name Card Holders
Once you’ve mastered the art of creating these charming pumpkin place card holders, you might find yourself eager for more ways to personalize your table settings. We’re seasoned experts when it comes to unique and memorable place card ideas, constantly exploring new methods to add that special touch to any gathering. The realm of DIY place card holders is truly boundless; you can either craft new designs from scratch or ingeniously repurpose unexpected items, much like how we transformed ribbon candy into delightful holders!
To further ignite your creativity and ensure every guest feels uniquely honored, here are some of our favorite past projects and additional simple ideas for crafting name card holders:
- Faceted Easter Egg Place Card Holders: These geometric marvels are not just for Easter! By using different paint colors—think metallics for New Year’s or muted tones for a bridal shower—these can adapt to almost any celebration, adding a modern, sculptural element to your table.
- Clay DIY Geometric Place Card Holders: Working with air-dry clay offers immense creative freedom. You can easily mold simple shapes like cubes, pyramids, or irregular blobs, then paint them in colors that match your event’s palette. A small slit cut into the wet clay allows for perfect card placement once dried.
- DIY Mini Mountain Photo Holders: Originally crafted to display cherished photographs, these miniature mountain sculptures are brilliantly adaptable for place cards. A tiny notch in the “mountain peak” can securely hold a name card, making them ideal for a nature-inspired, travel, or adventure-themed event.
- DIY Candy Ribbon Place Card Holders: A wonderfully whimsical and sweet option, perfect for children’s parties, baby showers, or any event where a pop of color and a treat is welcome. Guests can even take their edible place card home!
- Simple Pumpkin Leaf Place Card Holders: (The very project you’ve just learned!) A testament to quick, seasonal charm, perfect for fall entertaining.
- DIY Color Block Easter Table Name Cards: This concept, easily transferable to any holiday, involves creating vibrant, modern name cards using bold color blocks. Imagine crisp reds and greens for Christmas, or sunny yellows and blues for a summer picnic.
- Repurposed Wine Cork Place Card Holders: A classic and eco-friendly choice for wine enthusiasts. Simply make a clean, vertical slit in a wine cork (using a craft knife, carefully!) to slide in a name card. They add a rustic, sophisticated touch to any dinner party.
- Natural Pinecone Place Card Holders: Gather small pinecones and either tuck a name card into their natural scales or attach a small wire loop to their top to hold the card. These bring an authentic woodland feel, perfect for fall and winter gatherings.
- Fresh Fruit or Vegetable Place Card Holders: Small apples, pears, limes, artichokes, or pomegranates can serve as a beautiful, often edible, and fragrant base. Carefully make a small incision with a sharp knife or secure a small wire with the card attached into the fruit.
- Driftwood or Small Branch Holders: For a beachy or forest-themed table, small pieces of driftwood or sturdy twigs can be sawed with a shallow groove to hold a name card. These offer a very organic and unique aesthetic.
Embrace the joy of experimentation! By mixing different materials, textures, and colors, you can continually create fresh and engaging table settings that reflect your personal style and the spirit of your occasion. Every DIY project offers an opportunity to infuse your celebrations with heartfelt creativity.
DIY Pumpkin Place Card Holders: Project Overview
This easy DIY project is perfect for fall entertaining! Learn how to make these charming pumpkin place card holders to enhance your holiday table with a personal and festive touch.
10 mins
10 mins
DIY
Entertaining Decor, Fall Decor
Equipment
- Pencil or pen
- Wire cutters
Materials
- Gift tags or frame labels
- 2 strands of gold floral wire (approx. 5 inches each, for each setting)
- Mini pumpkins
Instructions
- Wrap half a strand of floral wire (about 5 inches long) around a pen or pencil to create a curled, leaf-like shape.
- Write each guest’s name on two stickers or labels. Place one sticker on each side of the straight, uncurled section of the wire, pressing them together to form a double-sided name card.
- Twist the straight end of the wire around the stem of your mini pumpkin. Adjust the curled end for a decorative “gold stem” finish, ensuring the name card stands upright.
~$10 (for a set)
diy pumpkin card place holder, fall crafts, holiday decor, table setting, easy DIY, autumn entertaining, handmade place cards

We truly hope this detailed guide has inspired you to create your own charming DIY Pumpkin Place Card Holders! They are a simple yet incredibly effective way to infuse your autumn gatherings with a personal touch, making every guest feel truly welcomed and special. These small details contribute immensely to the overall festive atmosphere, creating lasting memories around your beautifully set table.
Don’t forget to share your own DIY Pumpkin Place Card Holders with us on Instagram! Use the hashtag #sugarandclothloves – we absolutely adore seeing your unique creations and how you adapt our projects to fit your personal style. For even more quick, inspiring, and engaging DIY projects designed to elevate your home, entertaining, and everyday life, we invite you to explore our full collection right here! Happy crafting!
Explore Our Most Popular DIY Projects!
DIY Pom Pom Wall Hang
Continue Reading
DIY Marble Table Top with Gold Accents
Continue Reading
Ikea Bed Hack: DIY Wooden Headboard With Stikwood
Continue Reading
DIY Ikea Hack Dresser and Prepping for Guests
Continue Reading
DIY Ikea Hack Floating Credenza
Continue Reading
How to Make a DIY Knot Pillow
Continue Reading