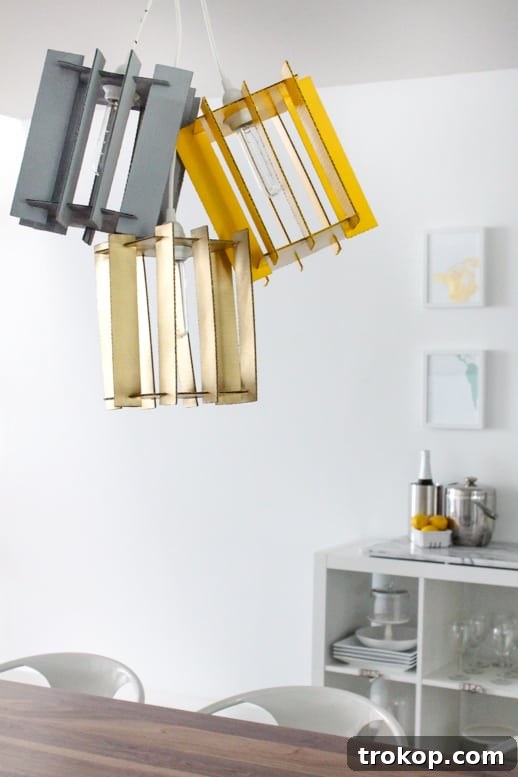
Transform your living space with a touch of eco-conscious creativity using this comprehensive DIY Recycled Cardboard Pendant Light tutorial. This guide will walk you through the process of repurposing a simple cardboard box into a strikingly modern and stylish lighting fixture, utilizing only a handful of common tools and a basic light kit. Embrace sustainable home decor and add a unique, personalized element to any room without breaking the bank.
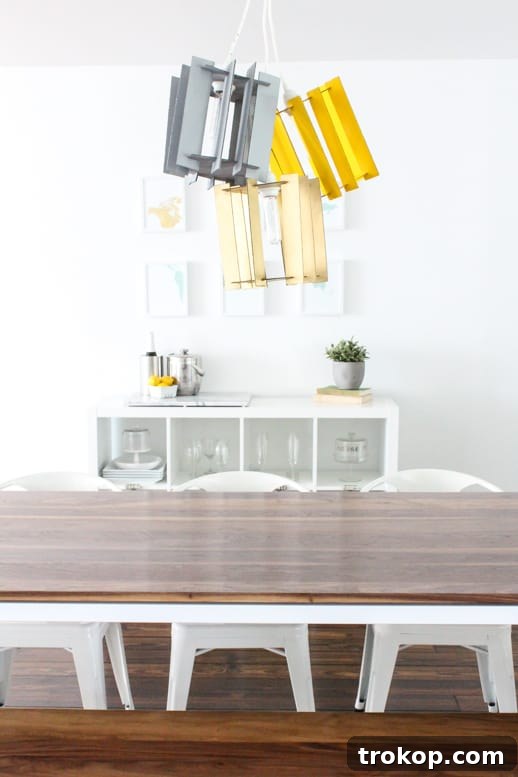
If your passion lies in eco-friendly projects and budget-conscious interior design, then crafting this DIY Cardboard Pendant Light is the ideal endeavor for your next weekend. This project not only offers a fantastic opportunity to breathe new life into materials you likely already have on hand, such as old shipping boxes, but it also culminates in a sophisticated, modern lighting fixture that exudes a far more luxurious appeal than its actual cost suggests. It’s a wonderful method to infuse both individual character and a commitment to sustainability into your home environment, all without the need for a substantial financial investment.
The original concept for this creative venture stemmed from an inspiring IKEA DIY event, passionately themed “recycle, reuse, recraft.” This project perfectly embodies each of those principles. Its ingenious design is straightforward enough for even beginner DIY enthusiasts to confidently undertake, yet it still boasts an eye-catching, geometric silhouette that feels distinct and contemporary. With just a sturdy cardboard box, a readily available pendant light kit, and the optional addition of spray paint for a custom finish, you can effortlessly transform what might be considered waste into a captivating statement piece that illuminates your space with both light and personality.
To truly elevate its aesthetic, consider pairing your newly crafted pendant light with an Edison-style bulb. This choice will cast a warm, inviting, and distinctly vintage glow, completing your eco-friendly and stylish lighting solution. Whether your goal is to add a whimsical touch to a kids’ room, introduce functional elegance to a home office, or simply explore the exciting world of sustainable DIY, this project promises a rewarding and enjoyable way to express your creativity while actively contributing to a greener lifestyle.
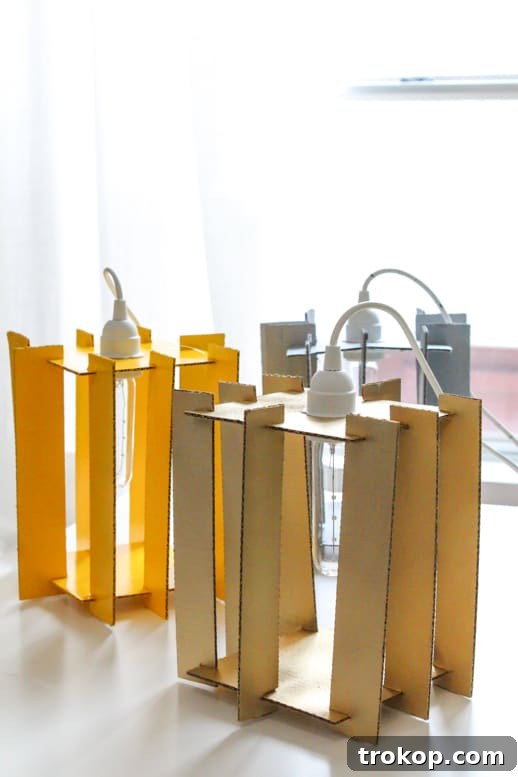
Table of Contents
Why Choose Cardboard for Your Pendant Light?
Cardboard might seem like an unconventional material for lighting, but it offers a multitude of benefits that make it an excellent choice for DIY projects, especially for those with an eco-conscious mindset. Firstly, it’s incredibly accessible and often free. Instead of discarding old shipping boxes, you can give them a new purpose, reducing waste and contributing to a circular economy. Secondly, cardboard is surprisingly versatile. It can be cut, folded, and shaped with ease, allowing for complex geometric designs with minimal effort. Its lightweight nature also means your finished pendant light will be easy to hang without heavy-duty fixtures.
Beyond its practicality, cardboard also provides a unique aesthetic. Its natural texture can add a rustic, industrial, or minimalist touch depending on how it’s finished. With paints, stains, or even decorative papers, the possibilities for customization are endless. This project champions the idea of upcycling, proving that beautiful and functional home decor doesn’t require expensive materials or specialized skills, just a bit of imagination and a willingness to create.
Geometric Design & Creative Freedom
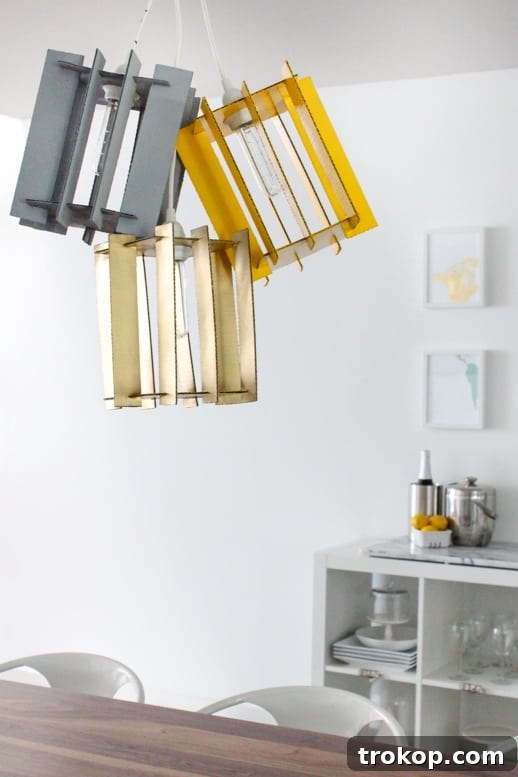
The beauty of this DIY pendant light lies in its elegantly simple yet impactful geometric design. Inspired by the principles of modern and minimalist aesthetics, the interlocking cardboard strips create a striking lantern-like cube. This structure not only provides stability but also allows light to diffuse beautifully, casting interesting shadows and adding ambiance to any room. The project’s origins, tied to an IKEA “recycle, reuse, recraft” event, underscore a philosophy of making high-design accessible and sustainable. It’s a testament to how humble materials can be transformed into something truly special with a clever approach.
While the tutorial provides a specific size and shape, the underlying technique is adaptable. You could experiment with different dimensions for the top/bottom panels and side strips to create taller, wider, or differently proportioned lights. Imagine a series of these lights in varying sizes hung at different heights for a dynamic cluster effect. The design encourages creative exploration, making each lamp a unique expression of its creator.
Materials & Tools Needed
Before diving into the crafting process, ensure you have all your materials and tools gathered. Precision in cutting is key for a polished final product, so take your time and measure carefully. Most of these items are likely already in your home or easily acquired from a local craft or hardware store, keeping the overall project cost wonderfully low.
- Cardboard Box or Cardboard Sheet: A medium-sized, sturdy box (like a moving box or appliance box) is ideal. The thicker the cardboard, the more robust your light will be. Look for clean, undamaged sections.
- Pendant Light Kit: This typically includes a lamp holder, cord, and ceiling rose. An IKEA light and cord set is a popular and affordable choice, ensuring compatibility and safety. Make sure it’s designed for hanging.
- 25-watt Light Bulb (maximum wattage for safety): Using a low-wattage LED or Edison-style bulb is crucial to prevent the cardboard from overheating.
- Paper Cutter, Scissors, or X-ACTO Knife: An X-ACTO knife or utility knife with a fresh, sharp blade will yield the cleanest and most precise cuts, which are essential for a professional finish. A paper cutter can also be highly effective for straight lines.
- Ruler: A metal ruler is recommended for straight edges and as a guide for your cutting tool.
- Pencil: For marking all your measurements before cutting.
- Spray Paint: (Optional) Choose a color that complements your existing decor. Metallics like gold, copper, or silver can add a sophisticated touch, while a matte black or white can offer a minimalist modern feel. Ensure it’s suitable for cardboard.
- Electrical Tape: (Optional) Used for adding durability and a contrasting accent to the light cord.
- Cutting Mat: (Highly Recommended) Protects your work surface and provides a stable area for cutting with an X-ACTO knife.
- Hot Glue Gun & Glue Sticks: (Optional, but recommended for extra stability) Can be used to reinforce joints if desired.
How to Make a DIY Cardboard Pendant Light
Follow these detailed steps carefully to construct your very own eco-friendly and stylish pendant light. Take your time with each stage to ensure precision and a beautiful outcome.
Step 1: Prepare Top & Bottom Panels
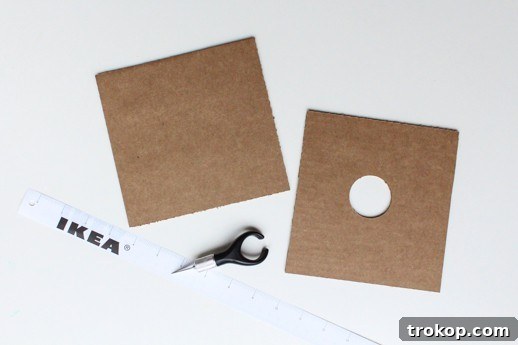
Begin by selecting a clean, flat section of your cardboard. Using your ruler and pencil, precisely mark out two perfect 6-inch by 6-inch squares. These will form the top and bottom plates of your pendant light. Cut these squares out with an X-ACTO knife or paper cutter, ensuring the edges are as straight and clean as possible for a professional finish. Next, find the exact center of each square. This can be done by drawing diagonal lines from corner to corner – the intersection is the center. In the center of each square, carefully cut a circular hole approximately 1.5 inches wide. This hole is where your pendant light cord will pass through. An X-ACTO knife is ideal for this, allowing you to carefully score and cut the circle. If you don’t have a circular cutting tool, you can cut an “X” in the middle and carefully punch and trim the opening to the required diameter, ensuring it’s neat enough for the light kit to sit snugly.
Step 2: Craft the Side Panels
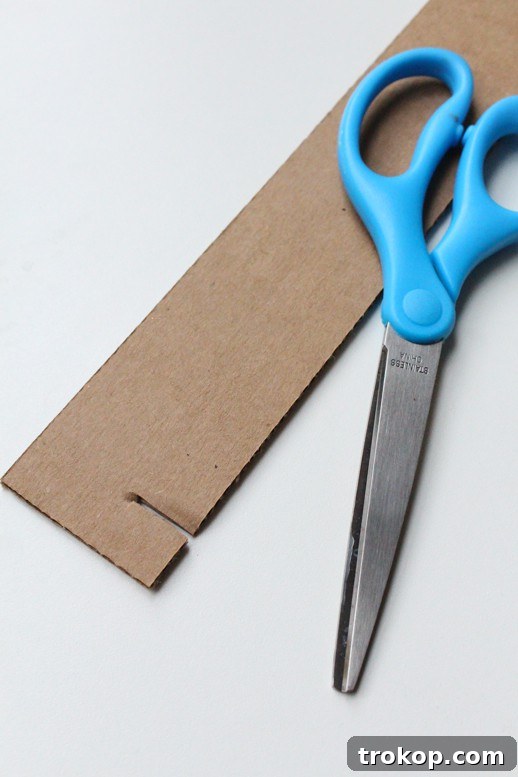
Now, prepare the vertical side elements of your pendant light. You will need to cut eight identical strips of cardboard, each measuring 1 3/4 inches wide by 9 1/2 inches long. Again, use a ruler and pencil for accuracy and a sharp blade for clean cuts. Once all eight strips are cut, you’ll create the interlocking slits. On each strip, measure precisely 3/4 inch from both the top and bottom edges. At these marks, cut a thin slit that is about 1/2 inch long into the cardboard. These slits are critical for the assembly, allowing the side strips to securely slot into the top and bottom square panels. To ensure perfect uniformity, use your very first cut strip as a template for all subsequent seven strips, marking and cutting them identically.
Step 3: Assemble the Geometric Frame
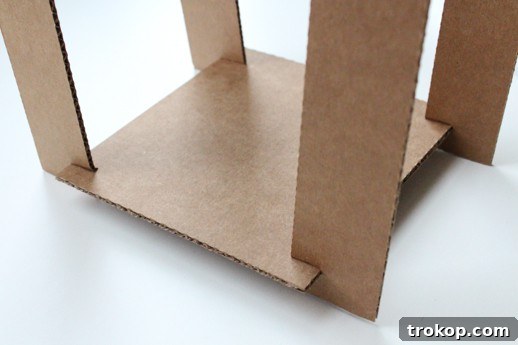
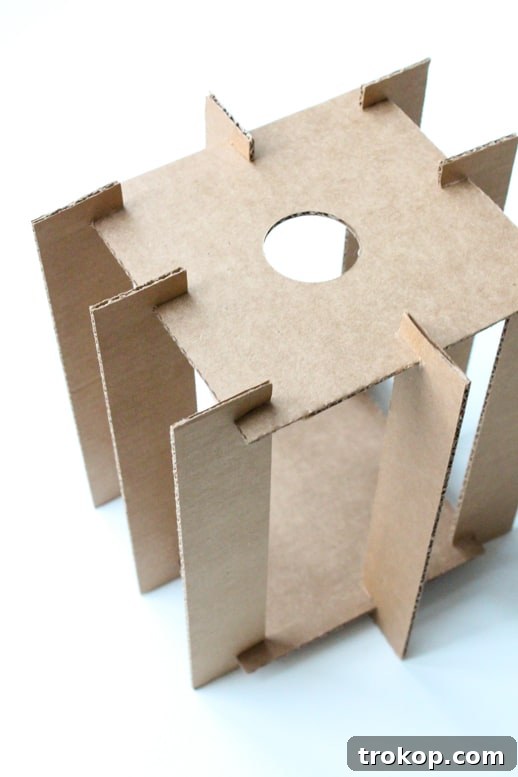
With all your cardboard pieces cut and prepared, it’s time to assemble the frame. Lay one of your 6×6 inch square panels flat on your work surface. This will serve as the base. Carefully take your eight side strips and begin inserting them into the slits around the edges of the square panel. The slits should align and interlock. Once all eight strips are standing vertically, gently take the second 6×6 inch square panel (the top piece) and carefully lower it onto the top of the vertical strips, fitting the corresponding slits into place. You should now have a sturdy, lantern-like cube structure with eight vertical cardboard sides. Ensure all connections are snug and the frame feels stable. This interlocking method provides excellent structural integrity.
Step 4: Customize Your Light (Optional)
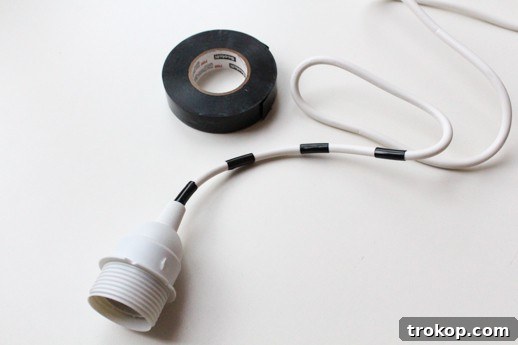
This is where you can truly personalize your DIY pendant light. While the natural cardboard offers a minimalist aesthetic, spray painting the exterior can give it a highly polished and professional finish. Consider metallic colors like gold, copper, or bronze for a chic, industrial, or even luxurious vibe that belies its humble origins. For a more contemporary feel, matte black or white spray paint can create a sleek, modern look. If you’re aiming for a playful touch, vibrant colors can make it an ideal fit for a kids’ room or creative space. Remember to spray paint in a well-ventilated area and apply multiple thin coats for an even, drip-free finish, allowing ample drying time between coats. You can also experiment with other finishes such as fabric wraps, decorative paper, or even natural twine for a bohemian look. As an additional optional detail, you can wrap sections of the light cord with electrical tape. This not only adds a touch of visual contrast and texture but also provides extra durability to the cord, especially if it’s a thinner type.
Step 5: Insert the Light Kit (Safety First!)
Now it’s time to integrate the electrical components. Carefully thread the cord of your pendant light kit through the circular hole you cut in the top panel of your cardboard frame. Gently pull the cord through until the lamp holder or socket component sits snugly and securely within the cardboard opening. If your light kit includes a safety loop or strain relief mechanism, ensure it is properly threaded and secured on the other side. This critical step provides robust support, ensuring the pendant light remains firmly in place and is strong enough to hang safely from the ceiling. A crucial safety reminder: always use a 25-watt light bulb or lower. Cardboard is a combustible material, and higher wattage bulbs generate excessive heat, posing a significant fire risk. Opt for LED bulbs, which produce minimal heat and are highly energy-efficient, making them the safest and most eco-friendly choice for this project.
Step 6: Hang Your Masterpiece
With the light kit securely in place, your DIY Recycled Cardboard Pendant Light is almost ready to illuminate your space. Follow the specific instructions provided with your pendant light kit for safely attaching it to your ceiling. If you are unsure about electrical wiring, it is always recommended to consult a qualified electrician. Once the fixture is safely mounted, screw in your chosen low-wattage bulb (preferably an LED or Edison-style bulb), and flip the switch. Step back and admire your handiwork! You’ve successfully created a modern, eco-friendly, and truly unique pendant lamp, crafted almost entirely from upcycled cardboard. This isn’t just a light; it’s a statement about sustainable living and personal style.
Expert Tips & Important Notes
To ensure your DIY cardboard pendant light is both beautiful and long-lasting, consider these additional tips and recommendations:
- Safety First and Always: This cannot be overstressed. Strictly adhere to a low-wattage bulb (25W maximum, but LEDs are highly preferred) to prevent any risk of overheating or fire. Regular incandescent bulbs generate a lot of heat, which can be dangerous for cardboard.
- Paint Smart: While you can spray paint after assembly, applying paint to the individual cardboard pieces *before* assembly can often result in a more even and thorough coat, especially in tight corners or interlocking areas. Ensure all paint is completely dry before assembly.
- Extra Support: For added stability and peace of mind, consider applying a small dab of hot glue or strong craft adhesive to each slit where the side strips interlock with the top and bottom panels. This reinforcement will make your frame even sturdier.
- Style Options Galore: Beyond metallics, think about vibrant colors for a child’s room, pastel shades for a softer look, or even decoupage with interesting paper patterns or fabric scraps. The cardboard is a blank canvas!
- Eco Bonus: If you can find it, using double-wall cardboard (often found in larger shipping boxes) will result in a significantly stronger and more durable lamp that is less prone to bending or damage over time.
- Seal for Longevity: To enhance the durability and resistance to moisture or dust, you can apply a clear, non-toxic, non-flammable sealant (like a clear matte varnish or craft sealer) to the finished cardboard. This adds a protective layer without altering the appearance too much.
Ensuring Safety & Longevity
The core of any DIY lighting project, especially one involving unconventional materials like cardboard, must be safety. Always prioritize the correct bulb wattage; LEDs are the modern choice, offering energy efficiency, longevity, and crucially, very little heat output, making them perfectly safe for this design. Beyond bulb selection, consider the placement of your pendant light. Ensure it’s not in an area prone to moisture or excessive humidity, which could compromise the cardboard’s integrity. For enhanced fire safety, some crafters opt for fire-retardant sprays or paints on their cardboard projects. While this adds an extra layer of protection, it should never substitute for using a low-wattage, cool-running bulb. Regular dusting will keep your light looking fresh and ensure optimal light output. By following these simple guidelines, your beautiful cardboard pendant light will not only be a stylish addition but also a safe and durable one.
Styling Your New Eco-Friendly Pendant Light
Once your unique cardboard pendant light is complete, the fun continues with integrating it into your home decor. Its minimalist, geometric form makes it incredibly versatile. For a truly cohesive look, consider repeating the geometric shapes or natural textures found in your light elsewhere in the room. A metallic spray-painted finish can perfectly complement industrial or glam decor, while a natural cardboard look fits seamlessly into Scandinavian, bohemian, or rustic themes. In a kids’ room, a brightly colored pendant can serve as a whimsical focal point. In a home office, it provides a unique, inspiring glow. Pair it with other upcycled decor elements, such as repurposed furniture or DIY wall art, to amplify your home’s sustainable story. This pendant light isn’t just about illumination; it’s a conversation starter, a testament to thoughtful design, and a celebration of resourcefulness.
DIY Cardboard Pendant Light
Equipment
-
Xacto knife or scissors
-
Ruler
Materials
- 1 cardboard box or cardboard sheet (medium-sized, sturdy)
- 1 pendant light kit
- 1 light bulb (25-watt max, LED recommended)
- Spray paint (optional, for customization)
- Electrical tape (optional, for cord accent/durability)
Instructions
-
Cut the top and bottom panels: Start by cutting two 6″ x 6″ cardboard squares. In the center of each square, cut a circular hole about 1.5″ wide.
-
Make the side panels: Cut eight strips of cardboard, each measuring 1 3/4″ x 9 1/2″. On each strip, measure 3/4″ from both the top and bottom edges, then cut a thin slit about 1/2″ long. Use the first strip as a template for identical cuts.
-
Assemble the frame: Lay one square panel flat. Insert the side strips into its slits. Then, carefully place the second square on top and fit the strips into its slits as well, creating a lantern-like cube.
-
Customize: (Optional) Spray paint the exterior for a polished look. You can also wrap sections of the light cord with electrical tape for extra detail and durability.
-
Insert the light kit: Thread your light cord through the hole in the top panel, pulling it through until the socket sits snugly. Secure it with the light kit’s safety loop (if present). Remember to use a 25-watt bulb or lower.
-
Hang: Attach the pendant to your ceiling following your light kit’s instructions, add your bulb, and switch it on to enjoy your new creation!