
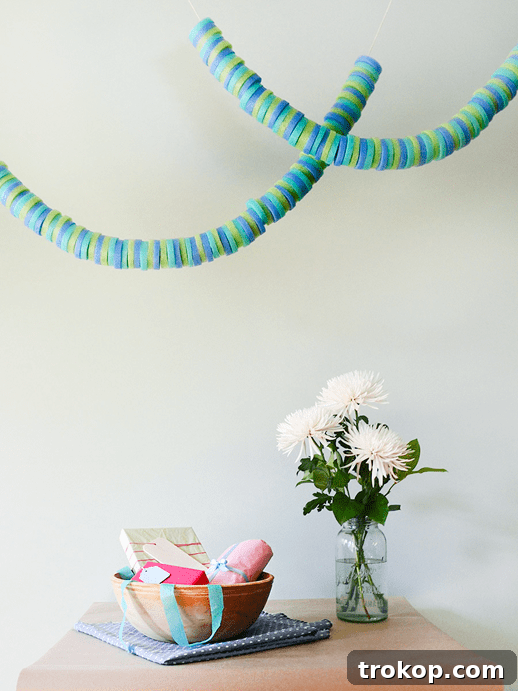
Transform your outdoor gatherings with a splash of color and creativity! This DIY Pool Noodle Garland offers an incredibly simple yet spectacularly vibrant way to decorate for any summer event. Whether you’re hosting a lively backyard barbecue, a relaxed pool party, or just want to add a cheerful touch to your patio, this project is your go-to solution. Forget complex crafting; with a few affordable materials and minimal effort, you can create a stunning visual display that will impress your guests and elevate your outdoor space.
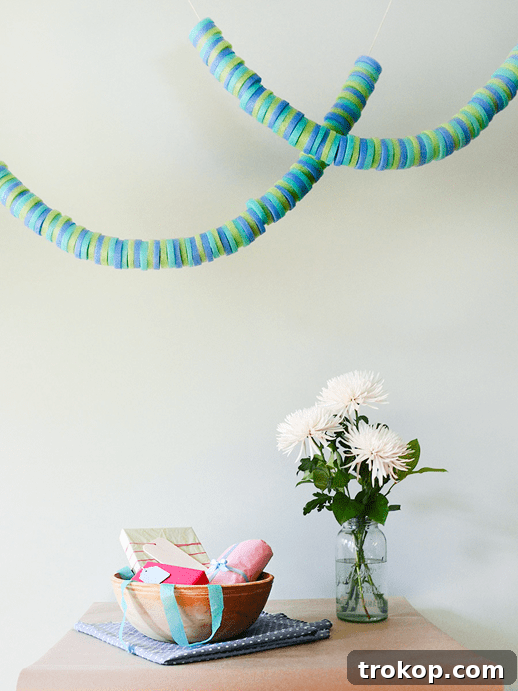
Dreaming of a backyard transformation that’s both fun and functional, without breaking the bank? Look no further than this ingenious DIY Pool Noodle Garland tutorial! As an avid crafter and decorator, I, Kathleen, find myself drawn to the vibrant hues and playful spirit that summer brings, especially when the seasonal beach toys start appearing in stores. There’s something undeniably captivating about those brightly colored foam tubes, and this project channels that excitement into a delightful decor piece.
This easy DIY project is perfect for adding an instant burst of color and a whimsical charm to any outdoor setting. It’s an ideal way to infuse your space with a summery vibe for your next outdoor celebration or a casual get-together with friends and family. And the best part? No pool? No problem! This garland is versatile enough to adorn any area, from a fence line to a balcony railing, or even strung across an open patio. So, gather your pool noodles, unleash your creativity, and prepare to transform your backyard into a lively and inviting oasis that reflects the joyful spirit of the season.
Why a DIY Pool Noodle Garland?
This vibrant project is more than just a simple craft; it’s a statement piece that brings an immediate sense of festivity and fun to any environment. Here’s why a DIY Pool Noodle Garland is the perfect choice for your next decorating endeavor:
- Unbeatable Affordability: Pool noodles are incredibly inexpensive, making this an extremely budget-friendly decoration idea. You can often find them at dollar stores or discount retailers, especially as summer approaches. This allows you to create a large, impactful decoration without spending a fortune, leaving more room in your budget for other party essentials.
- Effortless Customization: Available in a dazzling array of colors, pool noodles allow for endless creative possibilities. You can stick to a monochromatic theme, create a rainbow spectrum, or choose colors that perfectly match your party’s specific palette or seasonal decor. This flexibility means your garland can be unique to your style and event.
- Simple and Quick to Make: With just a few basic tools and a straightforward process, you can assemble a beautiful garland in under an hour. This makes it an ideal last-minute decoration idea when you need something eye-catching without a lengthy crafting commitment. It’s a satisfying project that yields immediate results.
- Versatile Decor for Any Occasion: While “pool noodle” is in the name, this garland isn’t just for poolside events. It’s fantastic for birthdays, graduations, Fourth of July celebrations, family reunions, or simply to brighten up your backyard on a sunny day. Hang it across a porch, drape it along a fence, string it between trees, or even use it as a colorful backdrop for a photo booth. Its playful nature is universally appealing.
- Kid-Friendly Crafting: This is a wonderful project to involve children in! Supervised cutting and threading can be a fun activity for younger helpers, allowing them to contribute to the party decor and express their creativity. It’s a great way to introduce them to DIY projects in a safe and engaging manner.
- Lightweight and Easy to Store: Once the party is over, this garland is lightweight and can be easily disassembled and stored for future use. The foam slices take up minimal space, making it a sustainable choice for reusable party decor.
Materials and Tools Needed to Make a DIY Pool Noodle Garland
Gathering your supplies is the first exciting step in bringing your vibrant pool noodle garland to life. You’ll be delighted by how few items are required to create such a striking decoration.
- Pool Noodles: The star of our show! The number you’ll need depends on the desired length and density of your garland. For a standard garland that uses half of each noodle as shown in the examples, three pool noodles are a great starting point. When selecting your noodles, consider a few tips:
- Color Coordination: If you’re aiming for a specific color scheme (e.g., all pastels, bright neons, or a gradient), you might find it beneficial to visit a few different stores. Various brands often carry unique shades, so a wider selection can help you achieve your perfect palette.
- Color Matching Tip: To ensure color consistency if buying from different brands or stores, it’s a good idea to cut a small, thin slice from each noodle you’ve purchased. Carry these samples with you to compare against new potential purchases. Don’t be surprised if you get a few curious glances – it’s all part of the crafting adventure!
- Noodle Density: Some noodles are denser than others. While not critical for this project, a slightly firmer noodle might be easier to cut into uniform slices.
- String or Twine: This will be the backbone of your garland. The length will entirely depend on how long you want your finished garland to be, plus extra for tying knots and hanging.
- Type of String: You can use standard crafting twine for a rustic feel, fishing line for a nearly invisible “floating” effect, strong embroidery floss for a more refined look, or even thin ribbon for added decorative flair. Choose a material that is durable enough to hold the foam slices without snapping.
- Thickness: A medium-thickness string is generally easiest to work with for threading the noodles. Too thin, and it might be hard to handle; too thick, and it might be difficult to pass through the noodle slices.
- Exacto Knife or Utility Knife: A sharp blade is essential for clean, precise cuts.
- Safety First: Always exercise extreme caution when using an Exacto knife. Ensure the blade is fully extended for better control and less chance of slippage. Keep your fingers clear of the cutting path.
- Alternative: A sharp serrated knife (like a bread knife) can also work if an Exacto knife isn’t available, but the cuts might be less clean.
- Cutting Mat: This protects your work surface and provides helpful guides for uniform cutting.
- Measurement Guides: The grid lines on a cutting mat are incredibly useful for ensuring your pool noodle slices are all the same thickness, leading to a more polished and professional-looking garland.
- Stability: A non-slip cutting mat also helps to keep your pool noodle steady as you cut, improving both precision and safety.
How to Make a DIY Pool Noodle Garland
Creating your festive pool noodle garland is a straightforward process that anyone can master. Just follow these simple steps for a colorful and charming decoration.
Step 1: Prepare Your Work Area and Pool Noodles
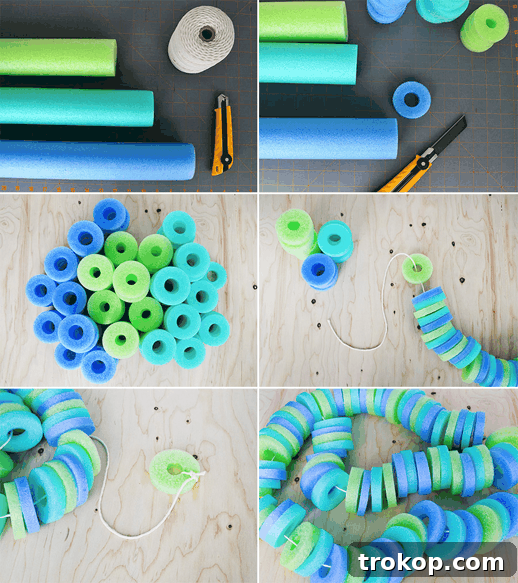
Lay your cutting mat on a stable, flat surface. This will protect your table and provide a helpful guide for cutting. Unpack your chosen pool noodles and have your Exacto knife and string ready. Consider the desired length of your finished garland. For example, if you want a longer, denser garland, you’ll need more slices. The garland pictured here, for instance, used approximately half of each of the three pool noodles, providing a good balance of color and volume.
Step 2: Precisely Slice Your Pool Noodles
With the blade of your Exacto knife fully extended, carefully begin to cut your pool noodles into uniform ½-inch slices. Use the grid lines on your cutting mat as a precise guide to ensure each slice is consistent in thickness. This uniformity will give your garland a neat and professional appearance.
- Cutting Technique: Apply gentle, consistent pressure while making a sawing motion with the knife. This method helps prevent crushing the soft foam of the pool noodle, ensuring clean, round slices. Avoid trying to press straight through, as this can deform the noodle.
- Safety Reminder: Always cut away from your body and keep your free hand clear of the blade’s path. If children are helping, ensure they are supervised or tasked with threading rather than cutting.
Continue cutting until you have accumulated enough slices for your desired garland length and fullness. Remember, you can always cut more if you decide to extend your design later.
Step 3: Thread the Pool Noodle Slices onto Your String
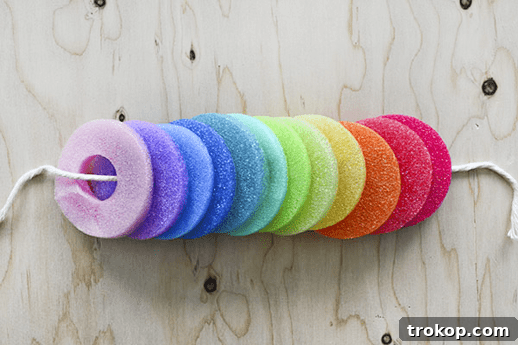
Once you have all your colorful pool noodle slices ready, it’s time to assemble your garland. Take your chosen string or twine and begin to thread the cut pool noodle slices onto it. You can create a pattern with different colors, alternate sizes (if you chose to cut some wider slices), or simply thread them randomly for a vibrant, eclectic look.
- Threading Tip: If your string is soft or flexible, you might find it easier to stiffen the end slightly with a dab of glue or by wrapping a small piece of tape around it. Alternatively, use a large-eyed needle to help guide the string through the center of each noodle slice, especially if your slices are small or numerous.
- Spacing: Decide if you want your noodles to be tightly packed together for a dense look or if you prefer a bit of space between each slice for a lighter, more airy feel. You can adjust the spacing as you thread.
Step 4: Secure the Ends of Your Garland
Once you’ve threaded all your pool noodle slices, it’s crucial to secure the ends to prevent them from sliding off. Tie a single pool noodle slice securely at each end of the garland. Create a strong knot around the string, positioning the noodle slice snug against the last threaded piece. This acts as a stopper.
- For Hanging: If you plan to hang your garland from a ceiling, wall, or another fixed surface, you can simply use the excess string at each end to tie it into place. For added security, you can tape the “stopper” noodle slice directly to the surface you’re hanging it from.
- Aesthetic Choice: If you find the visible stopper noodles distracting once the garland is secured, you can carefully cut them off. Just be sure the garland is firmly anchored by other means (e.g., strong knots in the string itself) before doing so, to prevent the rest of the noodles from scattering.
And there you have it! A beautiful, custom-made DIY Pool Noodle Garland, ready to bring a festive and unique touch to your summer decorations. This project offers a fun, alternative use for those beloved foam tubes beyond the swimming pool.
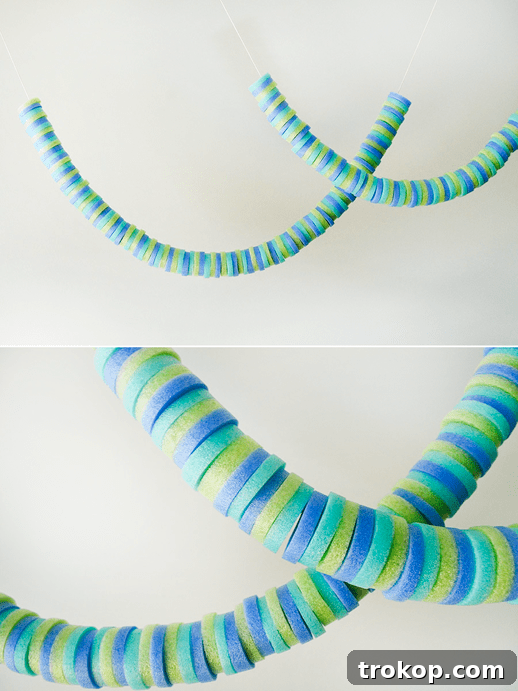
Creative Variations & Customization
While the basic pool noodle garland is wonderfully charming on its own, there are countless ways to infuse your personal style and take this DIY project to the next level. Here are some ideas to inspire your creativity:
- Themed Color Palettes: Instead of a random mix, plan your colors. Think patriotic reds, whites, and blues for Fourth of July, soft pastels for a baby shower, or vibrant tropical hues for a luau.
- Alternating Shapes and Sizes: Experiment with cutting some noodle slices slightly thicker or thinner, or even creating different shapes. While round is classic, a careful hand might produce oval or even square-ish cuts, adding visual interest.
- Adding Embellishments:
- Fairy Lights: For an enchanting evening ambiance, weave a string of battery-operated LED fairy lights through the noodle slices. The lights will glow through the foam, creating a magical effect.
- Ribbons and Tassels: Tie small bows of colorful ribbon between some of the noodle slices or attach playful tassels to the ends of the garland for added texture and movement.
- Beads or Pom-Poms: Intersperse large, lightweight beads or small craft pom-poms between the noodle slices on the string. This can add another layer of color and dimension.
- Painting and Glitter: While pool noodles come in many colors, you can always enhance them.
- Spray Paint: Lightly spray paint some slices with outdoor-friendly paint for custom colors or metallic finishes. Be sure to do this in a well-ventilated area.
- Glitter: For a touch of sparkle, apply craft glue to the edges of the noodle slices and sprinkle generously with glitter. Shake off the excess and let dry completely before threading.
- Varying Garland Configurations: Don’t limit yourself to a horizontal string.
- Vertical Strings: Create multiple shorter garlands and hang them vertically from a beam or tree branch at varying lengths for a waterfall effect.
- Swirling Designs: If hanging in an open space, you can twist multiple garlands together to create a dynamic, swirling sculpture.
- Curtain Effect: Use many vertical strands to create a colorful backdrop or a playful “doorway curtain” for an outdoor entrance.
- Interactive Elements: For a kids’ party, consider adding small, lightweight plastic toys or waterproof charms that can be clipped onto the garland.
By exploring these creative options, your DIY Pool Noodle Garland can become a truly unique and memorable piece of decor, perfectly tailored to your event and personal style.
Tutorial Notes and Tips for Your Pool Noodle Garland
To ensure your DIY Pool Noodle Garland project goes smoothly and your creation lasts, keep these helpful notes and tips in mind:
- Precision Cutting is Key: As mentioned in the instructions, always use a sawing motion with your Exacto knife or utility knife. This technique, rather than just pressing down, is vital to avoid crushing the soft foam of the pool noodle. Crushing can lead to uneven, misshapen slices that won’t look as neat on your garland. Take your time with each cut for the best results.
- Choose the Right String: The type and thickness of your string or twine are important. For longer garlands or those made with larger, heavier pool noodle pieces, consider using a thicker, more robust string or twine. This will provide better support and prevent the garland from sagging or potentially breaking under its own weight, especially if it’s exposed to wind outdoors. Fishing line works well for a subtle look, while braided nylon cord offers excellent strength.
- Understanding Pool Noodle Durability: While pool noodles are made of soft, lightweight foam (typically closed-cell polyethylene), they are surprisingly durable and resistant to water. They won’t melt easily under normal summer conditions, making them ideal for outdoor decorations. However, like most plastics, they are susceptible to environmental factors.
- Sun Exposure Warning: Prolonged exposure to intense direct sunlight can affect the integrity and appearance of your pool noodles. If left out in the sun for an extended period (weeks or months), they may start to warp, become brittle, fade in color, or even become misshapen. This is due to UV degradation, which breaks down the foam’s structure.
- Proper Storage for Longevity: To maximize the life of your pool noodle garland and keep it looking vibrant for many seasons to come, it’s crucial to store it properly when not in use. Bring your garland indoors or store it in a cool, dark place out of direct sunlight and extreme temperatures. A garage, shed, or large storage bin is ideal. This simple step will prevent premature fading, warping, and degradation, ensuring your festive decor is ready for your next celebration.
- Cleaning Your Garland: If your garland gets dusty or dirty from outdoor use, you can easily clean it. Simply wipe the noodle slices with a damp cloth and a mild soap solution, then rinse lightly and allow to air dry completely before storing.
- Child and Pet Safety: While pool noodles are generally safe, small slices could pose a choking hazard for very young children or pets. Ensure garlands are hung out of reach if small children or animals are present.
More Entertaining Decor Ideas
If you enjoyed crafting this delightful pool noodle garland and are looking for more ways to enhance your home and entertaining spaces, explore these related DIY decor projects from our archives. Each offers a unique opportunity to personalize your environment and add handmade charm:
- DIY Painted Chair Makeover: Give old chairs a fresh lease on life with a custom paint job.
- How To Make DIY Metallic Gold Stool Bases: Add a touch of glam to your seating with this easy metallic upgrade.
- DIY Minimal Beaded Blanket Holder: Organize your throws with a chic, minimalist beaded holder.
- How To Make An Easy Modern DIY Wind Chime: Bring soothing sounds and artistic flair to your outdoor space.
DIY Pool Noodle Garland: Quick Craft Card
Want a fun and easy summer decoration? Make this DIY Pool Noodle Garland!
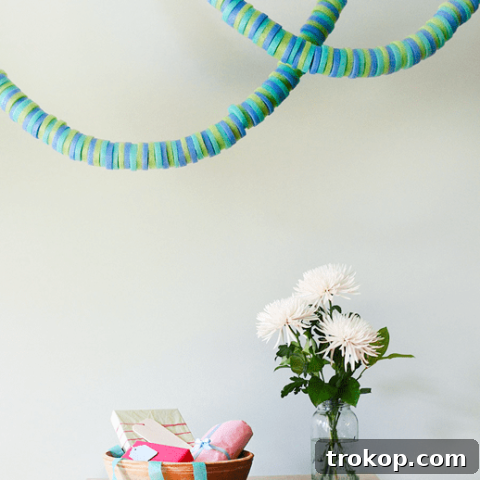
Active Time: 45 minutes
Total Time: 45 minutes
Course: DIY
Category: Outdoor
Equipment
- Exacto knife
- Cutting mat
Materials
- 3 pool noodles (any color of your choice)
- String (length depending on desired garland size)
Instructions
-
With the blade of your Exacto knife fully extended, cut your noodles into ½” slices using the lines on your cutting mat as a guide.
Depending on how long you want your finished garland to be, continue to cut the pool noodles until you have enough.
The garland pictured used half of each of the three noodles.
-
Feed the noodle slices onto the string.
-
Tie a noodle slice at each end of the garland to prevent the noodles from sliding off while you hang it.
-
If hanging from the ceiling or wall, you can simply tape this end noodle to the surface as well. Or, if it’s a visual distraction, cut it off once the garland is securely in place.
Estimated Cost: $13
Keywords: diy pool noodle garland, summer party decor, outdoor entertaining
We hope you’ve enjoyed creating this vibrant and versatile DIY Pool Noodle Garland! It’s an easy, inexpensive, and impactful way to infuse your spaces with summer joy. Don’t forget to share your amazing DIY pool noodle garland creations with us on Instagram using the hashtag #sugarandclothloves. We absolutely love seeing how you bring these projects to life in your own unique style!
Looking for more interior design inspiration, entertaining ideas, or fun seasonal DIYs? You can find all of our home decor tutorials, crafting guides, and creative ideas right here on our blog. Keep exploring and keep crafting!
28 Decorative Wall Mirrors You’ll Wish You Bought Sooner
Looking for the perfect wall mirror to enhance your space? Explore our comprehensive roundup of 28 stunning decorative wall mirrors that will instantly elevate any room. From minimalist designs to ornate statement pieces, discover options that reflect your style and brighten your home.
Continue Reading28 Decorative Wall Mirrors You’ll Wish You Bought Sooner
37 Best Beach Toys for Vacation Fun
Prepare for endless seaside adventures! Discover our curated list of the 37 best beach toys for kids, toddlers, and families. From sandcastle kits to flying discs and inflatable floats, find everything you need to make your next beach vacation unforgettable and filled with laughter.
Continue Reading37 Best Beach Toys for Vacation Fun
Your Guide to Hosting the Perfect Outdoor Movie Night
Create a magical cinematic experience under the stars! From DIY projectors and screen setups to cozy seating arrangements, delicious snacks, and ambiance lighting, explore the best tips and tricks for hosting an unforgettable outdoor movie night for all ages.
Continue ReadingYour Guide to Hosting the Perfect Outdoor Movie Night
33 Easy DIY Pumpkin Painting Ideas
Get ready for fall with festive and unique decorations! Explore 33 easy DIY pumpkin painting ideas that range from classic to contemporary. Whether you prefer intricate patterns, playful characters, or elegant color blocks, find inspiration to transform your pumpkins into stunning seasonal decor without carving.
Continue Reading33 Easy DIY Pumpkin Painting Ideas