
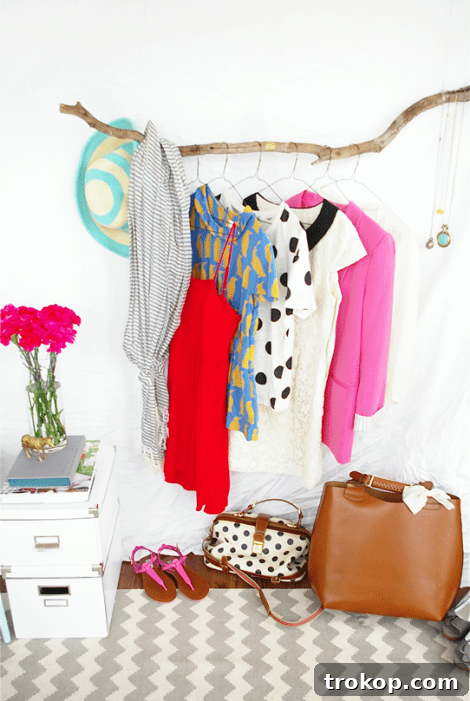
DIY Branch Clothing Rack: A Rustic and Eco-Friendly Wardrobe Solution
Are you searching for a unique, sustainable, and visually appealing way to organize your clothes? Look no further than a DIY branch clothing rack! This project seamlessly blends functionality with natural aesthetics, offering a distinctive storage solution that brings the beauty of the outdoors into your home. It’s an ideal choice for anyone looking to maximize limited closet space, embrace rustic or minimalist decor, or simply display their favorite garments with a touch of organic charm.
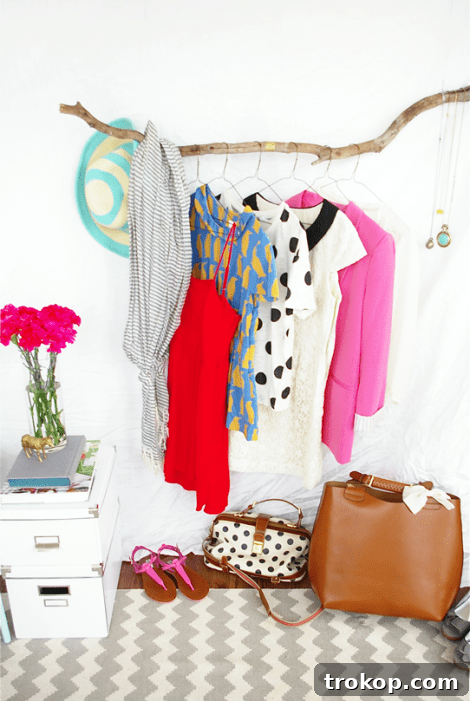
Creating your own branch clothing rack is not just a practical endeavor; it’s a creative statement. It allows you to repurpose fallen branches, giving them a new lease on life and reducing waste. If you appreciate projects that utilize natural or upcycled materials, this DIY will resonate deeply with you. Think of it as an extension of other sustainable home decor efforts, transforming simple elements into functional art pieces that enhance your living environment.
This comprehensive tutorial is designed to be beginner-friendly, requiring only a handful of readily available tools and materials. With a bit of enthusiasm and creativity, you’ll be able to construct a custom-made clothing rack that is as robust and practical as it is aesthetically pleasing. Imagine it gracing your bedroom, providing an inviting display in your entryway, or even serving as a captivating fixture in a boutique or at a special event. A branch clothing rack is more than just storage; it’s a conversation starter, a testament to your personal style and commitment to sustainable living. So, gather your supplies, find the perfect branch, and let’s embark on this rewarding journey to bring your vision to life!
Benefits of a Branch Clothing Rack
Opting for a DIY branch clothing rack offers a multitude of advantages beyond mere storage. It’s a statement piece that speaks to thoughtful living and unique design, offering practical solutions with an artistic flair:
- Eco-Friendly and Sustainable: By utilizing fallen branches, you’re embracing sustainable practices and giving new purpose to natural elements that would otherwise go to waste. This significantly reduces the demand for new manufactured goods and contributes to a greener home. It’s a small yet impactful step towards reducing your environmental footprint.
- Unique Aesthetic Appeal: Each branch is inherently unique, meaning your clothing rack will be a one-of-a-kind creation. Its organic shape, natural texture, and inherent imperfections introduce a distinctive rustic, bohemian, or even Scandinavian vibe. This natural element can beautifully soften modern interiors, add warmth to minimalist spaces, or enhance existing earthy decors, making it a focal point in any room.
- Cost-Effective: Compared to purchasing manufactured clothing racks from retailers, this DIY project is incredibly budget-friendly. The primary component – a well-sourced branch – can often be found for free, making it an accessible and economical project for almost anyone, regardless of budget constraints.
- Space-Saving and Versatile: Ideal for small apartments, bedrooms without built-in closets, or entryways, a branch rack provides open storage that can make a room feel larger and more airy. Its versatile design allows it to function not just for hanging clothes, but also for organizing accessories like scarves, hats, bags, or even displaying lightweight decorative items and plants, transforming it into a multi-functional organizer.
- Easy Customization: From choosing the type and finish of the branch to selecting hanging methods and decorative accents, this project offers endless opportunities for personalization. You can tailor every detail to perfectly match your specific taste, existing home decor, and the functional needs of your space.
Choosing the Perfect Branch and Materials
The foundation of your DIY clothing rack lies in selecting the right branch and securing reliable materials. The quality of these initial choices will determine both the durability and the aesthetic appeal of your finished project. Here’s a detailed guide on what you’ll need and how to choose wisely:
Selecting Your Branch
The branch is the star of this project, so take your time to find the right one. Look for a branch that possesses the following characteristics:
- Sturdy and Solid: It must be strong enough to bear the weight of your clothes without bending, cracking, or breaking. Test its rigidity by gently trying to bend it. Avoid branches with visible cracks, soft spots, or signs of decay, as these indicate weakness. Hardwoods like oak, maple, birch, or apple are generally excellent choices due to their inherent strength.
- Appropriate Length and Thickness: Consider the designated space for your clothing rack and the volume of items you wish to store. A length of 3-5 feet is often practical for most rooms, offering ample hanging space. For thickness, aim for a diameter of 1.5-3 inches. This range provides sufficient support for garments without making the rack appear overly bulky or imposing.
- Dry and Clean: Freshly fallen branches contain significant moisture and can attract pests. It is crucial to choose a branch that has been naturally air-dried for several weeks or even months. Ensure it’s free of loose bark, dirt, insects, spiderwebs, or mold. You may need to gently remove any remaining stubborn bark or rough spots with a wire brush or scraper for a cleaner, smoother finish.
- Characterful (Optional but Recommended): While a perfectly straight branch is perfectly functional, one with a slight natural curve, interesting knots, or unique textural variations can add more visual interest, personality, and charm to your finished rack, making it a true statement piece.
Essential Tools and Materials
- Sturdy Branch: As detailed above, thoroughly cleaned, dried, and ideally sanded.
- Heavy-Duty Picture Hanging Wire or Rope: This will serve as the suspension for your branch. It is imperative to select a material rated to support at least 40-50 pounds, or even more if you plan to hang heavy winter coats. Strong sisal rope, jute rope, or thin metal chains are also excellent alternatives that offer different aesthetic appeals and durability.
- Wire Cutters (for wire) or Sharp Scissors/Knife (for rope): Necessary for cleanly cutting your chosen suspension material to the desired lengths.
- “S” Hooks (Optional but Recommended): These versatile hooks make hanging clothes on the branch easier and can also be integrated into the suspension system if you’re attaching the rack to pre-installed ceiling hooks or eye bolts.
- Measuring Tape: Essential for accurate cutting of suspension lines, precise placement of ceiling anchors, and ensuring your rack hangs perfectly level.
- Sandpaper (Medium and Fine-Grit): To meticulously smooth any rough edges, splinters, or residual bark on your branch, ensuring it’s safe for clothing and handling.
- Drill with Appropriate Bit: Necessary for installing screw-in ceiling hooks or wall mounts securely. Always use a bit size appropriate for your screws.
- Ceiling Hooks, Swag Hooks, or Eye Bolts: The type of hardware you choose depends on your preferred hanging method and the structural integrity of your ceiling or wall. It is absolutely crucial that these are securely anchored into ceiling joists, wall studs, or solid wood beams, and not merely into drywall, to ensure stability and safety.
- Optional Finishing Supplies: A clear wood varnish, sealant, or paint for protecting and enhancing the branch; decorative twine, leather strips, or beads for aesthetic accents; small cup hooks or eye hooks for adding accessory hanging points directly to the branch.
Step-by-Step Guide to Making Your Branch Clothing Rack
Follow these simple, yet detailed, steps to construct your beautiful and functional DIY branch clothing rack. Attention to each step will ensure a stable, attractive, and long-lasting organizational solution:
- Prepare the Branch:
Once you’ve carefully selected your branch, the first crucial step is thorough preparation. Begin by cleaning it meticulously, wiping away any dirt, dust, or loose debris. Next, use sandpaper, starting with a medium-grit paper to remove any stubborn rough spots or remaining bark fragments, then progressing to a finer-grit sandpaper for a smooth, splinter-free finish. This step is vital not only for aesthetic appeal but also for safety, preventing snags on delicate clothing and ensuring comfortable handling. If desired, apply a clear wood sealant, varnish, or even a chosen paint color to the branch. This optional step protects the wood from moisture, enhances its appearance, and can prevent minor shedding or deter pests over time. Allow any applied finish to dry completely according to the manufacturer’s instructions before proceeding.
- Prepare the Suspension Wire/Rope:
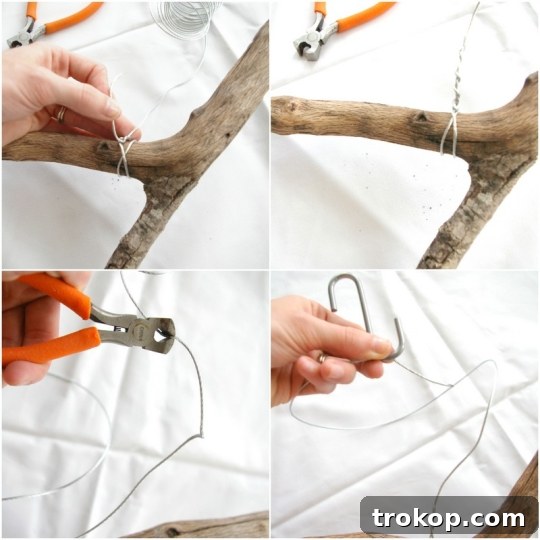
Using your heavy-duty wire cutters or sharp scissors (depending on your material), cut two equal lengths of your chosen hanging wire or rope. A practical rule of thumb is to cut them slightly longer than you initially anticipate needing, typically 2-3 feet each, in addition to the distance from the ceiling to your desired rack height. This extra length provides flexibility for knotting and adjustments. You can always trim any excess later for a clean and professional finish.
- Attach the Wire/Rope to the Branch:
Securely knot one end of each wire or rope around opposite ends of the prepared branch. The key here is a strong, non-slip knot that will hold under weight. You can wrap the wire/rope several times around the branch for added security and to create a visually appealing attachment point. Repeat this process on the other end of the branch. It is absolutely essential that both suspension lines are of equal length from their attachment points on the branch up to where they will be suspended from the ceiling. Use a measuring tape to meticulously double-check their lengths, ensuring the rack will hang perfectly balanced and level.
- Install Ceiling/Wall Mounts:
Before proceeding with hanging, precisely determine the desired placement for your branch clothing rack. Mark two points on your ceiling or upper wall where the rack will be suspended. These points should be horizontally aligned with the ends of your branch and spaced appropriately to ensure the rack hangs straight. Crucially, use a reliable stud finder to locate ceiling joists or wall studs. Drill pilot holes into these structural elements, then securely screw in your chosen heavy-duty ceiling hooks, swag hooks, or eye bolts. It is paramount that these anchors are robust enough and installed into solid framing to support the full anticipated weight of the branch, your clothing, and any additional accessories.
- Hang Your Branch Clothing Rack:
With your ceiling anchors firmly in place, proceed to knot the free ends of the picture wire (or rope) onto the “S” hooks, or directly onto the installed ceiling hooks if you’ve opted not to use “S” hooks. Carefully lift the branch and attach it to the ceiling anchors. Once hung, gently but firmly pull down on the entire branch to thoroughly test its security and ensure it can safely support the expected weight of your clothing without any signs of sagging, slipping, or detachment. Adjust the knots or wire length as needed to achieve a perfectly level and stable rack. Finally, trim any excess wire or rope for a neat, finished appearance.
Customization and Styling Ideas
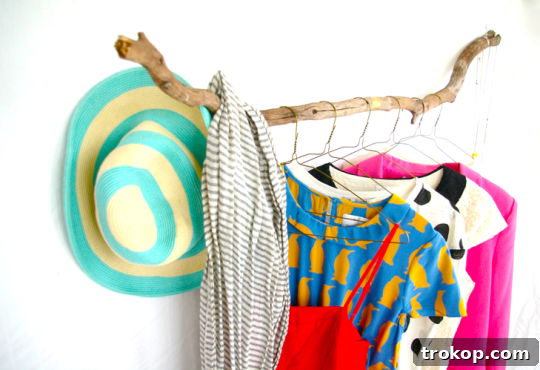
The true charm of a DIY project lies in its potential for personalization. Your branch clothing rack isn’t just a utilitarian item; it’s a blank canvas for your creativity. Here are numerous ways to customize and style your new natural wardrobe feature:
- Finishing Touches for Your Branch:
- Embrace Natural Charm: After thorough sanding, simply leave the branch raw and unsealed for an authentic, untouched, and purely organic look that highlights its natural beauty.
- Achieve Polished Elegance: Apply a clear varnish, lacquer, or polyurethane sealant to give the wood a subtle sheen, enhance its natural grain, and provide extra protection against wear and moisture.
- Infuse a Pop of Color: Paint the branch a bold, vibrant color to make a dramatic statement in your room, or opt for a classic neutral tone like crisp white, soft grey, or matte black to seamlessly blend with minimalist or modern decor.
- Add a Rustic Accent: Wrap the ends of the suspension wire or the branch’s attachment points with decorative twine, natural jute rope, or elegant leather strips. This not only adds a charming rustic touch but can also help to neatly conceal knots or connection points.
- Incorporate Beads & Baubles: For a bohemian, whimsical, or playful vibe, thread large wooden, ceramic, or even glass beads onto the suspension wires. These can also serve as decorative elements or spacers.
- Adding Extra Functionality:
- Accessory Hooks: Screw small cup hooks or eye hooks directly into the underside or sides of the branch. These provide convenient spots to hang necklaces, scarves, belts, lightweight handbags, or even keys, maximizing the rack’s organizational capabilities.
- Integrated Lighting: Weave delicate fairy lights or warm LED string lights around the branch. This creates a cozy, inviting glow that is especially enchanting for a bedroom, a nursery, or as an ambient light source in a display area.
- Potted Plants & Greenery: For a purely decorative or lighter-duty rack, small, lightweight potted plants with hanging loops (such as air plants, succulents, or ivy) can be suspended from the branch, transforming it into a living art installation and bringing more greenery indoors.
- Optimal Placement & Styling for Your Space:
- Bedroom Showcase: Utilize your branch rack to display your favorite outfits, creating a curated “capsule” wardrobe that’s both easily accessible and visually appealing. It’s a great way to plan outfits for the week.
- Welcoming Entryway Organizer: This rack provides a stylish and functional spot for guests’ coats, hats, and scarves, or for your own daily essentials like jackets and bags, keeping your entryway tidy and chic.
- Charming Nursery Delight: Hang adorable baby clothes, delicate blankets, or a collection of decorative mobiles, adding a touch of natural whimsy to the nursery decor.
- Artisanal Retail Display: For small businesses, pop-up shops, or craft fairs, this unique rack offers an artisanal, eye-catching way to present merchandise, attracting customers with its natural charm.
- Consider Clearance: Always ensure there’s ample vertical and horizontal space around the rack. This allows for long garments to hang freely without dragging on the floor and provides easy access to all your stored items without clutter.
Safety and Maintenance Tips
To ensure your DIY branch clothing rack remains safe, functional, and beautiful for many years to come, it’s important to keep these practical tips in mind. Proper installation and care are key to enjoying your natural decor piece:
- Weight Distribution and Limits: While a properly chosen sturdy branch can hold a surprising amount of weight, always be mindful of its total capacity. Distribute clothing items as evenly as possible across the entire length of the rack to prevent undue stress on one side or at the attachment points. Avoid overloading it with excessively heavy garments, especially if you’ve opted for lighter gauge wire or rope. If you anticipate hanging many heavy items like multiple winter coats or denim, consider doubling up the picture wire for enhanced strength or adding a third suspension point in the center of the branch for significantly increased support.
- Secure Installation is Paramount: The most crucial aspect of safety is ensuring your rack is firmly and correctly anchored to a structural element. Always attach ceiling hooks, swag hooks, or eye bolts into a ceiling joist, a solid wooden beam, or a stud in a load-bearing wall. Never rely on drywall alone, as it cannot support significant weight and could lead to the rack falling. If you’re uncertain about locating studs or joists, consider consulting a professional. Regularly check the security of the knots, the suspension material, and the mounting hardware to ensure everything remains tight and stable.
- Branch Care and Longevity:
- Keep it Dry: Avoid installing or hanging your branch rack in areas with persistently high humidity (like bathrooms without proper ventilation) or where it could be exposed to direct moisture. Excessive moisture can lead to the wood warping, cracking, or encouraging the growth of mold or mildew, which can compromise its integrity and appearance.
- Pest Prevention: If your branch was sourced from outdoors, thorough cleaning and ensuring it is completely dry before bringing it inside are essential steps to prevent introducing pests like wood-boring insects. Sealing the wood with varnish or a clear coat can also act as a protective barrier.
- Regular Cleaning: Dust the branch periodically with a soft, dry cloth to keep it looking fresh and prevent dust buildup that can diminish its natural beauty. For deeper cleaning, a slightly damp cloth can be used, followed immediately by drying.
- Check for Wear and Tear: Over time, like any functional item, suspension wires, ropes, and knots can show signs of wear. Periodically inspect all components for any fraying, corrosion, weakening, or loosening. If you notice any significant signs of wear, replace the affected components promptly to maintain the safety and integrity of your branch clothing rack and prevent potential accidents.
DIY Branch Clothing Rack At A Glance
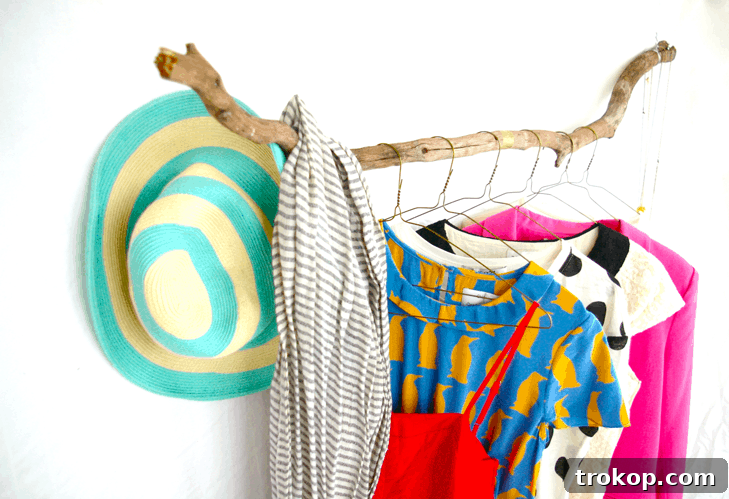
DIY Branch Clothing Rack
Transform a simple branch into a stylish and functional clothing rack with just a few materials and a bit of creativity, adding a unique natural touch to your home organization!
Total Time: 20 mins
Category: Home Decor, Organization, Sustainable Living
Equipment
- Wire cutters (or sharp scissors/knife for rope)
- Measuring Tape
- Sandpaper (medium and fine-grit)
- Drill with appropriate bit (for ceiling hooks)
- Stud finder (recommended)
Materials
- 1 sturdy tree branch (approx. 3-5 ft long, 1.5-3 inch diameter; cleaned, dried, and sanded)
- Heavy-duty picture hanging wire or strong rope (approx. 4-6 ft total length, rated for at least 40-50 lbs)
- 2 “S” hooks (optional, for easy clothes hanging or rack suspension)
- 2 Ceiling hooks, swag hooks, or eye bolts (chosen to match your ceiling type and weight requirements)
- Optional: Wood sealant/varnish/paint, decorative twine/beads.
Instructions
- Thoroughly clean, dry, and sand your chosen branch, ensuring all rough spots and bark are removed. Apply sealant if desired and allow to dry completely.
- Cut two equal lengths of picture wire (or rope) using wire cutters or scissors. Ensure each piece is long enough for your desired hanging height from the ceiling.
- Securely knot one end of each wire/rope around opposite ends of the branch. Wrap tightly to prevent slipping and measure carefully to ensure the suspended lengths are equal for a balanced rack.
- Install your chosen ceiling hooks securely into ceiling joists or studs, ensuring they are spaced to match the width of your branch. Use a stud finder for safety.
- Knot the free ends of the picture wire/rope onto the “S” hooks, or directly onto the installed ceiling hooks. Carefully hang the branch, gently pull to test security, and adjust lengths as needed to ensure it’s perfectly level and stable. Trim any excess wire/rope for a clean finish.

More DIY & Home Decor Inspiration
25 Best Clear Stadium Bags for Concerts, Sports & Events
Stay stylish and compliant with the best clear stadium bags…
Continue Reading
31 Best Beach Bags for Your Summer Essentials
From tote bags to straw bags, stay organized and chic…
Continue Reading
Our 41 Favorite Amazon Women’s Swimsuits
Get ready to hit the beach or pool in style…
Continue Reading
Leather Hexagon DIY Vanity Tray
Keep yourself organized and in style with this Leather Hexagon…
Continue Reading