

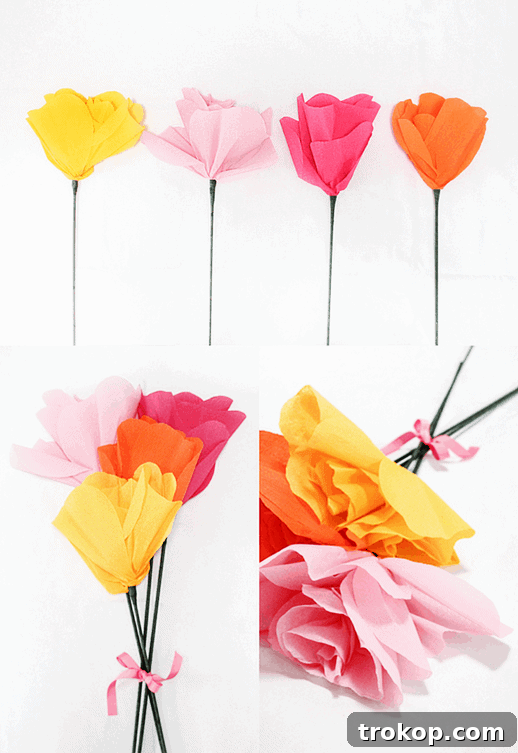
Crafting an Unforgettable Gift: Your Guide to DIY Giant Paper Flower Bouquets
Are you searching for a Mother’s Day gift that transcends the ordinary? Something that not only captures the delicate beauty of traditional flowers but also offers a lasting impression and a deeply personal touch? This year, surprise Mom with a truly unique and breathtaking gesture: a handmade giant paper flower bouquet. Imagine her delight as she receives a stunning arrangement that stands an impressive three feet tall – a magnificent testament to your creativity and affection.
We’re thrilled to guide you through the process of creating these show-stopping blooms, inspired by the gorgeous displays often featured in spring collections, much like those seen in the Langford Market lookbook for Spring. These aren’t just flowers; they’re intricate works of art, meticulously designed to impress and endure, promising to make a statement that lasts far beyond a single day.
Why Choose Giant Paper Flowers? More Than Just a Pretty Petal
In a world brimming with fleeting trends, the enduring allure of a giant paper flower bouquet stands out. It’s an innovative twist on classic floral gifts, offering a multitude of benefits that traditional arrangements simply can’t match. Choosing to craft these magnificent blooms isn’t just about embarking on a DIY project; it’s about investing in a lasting memory and a sustainable, allergy-friendly display of affection.
Everlasting Beauty: A Gift That Never Fades
Unlike fresh flowers that wilt and fade within days, giant paper flowers offer perpetual beauty. They remain vibrant, pristine, and structurally perfect indefinitely, serving as a constant reminder of a special occasion and the thoughtful effort behind them. This unparalleled durability makes them an exceptional keepsake, far outlasting any living bouquet and becoming a treasured item in any home.
Unleash Your Creativity: Customization at Its Best
One of the most exciting aspects of DIY giant paper flowers is the boundless opportunity for customization. You’re not limited by seasonal availability, specific color palettes, or a florist’s inventory. You have complete freedom to select Mom’s favorite colors – whether vibrant hues, soft pastels, or elegant monochromes – and choose from an array of flower types, from classic roses to whimsical peonies and striking dahlias. This personal touch ensures your bouquet is as unique and special as the person receiving it.
Allergy-Friendly and Eco-Conscious Decor
For those sensitive to pollen, strong floral scents, or simply seeking a more sustainable option, paper flowers are a dream come true. They provide all the visual splendor of natural blooms without any allergenic concerns. Furthermore, by choosing recycled or sustainably sourced paper options and creating a long-lasting item, you’re making an environmentally conscious choice, significantly reducing the waste associated with disposable decor.
The Unforgettable “Wow” Factor
Let’s be honest, few gifts elicit an immediate gasp of delight quite like a colossal, handcrafted paper flower. Their sheer size and intricate detail make an undeniable statement, transforming any space into an enchanting display. A three-foot-tall bouquet isn’t just decoration; it’s a magnificent conversation starter, a captivating focal point, and an instant mood-lifter that leaves a lasting impression on everyone who sees it.
Beyond Mother’s Day: Versatile Decor for Any Occasion
While an ideal Mother’s Day surprise, giant paper flowers transcend a single holiday. Their remarkable versatility makes them perfect for a myriad of celebrations, events, and decorative purposes throughout the year.
- Weddings and Bridal Showers: Create stunning backdrops for ceremonies, elegant aisle decor, or unique centerpieces that can be kept long after the vows are exchanged, serving as beautiful mementos.
- Baby Showers and Nursery Decor: Adorn a baby shower with soft, whimsical blooms, or decorate a nursery with flowers that are safe, durable, and add a touch of magic and serenity to the space.
- Birthdays and Anniversaries: Personalize milestone celebrations with flowers crafted in the guest of honor’s favorite colors or themed to match the event’s specific aesthetic.
- Home Decor: Brighten any room with a permanent splash of color and artistry. These blooms add instant elegance, charm, and a unique personality to living spaces, entryways, bedrooms, or even home offices.
- Photo Shoots and Events: Serve as magnificent props or stunning focal points, creating incredibly memorable visuals for professional photo sessions, corporate events, or vibrant party atmospheres.
- Retail Displays: Businesses can use them to create eye-catching window displays or interior decor that attracts attention and enhances brand aesthetic.
Gathering Your Tools: What You’ll Need to Craft Your Masterpiece
Embarking on your giant paper flower journey requires a few essential supplies. Most items are readily available at any local craft store or online, ensuring you can begin your inspiring project without delay and with ease.
- High-Quality Cardstock or Crepe Paper: This is the backbone of your flowers. Cardstock (65lb-110lb) is excellent for structural petals, offering crisp lines and holding shape well. Crepe paper (heavy or double-sided) provides a more delicate, realistic, and pliable texture, ideal for shaping natural curves and adding dimension.
- Sharp Scissors or a Craft Knife: Precision is absolutely key for achieving clean, professional-looking petal edges. A self-healing mat is highly recommended if you choose to use a craft knife for intricate cuts.
- Hot Glue Gun and Plenty of Glue Sticks: Your primary adhesive for quick, strong, and reliable bonds. Ensure you have a generous supply of glue sticks on hand to avoid interruptions during your crafting session.
- Floral Wire or Wooden Dowels: Essential for creating sturdy stems that can adequately support the weight and size of your large flower heads. Choose a thickness appropriate for the scale of your blooms.
- Petal Templates: You can find numerous free printable templates online, or for the adventurous and artistic, design your own unique shapes. Templates typically include various petal shapes and sizes for a beautifully layered and natural look.
- Pencil and Ruler: For accurately tracing templates onto your paper and ensuring precise measurements, especially when scaling up designs.
- Bone Folder, Dowel Rod, or Curling Tool: Indispensable for gently curling, shaping, and adding natural dimensionality to your petals, giving them a lifelike, three-dimensional appearance.
- Green Floral Tape: To neatly wrap stems, creating a cohesive, natural, and finished look that mimics real flower stems.
- Sturdy Vase or Stand: Crucial for proudly displaying your magnificent bouquet once completed, ensuring stability and enhancing its visual appeal.
The Art of Assembly: Crafting Your Giant Paper Flower Bouquet (A Conceptual Guide)
While the original inspiration points to a lookbook, the general principles of crafting beautiful giant paper flowers follow a similar, intuitive path. Here’s a conceptual guide to help you meticulously bring your grand floral vision to life, step by step:
Step 1: Planning and Inspiration – Laying the Foundation
Before making any cuts, take time to plan your project. Decide on your desired flower type (e.g., rose, peony, poppy, magnolia), select your specific color palette, and determine the exact size you wish each flower to be. Browse images online or in magazines for inspiration and choose a template that closely matches your chosen flower style. A cohesive theme and clear vision will significantly elevate your final bouquet.
Step 2: Preparing Your Petals – The Heart of the Flower
Carefully print and cut out your selected petal templates. Then, meticulously trace these templates onto your chosen paper. For a full, lush, and realistic flower, you’ll need multiple sizes of petals: smaller ones for the tight center, progressively larger ones for the outer layers. Cut each petal with precision to ensure smooth, clean edges – this detail makes a big difference.
Step 3: Shaping the Petals – Bringing Them to Life
This is the magical step where your flat paper begins to transform into vibrant, three-dimensional petals! Use a bone folder, the rounded edge of your scissors (exercising extreme caution!), or a dowel rod to gently curl the edges of your petals. For crepe paper, you can also carefully stretch the paper to create beautifully ruffled or cupped shapes. This critical step adds essential depth, movement, and realism to your blooms.
Step 4: Assembling the Flower Base – Building the Core
Begin with the smallest petals. Create a tight, lifelike center bud by gently rolling one or two small petals tightly upon themselves and securing with glue. Then, progressively begin gluing the next layer of petals around this central bud, overlapping them slightly and staggering their positions. Continue adding layers, gradually incorporating larger petals, ensuring each layer is securely attached and evenly spaced for a balanced and beautiful bloom.
Step 5: Attaching the Stem – Providing Support
Once your magnificent flower head is completely assembled and sturdy, securely attach a robust floral wire or wooden dowel to its base. Use a generous amount of hot glue to ensure it is firmly anchored and can support the flower’s weight. For a more polished and natural appearance, wrap the entire stem with green floral tape, extending up into the flower’s calyx (the green base beneath the petals). You might also add paper leaves at this stage if desired.
Step 6: Arranging Your Bouquet – The Final Masterpiece
Repeat the entire process for each individual flower you wish to include in your grand bouquet. Once you have a collection of giant, stunning blooms, arrange them artfully in your sturdy vase or stand. Consider varying their heights, angles, and directional facing for a dynamic and visually appealing display. Don’t be afraid to experiment with different arrangements until you achieve the perfect visual impact and balance that speaks to your artistic vision.
Tips for Stunning Results: Elevating Your Paper Flower Craft
To ensure your giant paper flower bouquet is nothing short of spectacular and truly professional-looking, keep these expert tips and tricks in mind as you craft:
- Vary Petal Sizes and Shapes: Most natural flowers feature petals of slightly different sizes and subtle variations in shape. Mimic this organic irregularity for a more authentic and less manufactured look.
- Embrace Dimension: Never flatten your petals! The curling, stretching, and shaping step is absolutely crucial for creating essential depth, movement, and making your flowers appear remarkably realistic and grand.
- Layering is Key: Overlap petals strategically and generously. More layers generally lead to a fuller, richer, and more luxurious bloom, giving it a profound sense of volume and texture.
- Consider Color Blending: Experiment with two or three subtle shades of the same color paper for a beautiful gradient effect, or introduce a complementary color for the flower’s center to add striking visual interest and depth.
- Secure Gluing: Always use enough hot glue to hold petals firmly in place, ensuring long-lasting stability, but be careful to avoid excessive amounts that might seep out and create a messy or visible finish.
- Practice Makes Perfect: If you’re new to the art of paper crafting, consider starting with a smaller, simpler flower to confidently get the hang of the various techniques before confidently tackling your magnificent giant masterpiece.
Displaying Your Magnificent Paper Flower Bouquet
Once your giant paper flower bouquet is complete, its display becomes an integral part of its charm and impact. Given their impressive size and artistic presence, these magnificent blooms require a prominent position to truly shine and captivate attention.
- Entryway Statement: Place the bouquet prominently in your foyer or entryway to greet guests with an immediate and unforgettable “wow” factor, setting a welcoming and artistic tone.
- Living Room Focal Point: Position it elegantly on a side table, in a spacious corner, or even directly on the floor next to a sofa to serve as a stunning, large-scale art piece that enhances the room’s aesthetic.
- Dining Room Elegance: While perhaps too grand for a typical dining table centerpiece, it could beautifully adorn a buffet, console table, or a corner in a dining area, adding sophisticated charm.
- Bedroom Sanctuary: Introduce a touch of whimsical elegance and permanent charm to a bedroom, bringing a consistent pop of color, softness, and personalized artistry to your private retreat.
- Office Inspiration: Brighten a home office or professional workspace, providing a burst of creative energy and a visually pleasing element to your working environment.
Remember to carefully choose a vase or stand that not only complements the grand scale and artistic style of your flowers but also provides unwavering stability. A tall, sturdy vase with a wide mouth is often ideal, ensuring the bouquet stands securely and allows the individual flowers to spread out beautifully, showcasing their full splendor.
Caring for Your Everlasting Blooms: Maintenance and Longevity
One of the greatest advantages of giant paper flowers is their incredibly minimal maintenance requirements. However, a few simple and easy practices will ensure they remain vibrant, clean, and beautiful for many years to come, truly living up to their “everlasting” promise:
- Dust Regularly: Over time, just like any other decor, dust can accumulate on the intricate petals. Gently dust your flowers with a soft, clean brush, a delicate feather duster, or a precise can of compressed air to keep them looking fresh.
- Avoid Direct Sunlight: While durable, prolonged and intense exposure to direct sunlight can potentially cause certain paper colors to fade over extended periods. Position your magnificent bouquet in a spot with indirect light to preserve its vibrant hues.
- Keep Away from Moisture: Remember, paper and water do not mix. Ensure your beautiful flowers are not placed in areas prone to high humidity, accidental spills, or direct contact with any liquids to prevent damage.
- Gentle Handling: While robust in their construction, paper can still tear if handled roughly or carelessly. Always hold your flowers securely by the stem or the sturdy base when moving or adjusting them to prevent any accidental damage.
Embrace the Joy of Crafting and Gifting
Creating a giant paper flower bouquet is so much more than just a craft project; it’s a truly rewarding opportunity to create something profoundly special, deeply personal, and incredibly memorable. Whether it’s for Mother’s Day, a cherished birthday, a grand wedding, or simply to infuse your home with unique beauty, these magnificent blooms are a testament to handmade artistry and heartfelt giving.
So, gather your materials, thoughtfully choose Mom’s favorite colors or a palette that inspires you, and embark on this delightful DIY adventure. The immense joy of creating and the lasting, vibrant beauty of your giant paper flower bouquet will undoubtedly make an unforgettable statement – a three-foot-tall declaration of love, creativity, and enduring thoughtfulness that will be cherished and admired for countless years to come. Happy crafting!