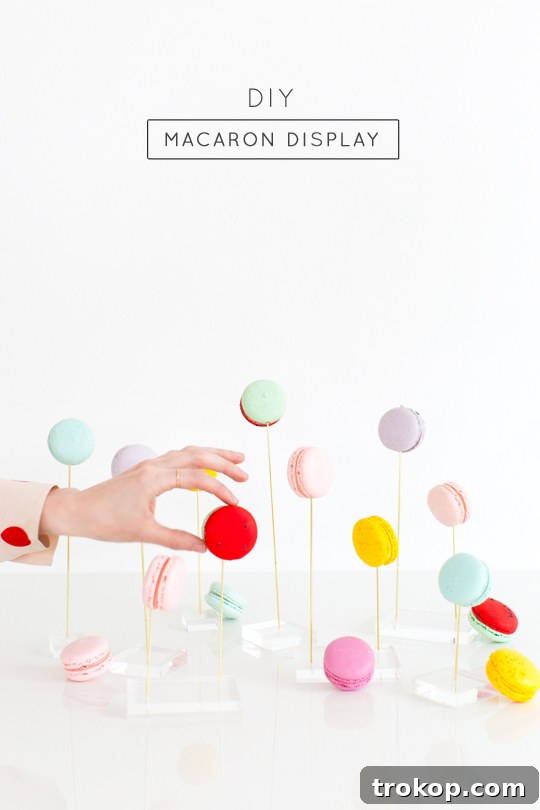
After immersing ourselves in countless macaron projects, a realization dawned: our exquisite, delicate macarons deserved a presentation as unique and captivating as they are. It was finally time to unveil the ultimate DIY macaron display! Forget standard platters and uninspired trays; we’re talking about an innovative, gravity-defying showcase that transforms your dessert table into a work of art.
For too long, our beautiful macaron creations, including those adorable DIY flamingo macarons, were simply laid out, missing an opportunity to truly shine. Can you imagine those vibrant, whimsical treats suspended elegantly, catching every eye? That, my friends, was a serious missed opportunity – one we are thrilled to rectify with this stunning and surprisingly simple DIY project. This isn’t just a stand; it’s a statement, an elevation of the humble macaron to its rightful place as a centerpiece.

Our commitment to all things macarons is well-documented, from intricate designs to creative flavor combinations. Now, with this stylish DIY macaron display, we can finally present them with the elegance they deserve. This display will be making its grand debut at an upcoming free DIY event on September 3rd, where it will hold court on our dessert table, showcasing a delightful array of macarons for all attendees. We’ll be sure to share more photos of these pretty little stands in action, fully laden for a crowd!
P.S. Want to be among the first to receive an exclusive invitation to our FREE DIY event and other exciting updates? Make sure to sign up for our newsletter here!

Crafting your own macaron display offers a plethora of advantages over store-bought alternatives. Beyond the sheer satisfaction of a DIY project, you gain complete control over the design, ensuring it perfectly complements your event’s theme and aesthetic. Imagine choosing precise heights for each macaron, creating a dynamic, multi-level arrangement that draws the eye and makes your treats irresistible. This level of customization is simply unattainable with mass-produced stands. Furthermore, the cost-effectiveness of this DIY approach means you can create a stunning display without breaking the bank, leaving more room in your budget for the delicious macarons themselves! It’s an investment in style, personalization, and a truly memorable presentation.
Materials and Tools Needed To Craft Your DIY Macaron Displays
Before you dive into creating these stunning macaron stands, gather your materials and tools. Each component plays a crucial role in achieving the elegant, modern look and sturdy functionality of the final display. We’ve carefully selected these items for their aesthetic appeal and ease of use in this project.
- 1/16″ brass rods: These rods are the backbone of your display, offering a sleek, minimalist look that allows your macarons to be the true stars. The slender brass provides a touch of sophistication and modern elegance, perfect for any occasion.
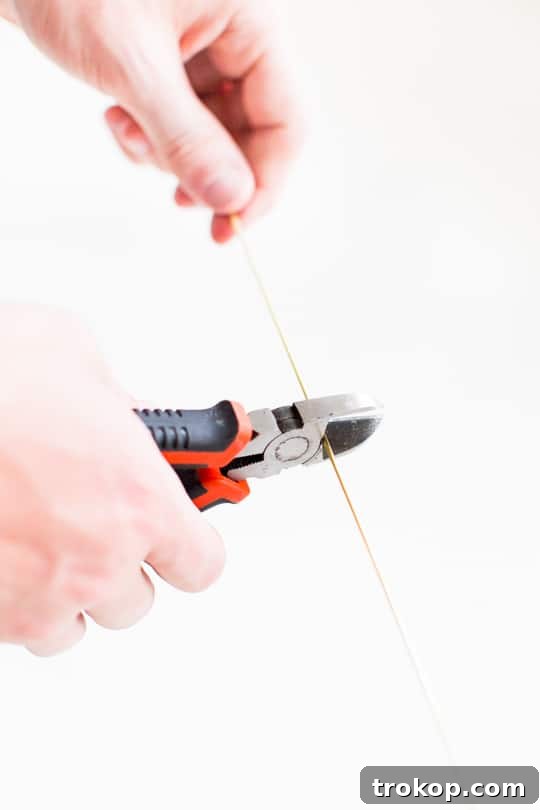
- Wire cutter: Essential for precisely cutting the brass rods to varying lengths. A good quality wire cutter ensures clean cuts, which are important for both aesthetics and safety.
- Acrylic blocks: These clear, sturdy blocks serve as the bases for your macaron stands. Their transparency provides a modern, almost invisible foundation, making your macarons appear to float. They come in various sizes, allowing you to create displays of different scales.
- Drill with 1/16″ drill bit: You’ll need this to create the holes in your acrylic blocks for the brass rods. Ensure your drill bit matches the diameter of your rods for a snug fit.
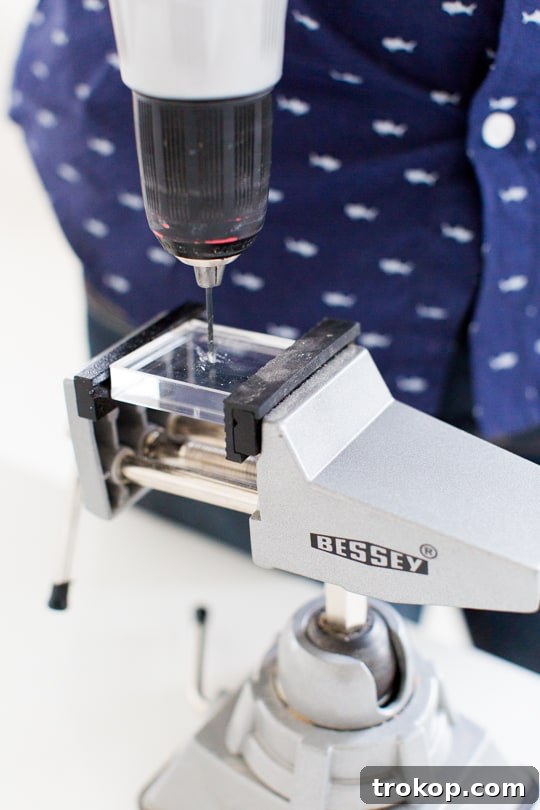
- Vice: While not strictly mandatory, a vice is highly recommended. It securely holds the small acrylic blocks in place, making it significantly easier and safer to drill straight, precise holes. Drilling small, smooth objects can be tricky, and a vice provides the stability you need for a professional finish. It also helps in controlling the drilling depth, preventing you from going all the way through the block.
A note on the vice: When drilling into the acrylic blocks, you’re not aiming to drill completely through them. Instead, you’ll drill approximately three-quarters of the way through. Having the block slightly raised and firmly held by a vice makes it much easier to gauge the depth and stop precisely when needed, ensuring a clean and effective socket for your brass rods. Safety first: always wear appropriate eye protection when drilling.

How To Make Your DIY Macaron Displays
Creating these elegant macaron displays is a straightforward process, but attention to detail will ensure a professional and stunning outcome. Follow these steps to assemble your custom macaron stands.
Step 1: Drilling the Acrylic Blocks
First, secure your acrylic blocks. If you have a vice, this is where it truly shines, holding the blocks firmly and preventing any slippage. For smaller blocks, a single, centered hole is usually sufficient. For larger acrylic blocks, drilling two holes spaced evenly apart can provide greater stability and allow for a more expansive display. Remember, you’re drilling approximately 3/4 of the way through the block, creating a secure socket for the brass rod without piercing the bottom.
Step 2: Cutting the Brass Rods
Once your holes are drilled, it’s time to prepare your brass rods. Using your wire cutters, carefully cut the rods to various heights. This is a crucial step for creating visual interest and dynamism in your final display. Imagine a small cluster of macarons at different elevations, creating a miniature skyline of sweet treats. Plan your heights beforehand to ensure a pleasing aesthetic – some short for front-row appeal, others taller to add drama and visibility from a distance. A varied arrangement prevents the display from looking flat and generic, giving it that professional, curated touch.
Step 3: Assembling Your Stands
With the drilling and cutting complete, assembly is the easiest part! Simply insert the cut brass rods firmly into the drilled holes in your acrylic blocks. The 1/16″ drill bit paired with the 1/16″ rods should create a snug fit, ensuring stability. Once the rods are in place, gently perch your macarons on top of each rod. Arrange them artfully, considering colors and flavors to create an appealing visual spread. And just like that, you’ve created a sophisticated, custom macaron display that’s ready to impress!

How To Prep Your Macarons for Display
The success of your stunning macaron display also hinges on the macarons themselves. While the stands provide the structure, well-prepared macarons ensure a flawless presentation. Here are a few essential tips for prepping your delicate confections:
Ensure Macaron Stability
If you’re working with particularly gooey or soft-filled macarons, they might struggle to stay perfectly upright on the slender brass rods. To prevent any tilting or slipping, consider these strategies:
- Thicker Filling: Opt for a slightly thicker or firmer macaron filling. This provides more structural integrity to the sandwich, making the macaron more robust.
- Chilling is Key: Before displaying, chill your filled macarons in the refrigerator for at least 30 minutes to an hour. This firms up both the shells and the filling, making them much stronger and less prone to collapsing or shifting when placed on the rods.
- Room Temperature Acclimation: While chilling helps, avoid displaying them for excessively long periods in very warm environments, as this can soften the filling again. If your event is outdoors or in a warm room, plan accordingly.
Strategic Placement on the Rod
The way you place the macaron on the brass rod can also make a significant difference in its stability and appearance:
- Center the Rod: Ideally, aim to gently push the brass rod through the center of the macaron. This distributes the weight evenly and creates the most stable perch.
- Utilize the “Feet”: If a macaron feels particularly delicate, or if you prefer not to pierce the center, you can very strategically stick the brass rod into the side or edge of the macaron’s “feet” or crust. The slightly ruffled texture of the feet can provide a bit more grip and support. Just be gentle to avoid cracking the delicate shell.
- Test Before Display: Before committing all your macarons to the display, test out a few different placements and chilling techniques to see what works best for your specific batch of macarons.
By following these simple preparation tips, your macarons will not only look incredible on their DIY stands but will also remain perfectly presented throughout your event, ready to be admired and enjoyed by all.




Imagine walking into a bakery or an event and being greeted by this captivating DIY macaron display – wouldn’t it instantly elevate your mood and make you want to grab your phone for a picture? It’s not just a dessert display; it’s an experience, a moment of delight that transforms a simple treat into a visual spectacle. This kind of presentation transcends mere food service; it’s about crafting an atmosphere, adding a touch of magic to your celebrations. We can honestly say that witnessing such an innovative and elegant arrangement would send us straight into non-stealth Instagramming mode! #noshame for capturing such beauty!
These versatile stands aren’t just limited to macarons. Think about miniature cupcakes, cake pops, or even small, decorative elements for a themed party. Their sleek design and customizable heights make them perfect for a variety of treats and decor needs, ensuring they become a staple for all your entertaining endeavors. From intimate gatherings to grand celebrations, these DIY macaron displays are guaranteed to be a conversation starter and a feast for the eyes.
We absolutely adore seeing your creative projects! If you decide to make your own DIY macaron display, please be sure to share it with us on social media using the hashtag #mysugarandcloth. We love featuring your beautiful work on our blog and connecting with our amazing community of crafters and bakers. Let your creativity shine and inspire others!