
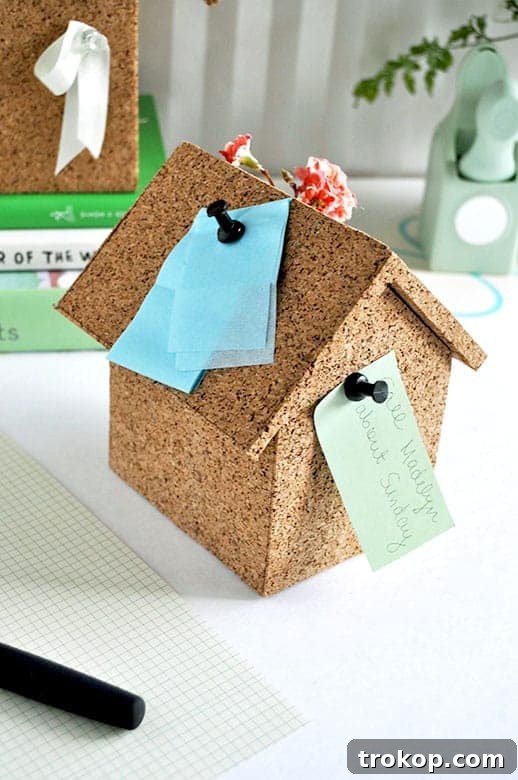
Transform your cluttered desk into an organized oasis with this incredibly charming and practical DIY Cork Storage Box! This isn’t just any storage solution; it’s a delightful miniature cork house designed to bring both whimsy and efficiency to your workspace. Imagine a tidy spot for all your office essentials inside, while the exterior serves as a personal bulletin board for your prettiest notes, important reminders, or inspiring quotes. Say goodbye to desktop chaos and hello to a personalized, clutter-free zone that sparks creativity.
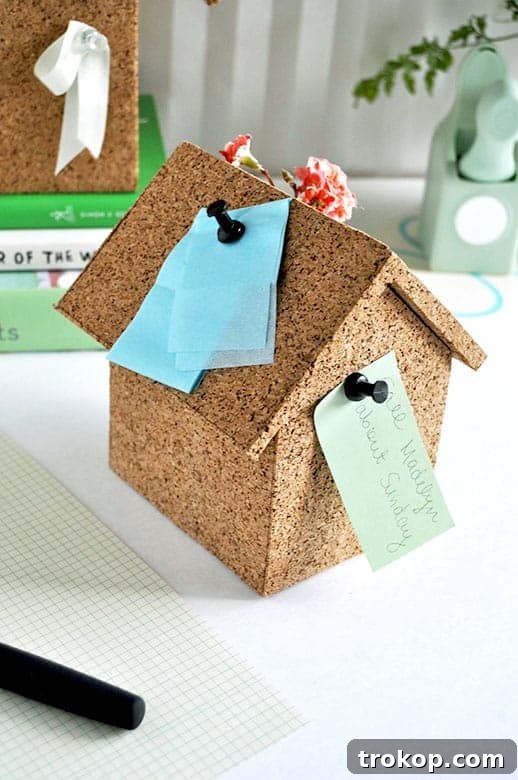
DIY Cork Storage Box: The Ultimate Guide to Crafting Stylish Workspace Organization
Are you yearning for a workspace that’s both functional and reflects your unique style? Look no further than this fantastic DIY Cork Storage Box project! Far from a mundane container, this creative endeavor results in an adorable, house-shaped organizer that not only stores your pens, paperclips, and other desktop necessities but also offers an interactive surface to pin your favorite memos, photos, or inspirational snippets. It’s the perfect blend of practical organization and personalized home office decor.
Whether you’re a seasoned crafter or just starting your DIY journey, this project is designed for accessibility and maximum impact. It promises to be a true asset to any desk, helping you maintain a neat environment while adding a touch of handmade charm. The beauty of this cork house lies in its dual functionality: a hidden sanctuary for your essentials and a visible display area for your creative output. This makes it an invaluable addition to any home office, study nook, or creative studio.
Crafting this unique storage solution requires only a few accessible materials, basic crafting tools, and a sprinkle of imagination. You’ll use readily available cork sheets to give your box a natural, tactile finish, transforming simple foam board into a durable and eye-catching organizer. The intuitive design means you can bring this adorable project to life in just a couple of hours, creating a custom piece that perfectly suits your organizational needs and aesthetic preferences. Get ready to embark on a fun and rewarding DIY adventure that will elevate your desk space to new levels of style and efficiency!
Why Create a DIY Cork Storage Box?
In today’s fast-paced world, maintaining an organized workspace is more crucial than ever for productivity and peace of mind. A cluttered desk can lead to a cluttered mind, making it harder to focus and find what you need. This DIY Cork Storage Box addresses that challenge head-on, offering a multitude of benefits beyond simple tidiness:
- Enhanced Organization: Keep all your essential office supplies – pens, pencils, paper clips, sticky notes, small tools, and more – neatly tucked away yet easily accessible. The compact design ensures everything has its place, reducing visual clutter.
- Aesthetic Appeal: Crafted to resemble a charming mini-house, this storage box adds a unique and decorative element to your desk. The natural texture and warm tones of cork bring an organic, sophisticated feel to any home office or studio, elevating your decor.
- Personalized Touch: Unlike mass-produced organizers, this DIY project allows you to infuse your personality into your workspace. You can customize the size, add decorative accents, or even paint the foam board before applying cork for a pop of color.
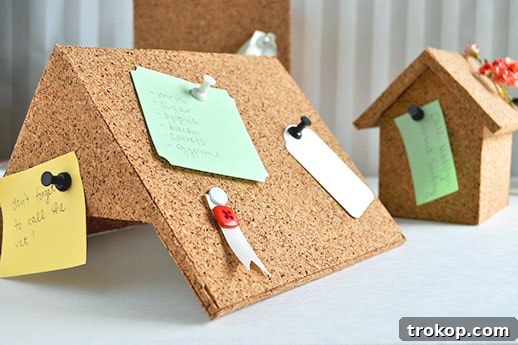
- Interactive Pin Board: The exterior cork surface isn’t just pretty; it’s functional! Use pushpins to display important reminders, inspirational quotes, cherished photos, business cards, or even small works of art. It’s a dynamic space that changes with your needs and moods.
- Cost-Effective: Creating your own storage solution is often significantly more affordable than purchasing designer desk accessories. The primary materials – foam board and cork – are budget-friendly and widely available.
- Eco-Friendly Choice: Cork is a sustainable and renewable resource, making this project an environmentally conscious crafting choice. It’s durable, lightweight, and adds a natural element to your home.
- Sense of Accomplishment: There’s immense satisfaction in creating something with your own hands. Completing this project will leave you with a functional item and a boost of creative confidence.
This DIY cork house isn’t just about storage; it’s about crafting a more inviting, efficient, and inspiring workspace. It’s a testament to how simple materials and a bit of creativity can lead to beautiful and practical results.
Materials and Tools Needed
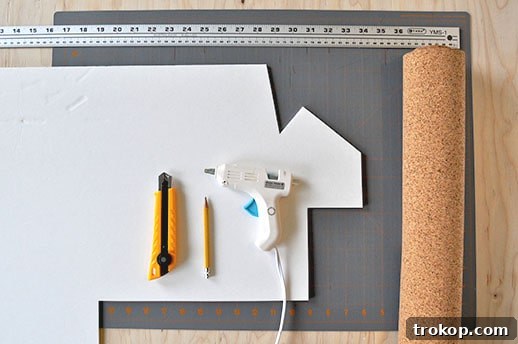
Before diving into the construction of your DIY Cork Storage Box, gathering all your materials and tools is essential. Having everything ready ensures a smooth and enjoyable crafting process. Here’s a detailed look at what you’ll need and why each item is important:
- Foam Board: This will form the sturdy structural core of your cork house. Foam board is lightweight, easy to cut, and provides a stable base for the cork. You’ll need enough to cut out all the walls and roof pieces. Opt for a standard thickness (usually around 3/16 inch or 5mm) for good rigidity without being too cumbersome. It’s readily available at craft stores, art supply stores, or even online.
- Self-Adhesive Cork Roll: This is the star material that gives your storage box its signature look and pin-board functionality. Self-adhesive cork simplifies the process immensely, as you won’t need to apply separate glue. Look for a roll that’s thick enough to hold pins securely (at least 1/8 inch or 3mm is ideal). Hardware stores, craft stores, or online retailers are good sources. If you happen to have any leftover cork, don’t let it go to waste! You can easily repurpose it for other charming projects like DIY cork coasters or a DIY desk organizer.
- Ruler: Precision is key in this project. A sturdy metal ruler is highly recommended, not only for accurate measuring but also as a reliable guide for making straight cuts with your craft knife. A transparent ruler can also be helpful for aligning pieces.
- Craft Knife (Exacto knife): This sharp tool is indispensable for cleanly cutting foam board and cork. Ensure you have a fresh, sharp blade for crisp edges and to minimize tearing. Always use extreme caution when handling any sharp blade.
- Hot Glue Gun and Glue Sticks: Your hot glue gun will be used to quickly and securely assemble the foam board structure. Hot glue sets rapidly, which is perfect for holding pieces in place while building the house. Have a good supply of glue sticks on hand.
- Cutting Mat: Protect your work surface from knife damage by placing a self-healing cutting mat underneath. It also helps your blade glide more smoothly, resulting in cleaner cuts.
With these materials and tools at your disposal, you’re well-equipped to create a stunning and functional cork storage box. Double-check your list before you begin to avoid interruptions during the creative process.
How to Make Your DIY Cork Storage Box: Step-by-Step Guide
Now that you have all your materials and tools ready, let’s get started on building your very own cork storage box. Follow these detailed instructions carefully to ensure a successful and satisfying crafting experience. We’ll begin by constructing the foundational foam board structure, then move on to adding the beautiful cork finish.
Building the Foam Board Structure
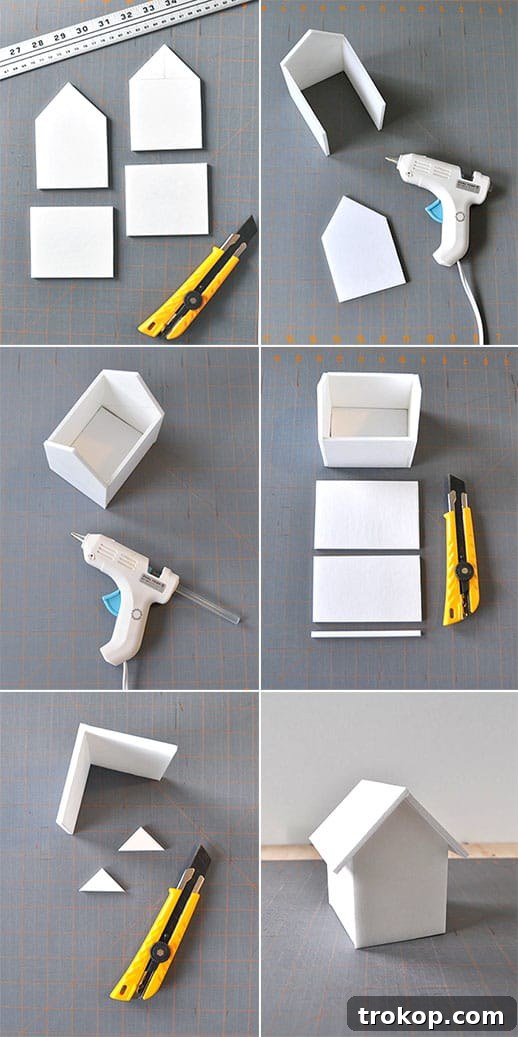
- Prepare the Walls for Your Cork House: Begin by precisely measuring and cutting the foam board pieces that will form the walls of your house. For the front and back walls, draw a 3-inch square. On top of this square, center and draw a 1 ½-inch tall triangle to form the roof peak. This will give your house its distinctive shape. For the two side walls, each piece should measure 3 inches in width by 3 ½ inches in height. Use your ruler and craft knife to make clean, straight cuts. Accuracy here will ensure your house assembles neatly.
- Assemble the Base Structure of the House: With your wall pieces cut, it’s time to bring them together. Apply a thin line of hot glue along the edges where the walls will meet. Carefully press the walls together, forming the basic rectangular shape of your house. Hold each joint firmly for a few seconds until the hot glue sets. Ensure all connections are secure and the walls stand upright at 90-degree angles. A steady hand and patience will result in a strong, square structure.
- Secure the Bottom of the Box: To create a sturdy base for your storage, cut a piece of foam board that fits perfectly inside the assembled walls. This piece will be the floor of your box. Apply hot glue along the bottom edges of the four assembled walls and then gently lower the foam board bottom into place. Press down firmly to ensure a strong bond. This step provides stability and a closed compartment for your office supplies.
- Construct the Roof Components: For the roof, you’ll need two rectangular pieces of foam board. Cut each piece to measure 3 inches in width by 4 ½ inches in length. Now, here’s a crucial detail for a symmetrical roof: trim exactly ¼ inch off the length of one of these pieces, making it 3 inches by 4 ¼ inches. This slight difference allows for a neat overlap at the peak. Next, apply hot glue along one long edge of each roof piece. Join these edges together to create a 90-degree angle, forming the pitched roof. Ensure the longer piece is positioned slightly on top, creating a smooth ridge. For enhanced support and durability, cut two small foam board triangles and glue them vertically, about 1 inch from each end, on the inside of the roof peak. These triangles act as internal braces.
- Complete the Foam Core House Assembly: Once the roof pieces are firmly glued together and the support triangles are in place, attach the completed roof assembly to the top of your house structure using hot glue. Ensure it’s centered and aligned properly. Hold it steady until the glue completely dries. At this point, you should have a fully assembled, sturdy foam board house, ready for its cork exterior.
Applying the Cork Covering
- Add the Cork Covering to Your House: This is where your house comes to life! Unroll your self-adhesive cork and cut pieces that are slightly larger than each foam board wall and roof section. This extra margin will allow for precise trimming later. Working one section at a time, carefully peel off the backing from a cork piece. Align it with the corresponding foam board wall or roof section, and slowly adhere it, smoothing out any air bubbles as you go. Once the cork is firmly attached, use your craft knife and ruler to meticulously trim any overhanging cork, creating clean, flush edges. Repeat this process for all four walls and both sides of the roof. Pay special attention to covering the underside of the roof edges that overhang the walls – this creates a polished and seamless finish.
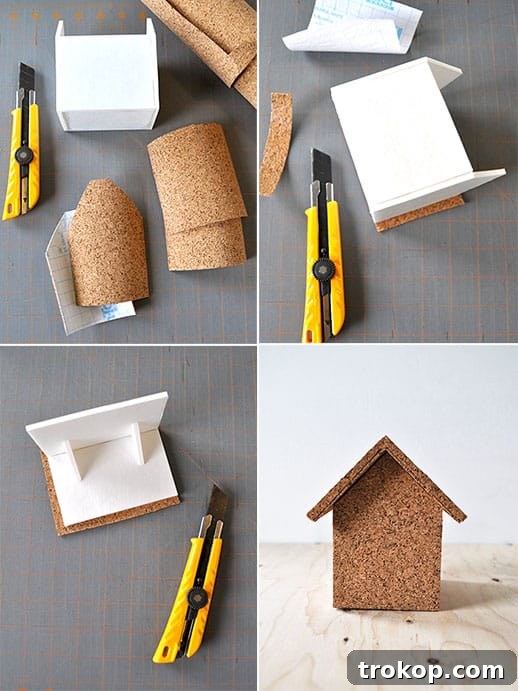
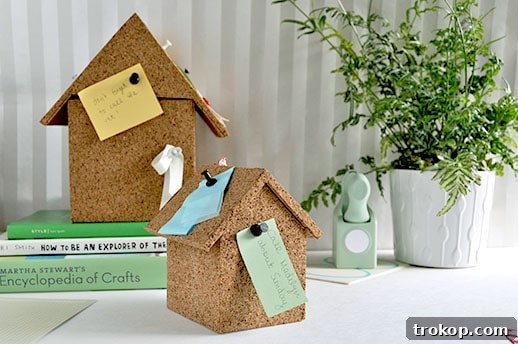
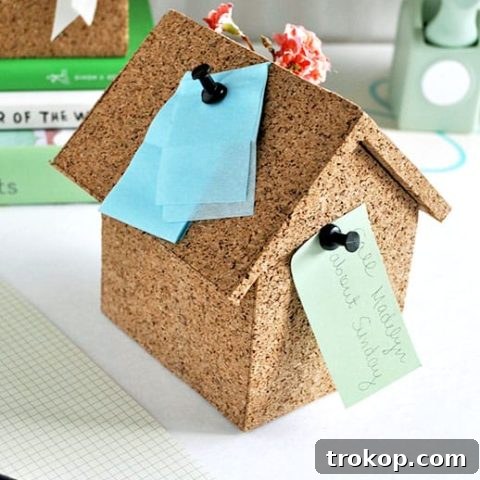
Congratulations! You’ve successfully created your functional, cork-covered house. Now it’s ready to store your office supplies and serve as a beautiful, interactive pin board for your desk. Pin your favorite post-it notes, reminders, or even small photos on the outside walls for an added touch of personalization and flair.
Tutorial Notes, Tips, and Creative Enhancements
To ensure your DIY Cork Storage Box is both beautiful and long-lasting, consider these additional tips and ideas for customization:
- Precision Trimming is Paramount: When trimming the cork, always use a fresh, sharp blade in your craft knife. A dull blade can tear the cork or leave jagged edges. Place your ruler firmly along the cut line and make multiple light passes rather than one deep cut. This technique provides cleaner, more precise edges and reduces the risk of cutting imperfections.
- Ensure Secure Roof Support: Hot glue sets quickly, but for maximum strength and alignment of the roof pieces, consider using small clips (like binder clips or clothespins) or rubber bands to hold the roof sections together while the glue dries completely. This ensures the 90-degree angle is maintained and the bond is solid.
- Care and Maintenance of Cork: To keep your cork storage box looking its best, dust it regularly with a soft cloth. If it gets dirty, gently wipe the surface with a lightly damp cloth, using plain water. Avoid using harsh chemical cleaners, as they can damage the cork or its adhesive. Regular, gentle cleaning will help preserve the natural beauty and integrity of the cork.
- Customization for Unique Style: Don’t hesitate to personalize your cork house! Before applying the cork, you can paint the foam board structure in any color to create a contrasting border or a vibrant inner pop. You could also use different patterns of cork (if available) or add small decorative elements like miniature windows or doors made from felt or paper.
- Vary the Size for Different Needs: The provided dimensions create a compact, desk-friendly organizer. However, feel free to adjust the measurements to create larger boxes for more substantial storage, or smaller ones for tiny treasures. Just ensure you scale all dimensions proportionally to maintain the house shape.
- Safety First: Always exercise caution when working with a craft knife and hot glue. Keep fingers clear of the blade’s path, and ensure good ventilation when using hot glue. If children are involved, adult supervision is essential for these steps.
- Enhance Durability: For an extra layer of protection, especially if you anticipate heavy use, consider applying a thin coat of clear craft sealant (matte or satin finish) over the cork once the project is complete. This can help protect against stains and minor wear.
By incorporating these tips, you can elevate your DIY Cork Storage Box from a simple craft project to a beautifully finished and highly functional piece of personalized office decor that you’ll cherish for years to come.
Beyond the Box: More Easy Organization Ideas and Projects
If you’ve enjoyed crafting your DIY Cork Storage Box and are eager to further declutter and beautify your workspace, we have plenty more easy and creative organization ideas for you to explore. These projects are designed to complement your new cork house, helping you create a cohesive and highly functional desk environment. Dive into these tutorials to continue your journey toward an impeccably organized and inspiring office:
- DIY Nesting Desk Organizer Set: Create a modular system that fits perfectly together or can be spread out for versatile storage.
- DIY Memo Board with Clips: A stylish way to keep papers, notes, and photos visible and accessible.
- Hexagon DIY Pen Holder: Add a touch of modern geometry to your desk with this chic pen holder.
- DIY Dry Erase Board: Perfect for quick notes, brainstorming, and daily to-do lists that can be easily updated.
Each of these projects is designed to be approachable for crafters of all skill levels, ensuring that you can continue to personalize and organize your space with confidence and flair. Enjoy transforming your office into a hub of productivity and style!
DIY Cork Storage Box (Project Overview)
Craft this charming DIY Cork Storage Box to neatly store your office supplies inside and creatively pin notes and inspirations on its exterior. It’s a dual-purpose solution for a stylish and organized desk.
Estimated Prep Time: 2 hours
Estimated Total Time: 2 hours
Category: DIY Office Decor, Organization
Course: DIY
Keywords: cork storage box, DIY desk organizer, office craft
Approximate Cost: $30
Equipment
- Cutting Mat
- Ruler
- Craft Knife (Exacto knife)
- Hot Glue Gun and Glue Sticks
Materials
- 5 sheets of Foam Board
- 1 roll of Self-Adhesive Cork
Instructions
- Create the Walls: Using your craft knife, cut out the front and side walls from the foam board. For the front wall, draw a 3” square and add a 1 ½” triangle on top for the roof peak. Each side wall should measure 3” x 3 ½”.
- Assemble the Structure: Carefully hot glue the foam board walls together to form the basic house shape. Ensure corners are square and secure.
- Add the Bottom: Cut a foam board piece to fit precisely inside the assembled walls for the bottom of the box. Glue it firmly in place to create a stable base for your storage.
- Construct the Roof: Cut two foam board pieces, each measuring 3” x 4 ½”. Trim ¼” off one of these pieces along its length. Hot glue the two roof pieces together to form a 90-degree angle, ensuring the slightly longer piece overlaps the shorter one at the peak for a clean finish and symmetry. For added structural integrity, cut two small foam board triangles and glue them approximately 1” from each end along the inside of the roof peak.
- Complete Foam Board Assembly: Once the roof is securely in place and the glue has dried, you should have a complete, sturdy foam board house structure.
- Apply Cork Covering: Cut pieces of the self-adhesive cork slightly larger than each foam board wall and roof section. Carefully peel off the backing and adhere the cork to the foam board, smoothing out any bubbles. Use your craft knife to meticulously trim any overhanging cork for a neat edge. Repeat this process for all four walls and the roof, making sure to cover the underside of the roof edges that overhang the walls for a seamless look.
Related Organization & Decor Ideas
Looking for more ways to enhance your home office or add a touch of personal flair to your living spaces? These articles offer inspiring ideas for decor, organization, and creative projects that complement your new DIY Cork Storage Box.
46 Cute Desk Accessories to Brighten Your Workspace
From colorful pens to quirky paperweights, spruce up your work…Continue Reading46 Cute Desk Accessories to Brighten Your Workspace
19 Unique & Easy Houseplants that We’re Loving
Looking for unique house plants? Dive into our guide to…Continue Reading19 Unique & Easy Houseplants that We’re Loving
16 Genius Ikea Desk Hacks You Need In Your Life
Discover the ultimate IKEA desk hack guide for a stylish…Continue Reading16 Genius Ikea Desk Hacks You Need In Your Life
DIY Flip Photo Album
This DIY Flip Photo Album tutorial shows you how to…Continue ReadingDIY Flip Photo Album
We hope these ideas inspire you to keep crafting and organizing your space. Happy DIYing!