
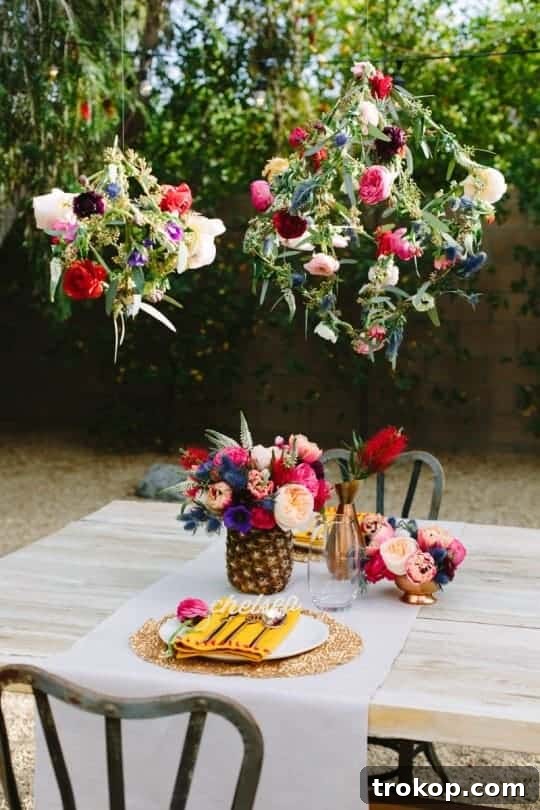
Transforming ordinary spaces into extraordinary realms of beauty and elegance often begins with a touch of handmade magic. Today, we’re thrilled to finally unveil the detailed tutorial for our much-loved DIY Geometric Floral Pendants. These captivating creations, first showcased in our enchanting Palm Springs inspired tablescape, are more than just decorations; they are whimsical works of art designed to infuse any setting with romance and modern botanical charm. If you’ve been searching for a unique way to elevate your event decor or add a distinctive flair to your home, look no further. This project, while delivering a sophisticated final product, is surprisingly straightforward, making it accessible for any DIY enthusiast.
The Allure of Modern Botanical Design: Why Geometric Floral Pendants?
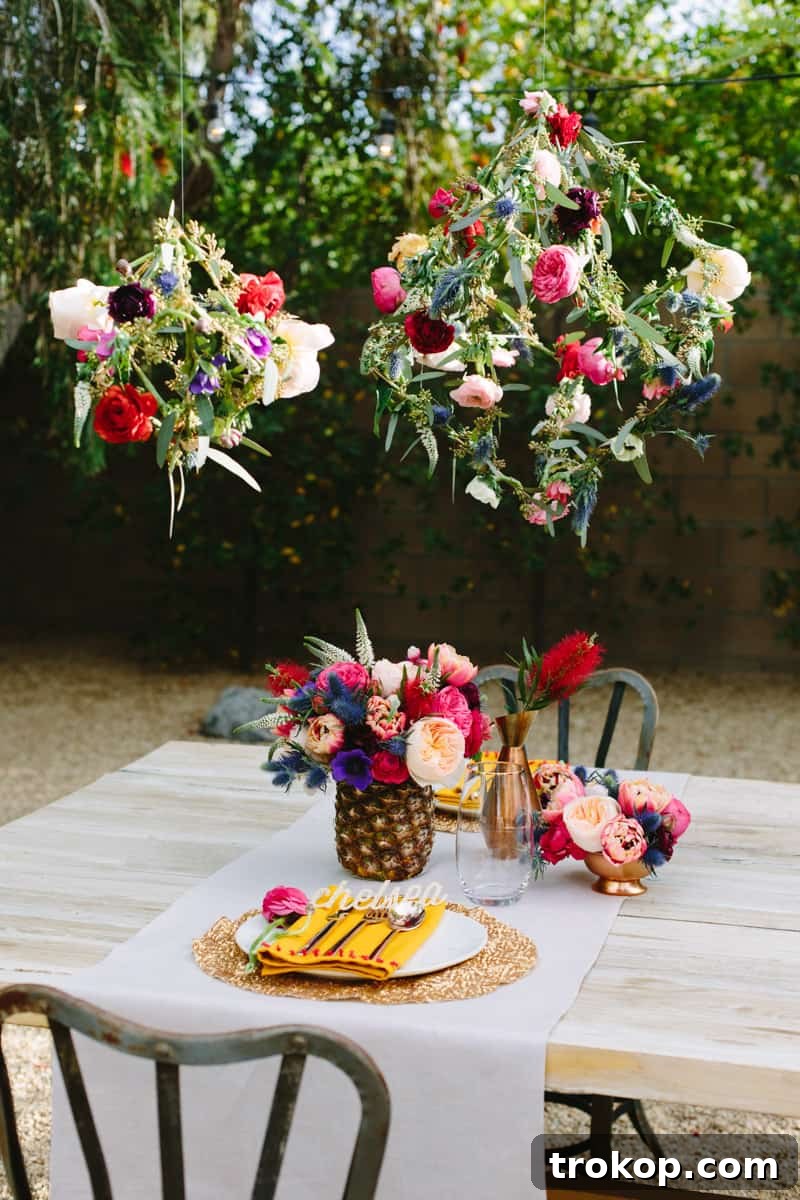
There’s something truly captivating about the fusion of crisp, modern geometric lines and the organic, flowing beauty of fresh flowers. Our DIY Geometric Floral Pendants embody this perfect blend, creating a visual spectacle that’s both contemporary and timeless. These pendants cast a magical glow as the sun dips below the horizon, transforming an ordinary evening into an unforgettable soiree. Imagine them adorning an outdoor wedding reception, creating a dreamy backdrop for a garden party, or even hanging gracefully in a nursery, adding a touch of whimsical elegance. Their unique design makes them incredibly versatile, suitable for a wide array of themes and occasions, from bohemian chic to minimalist modern.
While the intricate appearance might suggest a complex undertaking, we promise the creative process is far simpler than it looks. The most significant investment will be your time, typically around an hour and a half to two hours for a large pendant. However, the sheer joy and satisfaction of crafting these beautiful pieces, and the stunning impact they have on your space, make every moment absolutely worthwhile. Plus, the sense of accomplishment you’ll feel when guests admire your handmade creations is truly priceless. These pendants offer a personalized touch that mass-produced decor simply cannot replicate, allowing your unique style to shine through.
Planning Your Project: Size, Scale, and Vision for Your DIY Pendants
One of the best aspects of these DIY Geometric Floral Pendants is their adaptability. You have complete control over the size and quantity, allowing you to tailor them perfectly to your specific needs and the space you wish to adorn. For instance, our Palm Springs shoot featured a larger pendant measuring 12 inches on all sides, alongside a smaller, more delicate 6-inch version. These dimensions provide a good starting point, but feel free to experiment.
The size you choose will directly influence the time commitment required. Smaller pendants are quicker to assemble, making them ideal if you’re planning to create a grand display of many. Larger pendants, while more time-consuming, make a bolder statement and can serve as focal points. Consider the overall scale of your event or room. For a dramatic effect in a spacious venue, a collection of varying sizes could create an enchanting visual dynamic. For more intimate settings, a few carefully placed smaller pendants might be all you need to achieve that romantic, whimsical vibe. Think about where they will hang and how they will interact with other elements of your decor.
Gathering Your Creative Arsenal: Materials for Your Stunning Pendants
Before diving into the construction of your beautiful geometric floral pendants, it’s essential to gather all your materials. Having everything at hand will ensure a smooth and enjoyable crafting experience. Here’s a comprehensive list of what you’ll need, along with some insights into why each item is crucial:
Essential Supplies for Your DIY Pendants
- Wooden Skewers (24 pieces): These form the structural backbone of your pendants. We recommend 12-inch skewers for larger pendants and 6-inch skewers for smaller ones. Their lightweight nature makes them perfect for hanging decorations, and they are readily available and inexpensive.
- Floral Tape: This specialized tape is designed to stretch and adhere to itself, providing a discreet yet secure way to attach greenery and flowers to your skewers. Its green color often blends seamlessly with stems, making your attachments virtually invisible.
- Floral Wire: For heavier blooms or for creating more rigid attachments, floral wire is indispensable. It offers stronger support and can be easily manipulated and cut to size.
- Wire Cutters: Essential for cleanly snipping floral wire to your desired lengths, ensuring neat and professional results.
- Floral Shears: These sharp scissors are specifically designed for cutting flower stems and greenery without crushing them, helping to preserve the integrity and freshness of your botanicals (if using fresh).
- Hot Glue Gun and Glue Sticks: Your trusty hot glue gun will be your best friend for quickly and securely joining the wooden skewers to form the geometric frame. It provides an instant, strong bond.
- Fishing Wire: This transparent, durable line is perfect for hanging your finished pendants. Its almost invisible quality ensures that the focus remains entirely on your beautiful floral creation, making it appear as if it’s floating.
Selecting Your Florals: Bringing Your Vision to Life
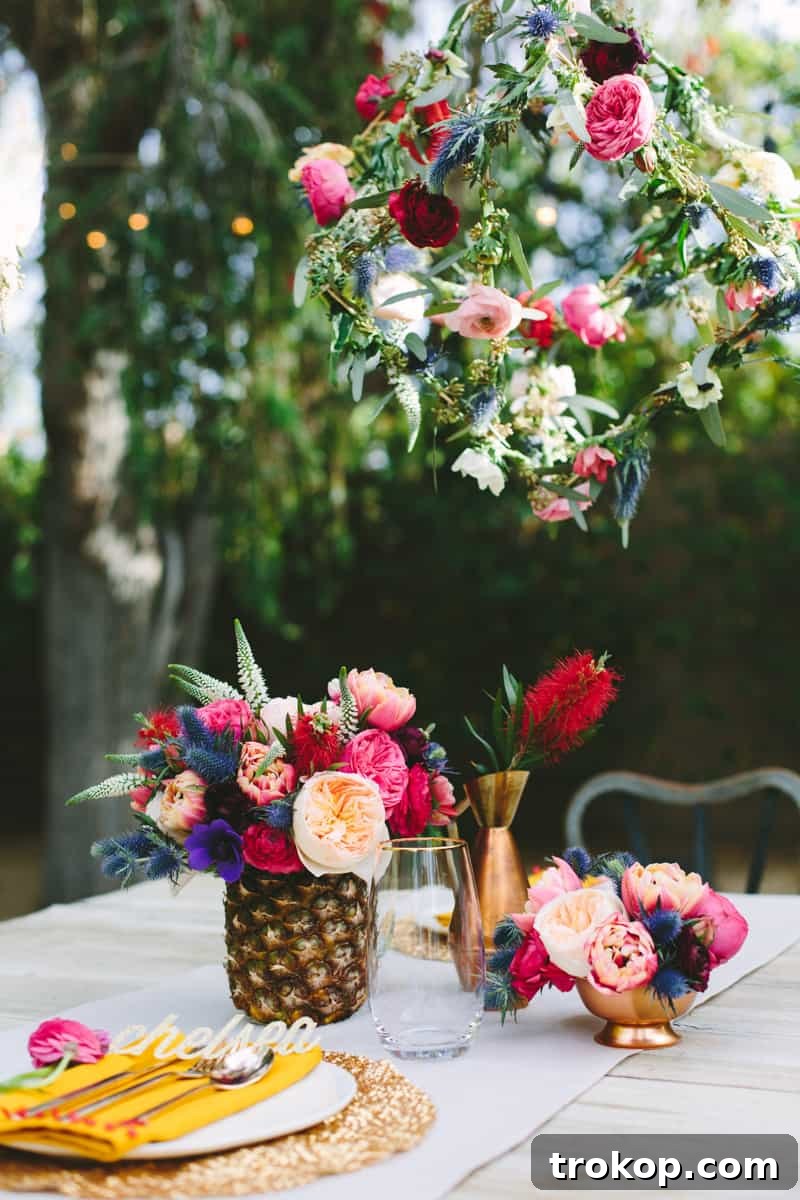
The choice of florals is where your personal style truly shines. For our original project, we were generously supplied with stunning blooms from Flower Muse, known for their exquisite selections. When choosing your flowers and greenery, consider the following:
- Fresh vs. Artificial: Fresh flowers offer unparalleled natural beauty and fragrance, but require careful handling and have a limited lifespan. Artificial flowers, on the other hand, provide durability and can be prepared well in advance, making them a great option for long-lasting decor. For a realistic look with artificials, opt for high-quality silk or ‘real touch’ varieties.
- Weight: Be mindful of the weight of your chosen florals. Heavier flowers might require more robust attachment methods or a sturdier frame to prevent the pendant from sagging or breaking.
- Variety and Texture: Mix different types of greenery and flowers to create visual interest and depth. Combine broad leaves with delicate sprigs, and incorporate blooms of various sizes and shapes.
- Color Palette: Select flowers that complement your event’s theme or your home’s existing decor. A monochromatic scheme can be incredibly elegant, while a vibrant mix can add a playful, celebratory feel.
Careful planning in the material selection phase will set you up for success and allow your creativity to flow freely during the assembly process.
Step-by-Step Guide: Crafting Your Geometric Floral Pendants
Now that you’ve gathered all your supplies, let’s dive into the exciting part: bringing your DIY Geometric Floral Pendants to life. Follow these steps carefully to construct a sturdy and beautiful base for your floral arrangements.
Step 1: Constructing the Geometric Frame
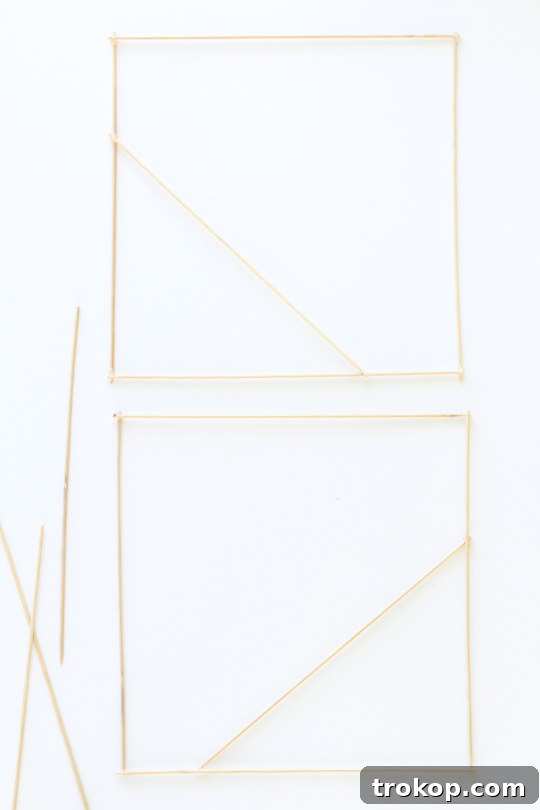
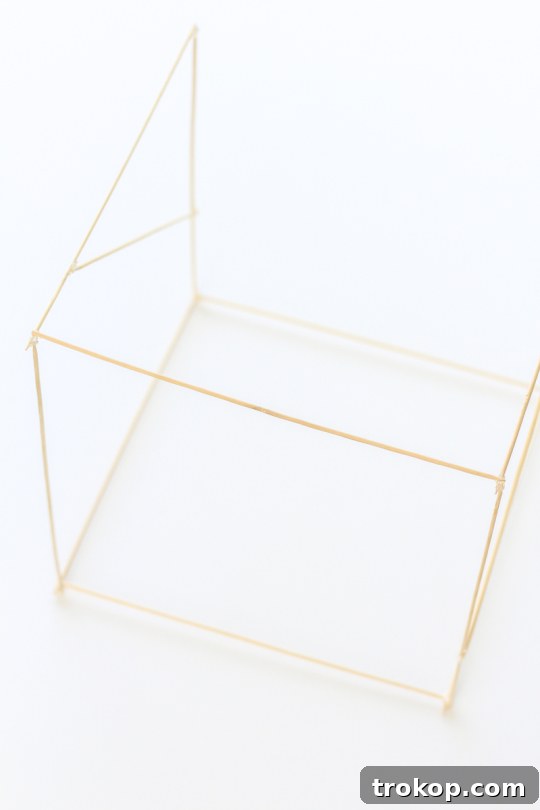
The foundation of your floral pendant is its geometric frame. For each side of your 3D square, you’ll start by making a 2D shape. Take five wooden skewers: four will form the sides of a simple square, and the fifth will be glued diagonally across one corner. Use your hot glue gun to securely fasten the skewers at their intersecting points. Hold each joint firmly for a few seconds until the glue sets. You will need to create two identical versions of this square shape. These will serve as the top and bottom faces of your three-dimensional pendant.
Next, you’ll connect these two 2D squares to form a complete 3D structure. Take four additional skewers, which will act as the vertical connectors. Apply hot glue to the corners of one 2D square and carefully attach one end of each of these four skewers. Once these are secure, apply hot glue to the free ends of the vertical skewers and carefully attach the second 2D square to complete the cube-like shape. Ensure all connections are strong and the structure is stable. Precision here will result in a perfectly symmetrical pendant.
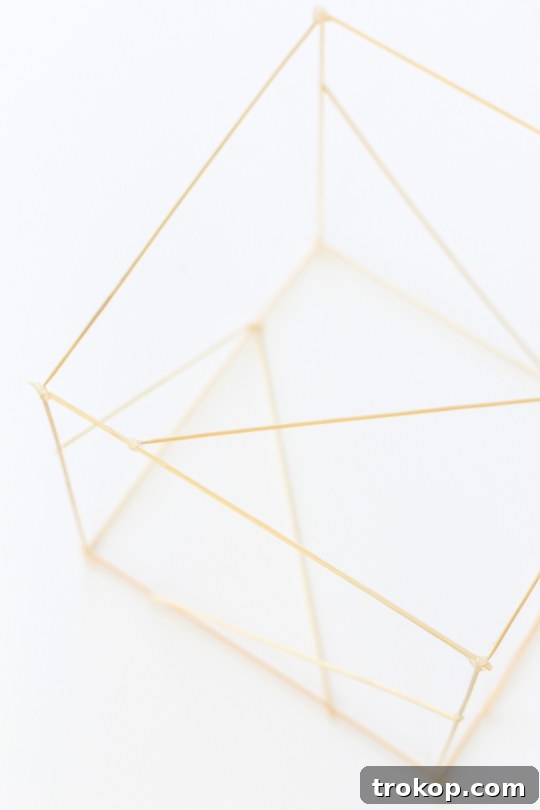
For a fuller, more robust look, or if you anticipate using a significant amount of flowers, consider adding extra diagonal skewers within the faces of your 3D cube. These additional skewers provide more surface area for attaching flowers and greenery, helping to create a denser, more luxurious arrangement. They also add to the structural integrity, which is especially important for larger pendants or those adorned with heavier blooms. Simply hot glue these additional skewers across the empty squares of your frame.
Step 2: Laying the Greenery Foundation
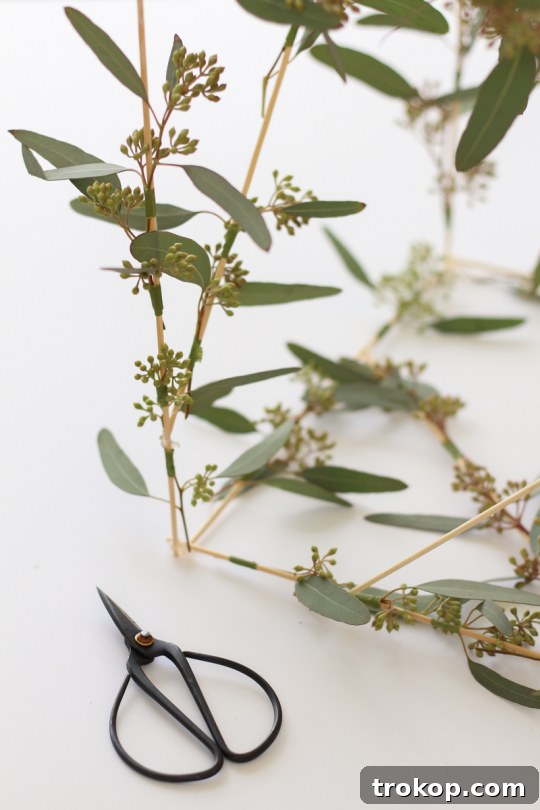
With your geometric frame complete, it’s time to start bringing it to life with foliage. Begin by filling in the base with simple greenery. This step is crucial as the greenery provides a lush backdrop for your flowers and helps to camouflage the wooden skewers, giving the pendant a more organic and natural appearance. Using your floral shears, cut segments of greenery to manageable sizes. Then, attach these segments to the skewers using floral tape. Start by wrapping the floral tape around the skewer at the point where you want to attach the greenery, then lay the greenery stem against the skewer and continue wrapping the tape tightly around both the stem and the skewer. Overlap the tape slightly to ensure a secure hold. Work your way around the entire frame, creating a balanced and even distribution of greenery. Don’t be afraid to allow some pieces to extend slightly beyond the frame for a more natural, cascading effect.
Step 3: Infusing with Blooms and Buds
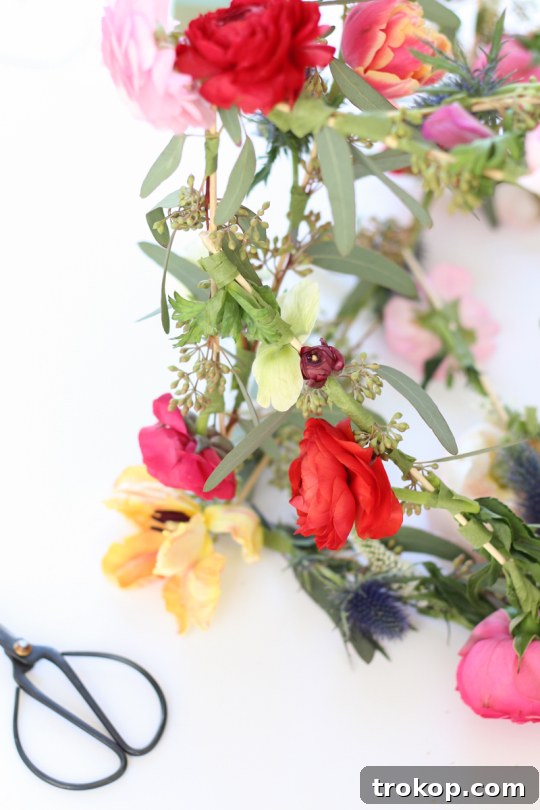
Once your greenery foundation is securely in place, it’s time for the exciting part: adding the flowers! Begin filling in the empty spots with your chosen buds and blooms. This is where you can truly express your artistic vision. Consider placing larger, more prominent flowers first, then filling in around them with smaller blooms and additional greenery for depth. Depending on the weight and type of florals you’re using, you can either continue to use floral tape for lighter flowers or switch to floral wire for heavier, more substantial blooms. For floral wire, wrap it around the stem of the flower and then around a skewer, twisting the ends of the wire together to secure it tightly. Remember to hide the wire as much as possible within the foliage.
A crucial tip for this stage is to be careful not to overload your pendant. While it might be tempting to add an abundance of flowers, ensure that the skewers can comfortably hold the weight of the arrangement once it’s hanging. Too much weight can cause the frame to sag or even break, compromising the beauty and longevity of your creation. Step back frequently to assess the balance and density of your floral arrangement, ensuring it looks cohesive and visually appealing from all angles. Aim for a look that is full and lush without being overly cumbersome.
Step 4: The Grand Reveal – Hanging Your Pendants
With your beautiful geometric floral pendants fully bloomed and perfected, the final step is to prepare them for display. Take a length of fishing wire – chosen for its transparency – and double knot it securely to one corner of your pendant’s frame. A double knot ensures maximum security, preventing your beautiful creation from slipping or falling. Depending on how you plan to hang it, you might want to create a loop at the other end of the fishing wire or tie it directly to your hanging point.
These stunning pendants are incredibly versatile in their placement. Imagine them dangling elegantly from a ceiling, creating a captivating focal point in your living room or dining area. For events, they can be suspended from archways, pergolas, or even tree branches in an outdoor setting, adding a touch of romance and whimsy to any celebration. They also make magnificent additions to photo backdrops, creating a truly memorable visual. Once they’re gracefully suspended, you’re all set to enjoy the enchanting ambiance they create, whether for an intimate evening soiree or a grand celebratory gathering.
Beyond the Tutorial: Customization and Inspiration
The beauty of DIY projects like these Geometric Floral Pendants lies in their potential for endless customization. While we’ve provided a solid foundation, consider these ideas to truly make them your own:
Color Schemes and Themes
Adapt your pendants to match any event theme or seasonal decor. For a spring wedding, opt for pastels like blush pinks and soft greens. A bohemian-inspired event might call for earthy tones, dried florals, and pampas grass integrated into the design. For a modern, minimalist look, choose monochromatic white or cream flowers with sparse, architectural greenery. During the holidays, consider rich reds, deep greens, and hints of metallic accents. The possibilities are as boundless as your imagination.
Alternative Materials and Shapes
While wooden skewers are affordable and easy to work with, don’t limit yourself. For a more industrial or upscale look, you could experiment with thin metal rods or painted dowels. Consider spraying your finished wooden frames with metallic paint (gold, copper, silver) before adding florals for an entirely different aesthetic. If you’re feeling adventurous, you could even try constructing different geometric shapes, such as hexagons or pyramids, though these would require more complex construction techniques.
Lighting Integration
To truly enhance the magical ambiance, especially for evening events, consider weaving tiny, battery-operated fairy lights or micro LED string lights through the floral arrangements. The subtle sparkle will add another layer of charm and make your pendants glow beautifully as dusk settles. Ensure any lights are lightweight and don’t add undue stress to the frame.
Personal Touches and Embellishments
Infuse even more personality into your pendants by adding delicate ribbons cascading from the bottom, incorporating small beads or crystals that catch the light, or even attaching tiny framed photos for a sentimental touch at a wedding or anniversary celebration. These small details can elevate your pendants from beautiful decor to cherished keepsakes.
The Joy of DIY: Crafting Memories and Making a Statement
Embarking on a DIY project like these Geometric Floral Pendants is more than just a craft; it’s an experience. There’s immense satisfaction in knowing that you’ve created something beautiful with your own hands, infusing it with personal care and creativity. These pendants aren’t just decorations; they are conversation starters, mood setters, and tangible expressions of your vision. They offer an unparalleled opportunity to personalize your surroundings, whether it’s your home, a celebratory gathering, or a momentous occasion like a wedding.
The gentle sway of the florals, the delicate play of light, and the unique geometric form all combine to create an unforgettable aesthetic impact. Guests will undoubtedly be charmed by their originality and the obvious effort put into making your space truly special. So, gather your materials, let your creativity bloom, and get ready to transform your next event or living area into a breathtaking botanical sanctuary. We can’t wait to see the beautiful geometric floral pendants you’ll create!
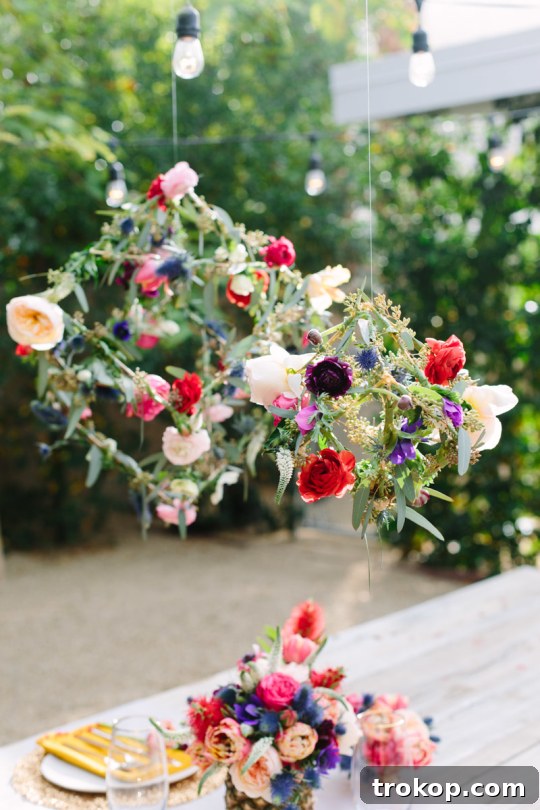
flowers c/o Flower Muse // styled table photos by Mary Cost Photography