

DIY Mini Patterned Side Table: Your Guide to Effortless Home Decor
Who says beautiful home decor has to be complicated or require a workshop full of power tools? Absolutely no one, especially not after you discover the joy and simplicity of creating your very own DIY mini patterned side table! I, Teri, am thrilled to share this project that brings a fresh, personalized touch to any living space. If the thought of intricate woodworking has kept you from diving into furniture DIY, prepare to have your fears banished. This project is specifically designed to be easy, accessible, and completely power-tool-free – perfect for crafting enthusiasts of all skill levels, just like me!
Imagine adding a bespoke piece to your home that reflects your unique style and craftsmanship. This mini side table isn’t just a functional item; it’s a statement, a conversation starter, and a testament to the fact that stunning decor can be achieved without professional equipment. Let’s embark on this creative journey together and transform simple materials into a charming and practical accent table.
Versatile Uses for Your New Side Table
One of the best features of this DIY mini patterned side table is its incredible versatility. Far from being a one-trick pony, this charming piece can effortlessly adapt to various roles within your home, enhancing both functionality and aesthetic appeal. Its compact size and unique design make it an indispensable addition to any room.
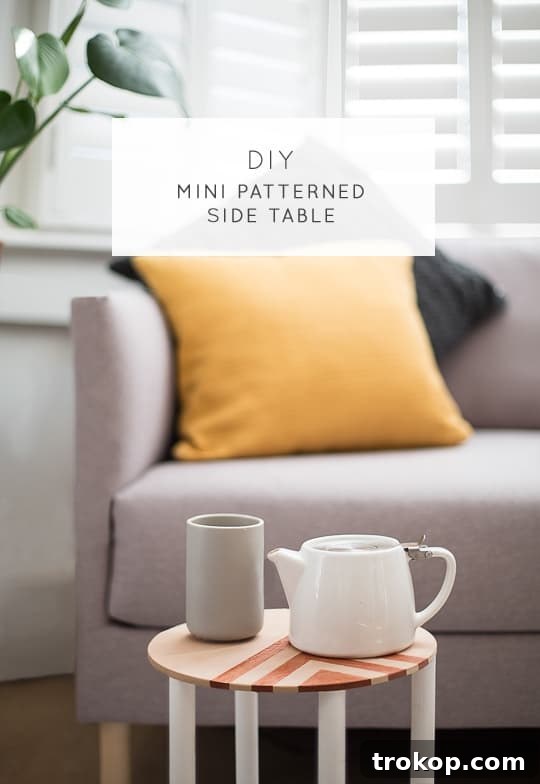
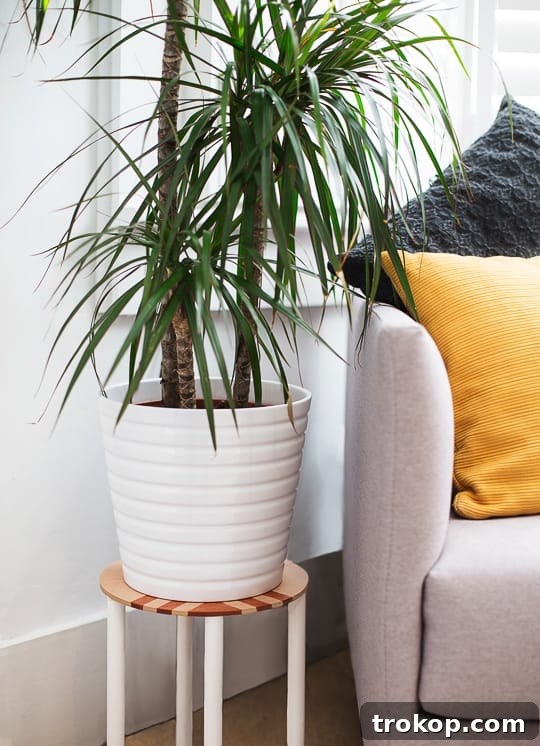
Firstly, imagine it nestled beside your sofa, ready to perch your favorite snacks, a comforting cup of tea, or that gripping novel you’re currently devouring. Gone are the days of precariously balancing drinks on the floor, risking those frequent, catastrophic spills! While I might still have my clumsy moments occasionally, having a dedicated spot for my essentials certainly brings a sense of calm and order to my lounging sessions.
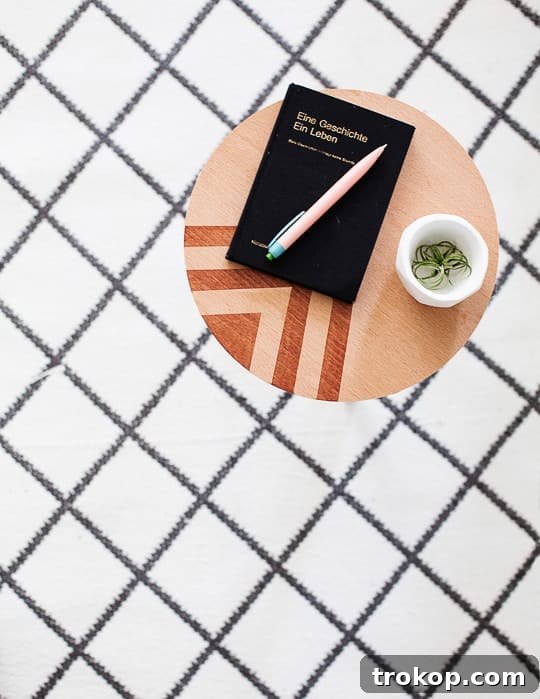
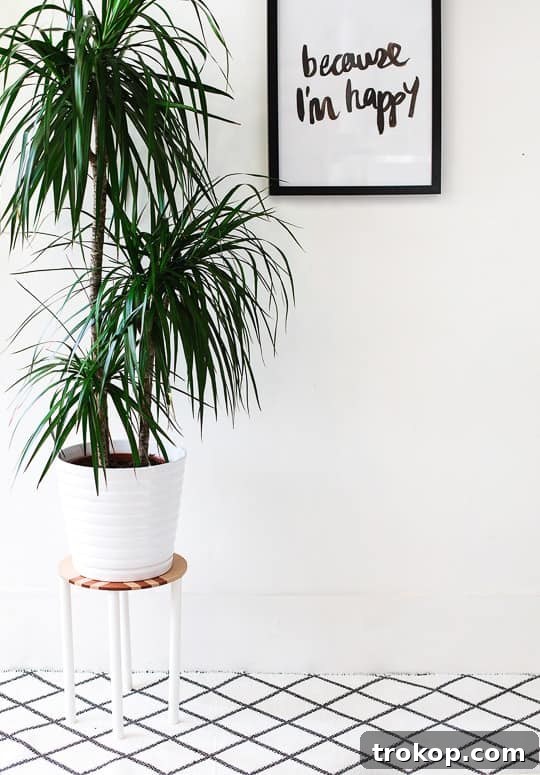
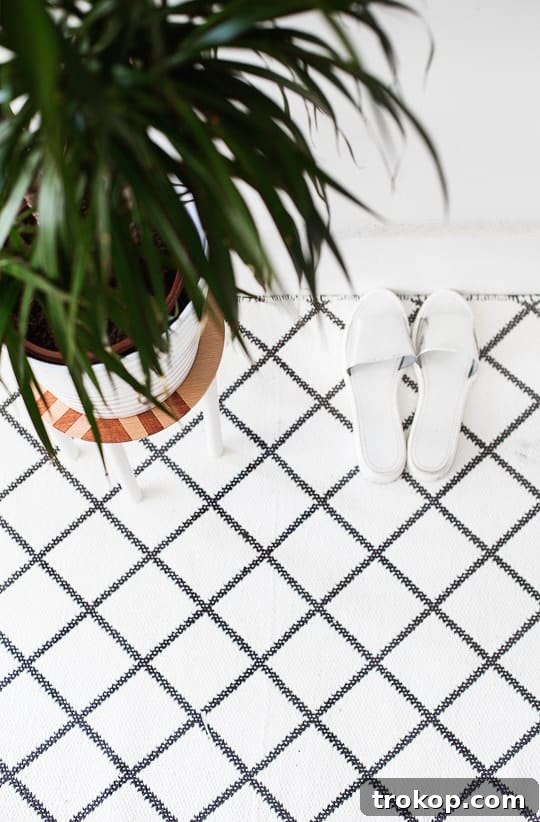
Beyond being a perfect companion for your relaxation zone, this table shines as a stylish pot plant stand. Elevate your beloved greenery and showcase your botanical treasures, adding a touch of natural elegance to any corner. The mid-century inspired varnished pattern gives this little table an added layer of personality, turning a simple plant display into a curated vignette. You have the creative freedom to pick a varnish shade that perfectly complements your existing home decor, ensuring a cohesive and harmonious look.
But the uses don’t stop there! Consider employing it as a convenient bedside table in a smaller bedroom, holding your alarm clock, a glass of water, or your nightly read. It can also serve as an eye-catching accent table in an entryway, a guest bathroom, or even on a covered balcony, providing a spot for keys, decorative items, or a small vase of fresh flowers. Its adaptability makes it an ideal piece for renters, small apartments, or anyone who loves to redecorate frequently.
Why Choose This DIY Project?
In a world saturated with mass-produced furniture, undertaking a DIY project like this mini patterned side table offers numerous compelling benefits. Firstly, it’s an incredibly cost-effective way to add stylish and functional pieces to your home. Rather than spending a premium on store-bought items, you can create something truly unique and beautiful using readily available and inexpensive materials.
Secondly, customization is at the heart of DIY. This project allows you to select your preferred varnish color, paint for the legs, and even adapt the pattern to suit your personal aesthetic. The ability to tailor every detail ensures that your finished table will seamlessly integrate with your existing decor, or even inspire a new design direction for your space.
Perhaps most importantly, this project is wonderfully empowering. The “no power tools” approach means it’s accessible to everyone, regardless of prior crafting experience or access to a specialized workshop. It’s a fantastic entry point into furniture making, proving that you don’t need complex machinery to create something impressive. There’s immense satisfaction in looking at a piece of furniture and knowing that you brought it to life with your own hands. It’s a project that builds confidence, sparks creativity, and leaves you with a tangible, beautiful result.
Materials You’ll Need
Gathering your materials is the first exciting step towards building your beautiful side table. The beauty of this project lies in its simplicity; most of these items are easily found at your local craft store, hardware shop, or online. Here’s a comprehensive list:
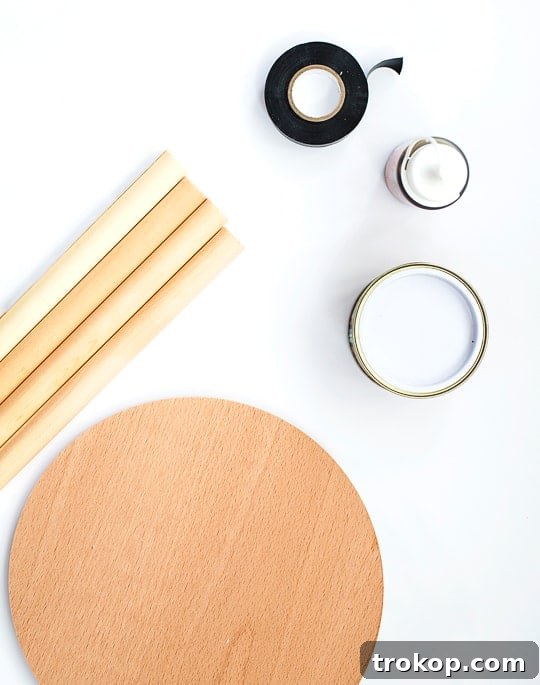
- MDF wooden disc (roughly 10″ in diameter): This will be your tabletop. MDF (Medium-Density Fiberboard) is a great choice for its smooth surface and affordability. A pre-cut disc saves you from needing to cut wood.
- Sandpaper (fine-grit): Essential for smoothing out any rough edges or surfaces on both the disc and the dowel rods, ensuring a professional finish.
- Varnish in the color of your choice: This will create the striking pattern on your tabletop. Choose a shade that complements your home decor or provides a bold contrast.
- Old cloth or lint-free rags: For applying the varnish evenly without leaving brush strokes.
- Duct tape or painter’s tape: Crucial for masking off your pattern and ensuring clean, crisp lines. Painter’s tape is often preferred for its clean removal.
- Scissors: For cutting your tape to size and shape.
- 4 x 12” wooden dowel rods: These will form the stylish legs of your table. Ensure they are straight and uniform in size.
- White wood paint (or color of your choice): For painting the table legs. A good quality wood paint will give a durable and attractive finish.
- Strong wood glue: To securely attach the legs to the tabletop. Look for a quick-setting, high-strength formula.
- Tape measure: For accurate measurements, especially when placing the pattern and legs.
- Ruler: For drawing straight lines and ensuring precise pattern alignment.
- Pencil: For marking measurements and outlines on the wood before taping.
Step-by-Step Guide: Crafting Your Mini Patterned Side Table
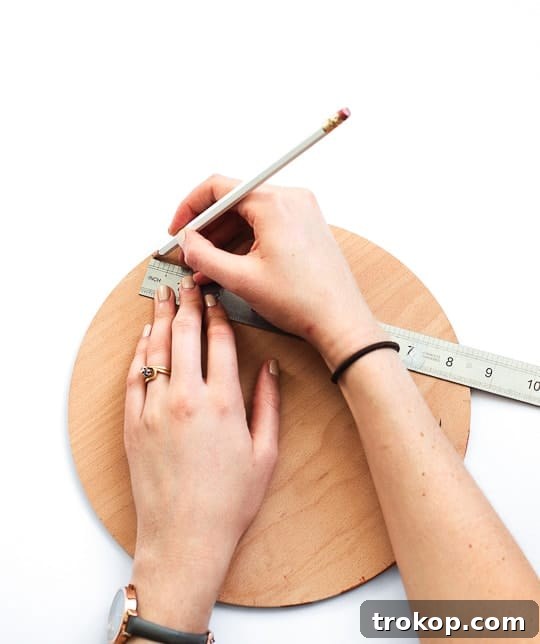
Preparation: Sanding for a Smooth Finish
Every great DIY project begins with thorough preparation. For this side table, that means ensuring all your wooden components are beautifully smooth. Take your fine-grit sandpaper and gently sand down any rough edges or splintered spots on both the MDF disc and the four wooden dowel rods. Pay particular attention to the circumference of the disc and the ends of the dowels. The goal is to achieve a silky-smooth surface, which will not only be more pleasant to touch but also allow for a much cleaner and more professional paint and varnish application. Wipe away any dust with a clean, dry cloth before moving to the next step.
Designing Your Unique Tabletop Pattern
Now for the creative part – designing the mid-century inspired pattern! Precision here will ensure a stunning result.
- Locate the Centerline: Begin by placing your MDF disc on a flat, stable surface. Using your ruler and pencil, find and mark the halfway point across the diameter of the disc. This will serve as your horizontal centerline.
- Mark the Arrowhead Apex: From your horizontal centerline, measure approximately one inch upwards along the vertical axis of the disc. Make a clear pencil mark here. This will be the top point of your arrowhead pattern.
- Define the Base Points: Next, measure down from your centerline to find the corresponding halfway point along the bottom edge of the disc. Mark this point. Then, using your tape measure, measure 4 inches to either side of this bottom center mark, making two additional marks. You should now have three marks along the bottom edge: one at the very center, and two 4 inches away on either side.
- Outline the First Triangle: Connect these penciled points to form the outline of your main triangle. You should have a clear arrowhead shape defined on your MDF disc.
- Apply the First Layer of Tape: Carefully apply duct tape or painter’s tape along these pencil lines to create the initial triangle shape. Press the tape down firmly and smoothly, ensuring it lies perfectly flush against the wood. This step is critical for preventing varnish bleed.
- Create Inner Triangles: Now, you’ll create the nested pattern. Working inwards from your first tape triangle, apply two more layers of tape triangles. Leave a gap between each tape line that is roughly the same width as your tape. While you can measure this for absolute precision, it’s often easy enough to gauge by eye, aiming for a consistent, visually pleasing spacing. Smooth down each layer of tape thoroughly. You should now have a series of concentric tape triangles, creating masked-off areas where the varnish will be applied.
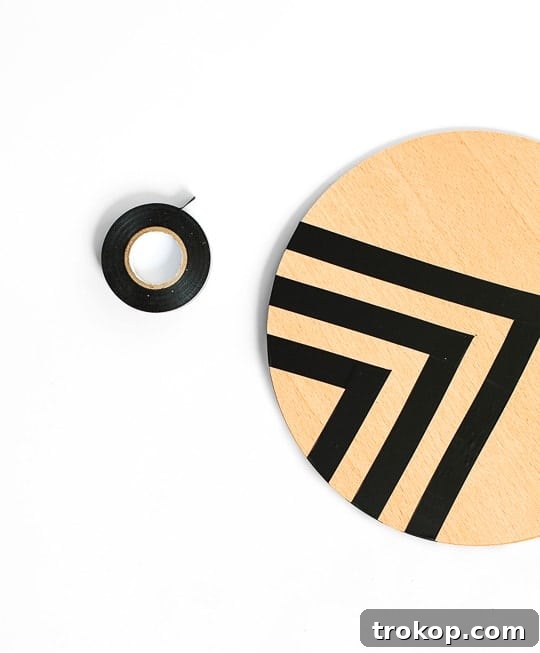
The Art of Varnishing for Lasting Beauty
With your pattern carefully taped, it’s time to bring your tabletop to life with varnish. This step requires a steady hand and patience for the best results.
- Prepare for Varnishing: Once you have completed all your tape triangles, working your way to the smallest one, prepare your work area. Ensure it’s well-ventilated and lay down some newspaper or a drop cloth to protect your surfaces.
- Apply the Varnish: Pour a small amount of your chosen varnish onto an old, lint-free cloth. The key is to avoid over-saturating the wood. Gently rub the varnish into the exposed gaps between the tape lines. Use smooth, even strokes, moving with the grain of the wood if applicable, to ensure a consistent finish.
- Avoid Bleeding: Be mindful not to apply too much varnish at once, as this can cause it to bleed under the tape, ruining your crisp lines. It’s always better to apply two thinner coats to achieve your desired color depth and richness than one heavy, messy coat.
- Allow to Dry: After applying the first coat, leave the tabletop to dry completely according to the manufacturer’s instructions on your varnish product. Drying times can vary significantly based on temperature, humidity, and varnish type. Once dry, you can apply a second thin coat if you wish to deepen the color or enhance the protective layer. Ensure the second coat is also fully dry before proceeding.
Painting and Assembling the Side Table Legs
While your tabletop varnish is drying, you can begin preparing the legs. This parallel workflow saves time and ensures everything is ready for final assembly.
- Paint the Legs: Take your four wooden dowel rods and apply a thin, even coat of your chosen white wood paint (or any color you prefer). To achieve optimal coverage and a smooth finish, it’s best to do two thin coats rather than one thick one. Allow the first coat to dry completely before applying the second. This prevents drips and ensures the paint adheres properly. Make sure the legs are totally dry and not tacky before you handle them further, as any wet paint could lead to smudges and a messy finish.
- Remove the Tape: Once the varnish on your tabletop is completely dry to the touch, carefully peel away all the tape. Do this slowly and at an angle to reveal your beautifully varnished pattern. You should be left with clean, crisp lines and a stunning geometric design.
- Mark Leg Placement: Turn the wood disc over so the unvarnished side is facing up. This will be the underside of your table. Find and mark the central point on this side once again with your pencil. To ensure the legs are evenly spread and stable, use your tape measure to measure the circumference of the disc. Divide this number by four. Mark these four equidistant points around the edge of the disc where each leg will be attached.
- Ensure Front Alignment: For a polished look, check that the first leg placement point (which will be your front leg) corresponds directly with the center of the smallest triangle on the varnished side of your tabletop. This detail will make your table appear more thoughtfully designed.
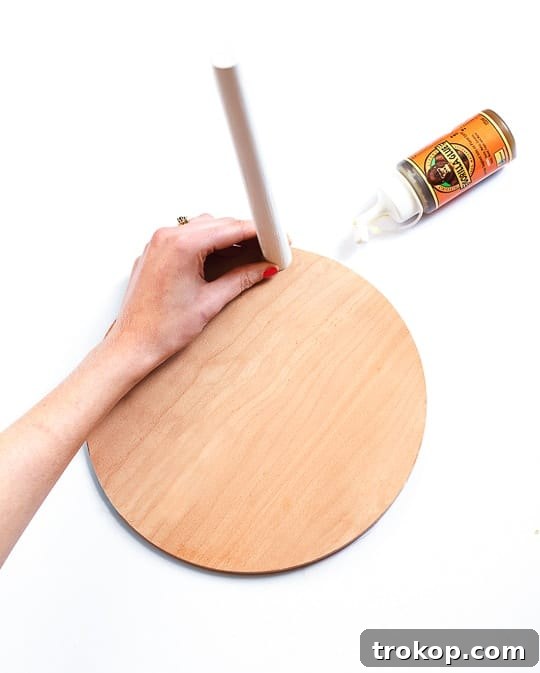
- Apply Wood Glue: Lie the wood disc on a stable surface, with the marked underside facing up. Apply a moderate amount of strong wood glue to the end of one of your painted dowel rods. You don’t want to be overly generous, as excess glue can seep out and create a sticky mess on the finished table.
- Attach and Secure Legs: Carefully place the glued end of the dowel rod onto one of your marked points on the underside of the disc. Hold it firmly in place for a few minutes until the glue starts to become tacky and holds the leg upright on its own. To ensure the leg dries straight and securely, prop something stable against it, like a heavy book, a bottle, or even another piece of wood.
- Repeat for All Legs: Repeat this process for all four legs, ensuring each is aligned correctly and propped securely.
- Final Drying Time: Once all legs are attached, leave the entire assembly to dry undisturbed. For the strongest bond, it’s highly recommended to leave it to cure overnight, or even for 24 hours, depending on your wood glue’s instructions. This extended drying time ensures the glue reaches its maximum strength, providing a stable and durable table.
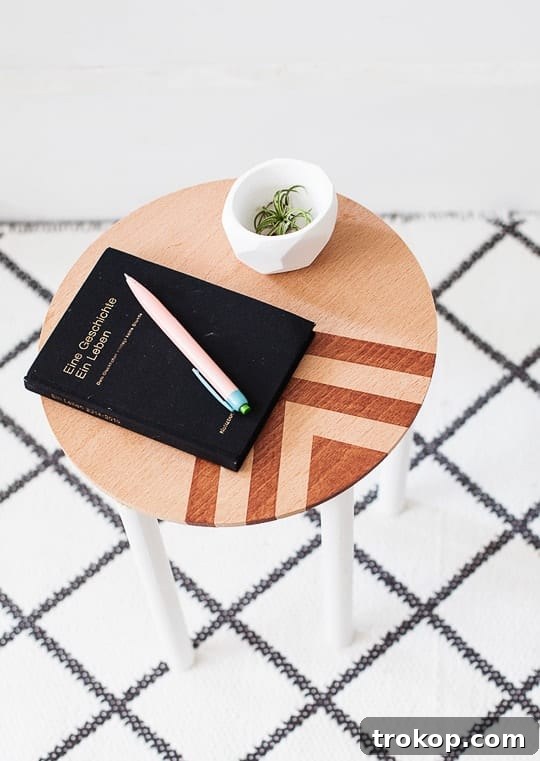


Creative Customization Ideas
The beauty of DIY projects lies in their endless potential for personalization. While the geometric pattern with varnished details and white legs offers a classic mid-century appeal, don’t hesitate to put your own creative spin on this design. Here are a few ideas to inspire you:
- Color Play: Instead of white, paint the legs in a vibrant color that pops, or a deep, moody tone for a more sophisticated look. You could even use metallic spray paint for a touch of glamour. For the tabletop pattern, consider using different colored stains or even a contrasting paint color within the taped areas instead of varnish for a completely different effect.
- Alternative Patterns: The taping technique allows for endless possibilities beyond the arrowhead. Experiment with stripes, chevrons, checkerboard, or even a simple half-dipped effect. Freehand painting with stencils could also open up new design avenues.
- Leg Variations: While dowel rods offer a clean, minimalist look, you could explore other simple leg options. Tapered furniture legs (which often come with pre-drilled holes for easy attachment) or even hairpin legs could transform the table’s overall style, leaning into different aesthetic movements like industrial or modern farmhouse.
- Textural Finishes: Beyond varnish, you could use a clear matte sealant for a subdued look, or experiment with chalk paint for a rustic, distressed finish. A high-gloss topcoat would provide a sleek, contemporary feel.
- Mixed Materials: For the truly adventurous, consider adding a small glass top for an extra layer of protection and visual appeal, or a thin piece of cork on the surface for a practical, natural touch.
Care and Maintenance Tips
To ensure your beautiful new mini side table stands the test of time and continues to look its best, a little care goes a long way. The varnish on the tabletop offers some protection, but it’s always wise to wipe up spills immediately with a soft, damp cloth. Avoid harsh chemical cleaners, as these can strip the varnish or paint. For general cleaning, a gentle wipe with a microfiber cloth is usually sufficient. If you plan to use it heavily as a drink or plant stand, consider adding felt pads to the bottom of the legs to protect your floors and prevent scratching.
Now, your mini patterned side table is good to go! Flip it over and start putting it to use in your home. You could even get creative and make a few in varying heights to create a charming cluster of tables, perfect for a dynamic living room arrangement, or as an elaborate plant pot display. Who knew making such a stylish and functional piece of furniture could be so simple, and entirely without power tools?
If you need me, I’ll be lounging comfortably on my sofa, sipping tea from my newly crafted table, and already dreaming up my next exciting DIY project. Happy crafting!
 Teri is a talented designer, illustrator, stylist, and crafter. Originally trained in print and surface pattern design, she brings five years of in-house design experience from a greetings card company. Today, she dedicates her full-time efforts to creating inspiring content for The Lovely Drawer from her cozy London flat.