
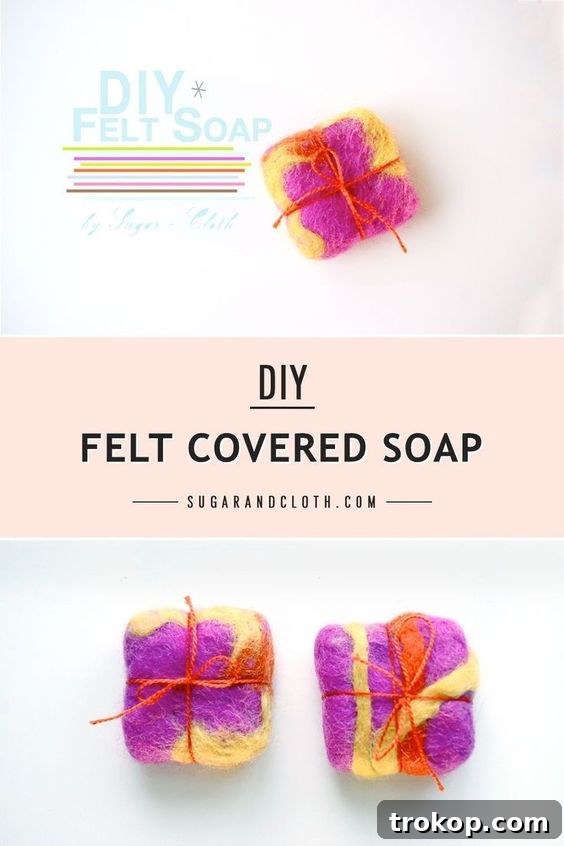
Welcome to the enchanting world of DIY felted soap! This comprehensive guide invites you to explore the artistic and practical craft of transforming ordinary soap bars into luxurious, exfoliating masterpieces. Immerse yourself in a creative process where vibrant wool fibers embrace a simple bar of soap, resulting in a unique, functional work of art that’s as delightful to make as it is to use. Whether you’re looking for a sustainable addition to your self-care routine, a gentle exfoliator that prolongs soap life, or a thoughtful handmade gift, felted soap offers a charming solution. Prepare to discover the magic where creativity meets practicality, yielding beautiful bars that are almost too pretty to lather up!
Master the Art of DIY Felted Soap: Your Ultimate Guide to Crafting Luxurious, Exfoliating Bars
Felted soap is a delightful fusion of crafting and practicality, offering a unique blend of benefits that elevate your daily cleansing ritual. Far more than just a decorative item, these beautiful bars integrate a natural washcloth directly onto the soap itself, providing a gentle exfoliating experience while significantly extending the life of your favorite soap. This step-by-step tutorial will guide you through the creative and enjoyable process of making your own felted soaps, turning humble ingredients into exquisite, functional treasures perfect for personal indulgence or as thoughtful, eco-friendly gifts for friends and loved ones.
There are numerous compelling reasons to embrace the craft of making your own felted soap. Firstly, each bar comes with its own built-in washcloth, eliminating the need for separate loofahs or sponges, making it a hygienic and convenient all-in-one solution. Secondly, the process is surprisingly simple, cost-effective, and deeply satisfying, allowing you to personalize your soap with a myriad of colors and designs. Lastly, the finished product is often so aesthetically pleasing and luxurious that you might find it almost too beautiful to use – though we encourage you to enjoy its many benefits!
Table of Contents
What is Felted Soap and Why Make It?
Felted soap is precisely what its name implies: a bar of soap elegantly encased in a layer of felted wool. This ancient craft, known as wet felting, involves using hot water, friction, and sometimes soap (in this case, the soap itself!) to interlock wool fibers, creating a dense, durable fabric around the soap bar. The wool serves multiple brilliant purposes, effectively functioning as a natural, integrated washcloth or shower puff that enhances your bathing experience and significantly extends the life of your soap.
The choice of wool for this craft is not arbitrary; wool possesses remarkable natural properties that make it ideal. It is inherently antibacterial and antifungal, meaning it naturally resists the growth of mold and bacteria that can often plague traditional washcloths or sponges. This ensures your felted soap remains hygienic and fresh. Furthermore, the wool fibers act as an excellent yet gentle exfoliant, effectively buffing away dull, dead skin cells to reveal smoother, brighter skin beneath. This makes felted soap a wonderful option for all skin types, including sensitive skin, as the exfoliation is mild and soothing.
Essential Materials for Your DIY Felted Soap
Gathering your materials is the first exciting step in your felted soap journey. The beauty of this craft lies in its simplicity and the readily available nature of its core components. Here’s what you’ll need to create your own beautiful and functional felted soap bars:
- Soap Bar: The foundation of your project! Opt for a high-quality, unscented, and natural soap bar. Castile soap or glycerin soap bars work exceptionally well because they create a good lather, which is crucial for the felting process, and their neutral scent won’t interfere with any added essential oils if you choose to use them later. Ensure the bar is firm and not too soft, as softer soaps can sometimes break down too quickly during the initial felting stages.
- Wool Roving in Various Colors: This is where the artistry comes in! Wool roving refers to long, untwisted bundles of wool fibers. For best results and a luxurious feel, choose fine wool types like Merino or Alpaca wool. These fibers are softer and felt more easily than coarser wools. You can select a single color for a classic, minimalist look or combine several different colored wool strands to create stunning marbled, striped, or patterned effects. The amount needed per bar is relatively small, so a few ounces of roving will go a long way. You can often find wool roving in various colors online or at local craft stores.
- Bowl of Hot Water: Hot water is essential for the wet felting process. The heat helps the wool fibers’ scales to open, allowing them to interlock and bind together more effectively.
- Scissors: A basic pair of sharp scissors will be needed to cut the wool roving to the appropriate size.
- Dish or Extra Bowl: Keep a designated dish or bowl nearby to catch excess water as you work, helping to keep your crafting area tidy.
- Towel: A clean towel is indispensable for absorbing excess water from your felted soap once the felting process is complete and for patting it dry before air drying.
- String/Twine (Optional): If you plan to gift your felted soaps or prefer to hang them to dry and display, a natural string or twine can add a lovely rustic touch.
- Rubber Mat or Bubble Wrap (Optional): Some crafters find that a rubber mat or bubble wrap (bubble side up) provides additional friction, which can aid in the felting process, especially for beginners.
Step-by-Step Guide: How to Make a DIY Felted Soap Bar
Now that you have all your materials ready, let’s dive into the fascinating process of wet felting your very own soap bar. This craft is incredibly tactile and rewarding, allowing you to feel the transformation of wool into a durable, cohesive layer.
Step 1: Prepare the Wool Roving
Begin by gently pulling a thin, even strand of your primary wool roving color. You’ll need a piece that is long and wide enough to completely encompass your bar of soap when folded. A good starting point is approximately 6-8 inches long and wide enough to tear into a flat, thin layer. The key is to create thin, wispy layers rather than thick clumps, as thinner layers felt more evenly and create a stronger bond. Overlap the ends slightly to ensure full coverage.
Step 2: Wrap the Soap Evenly
Carefully place your soap bar in the center of the prepared wool strand. Begin by folding and spreading the wool over one side of the soap, ensuring it is snugly covered. Then, take the remaining wool and wrap it around the other side of the soap, overlapping the initial layer. It’s crucial that the entire soap bar is encased in a relatively thick and even layer of wool, with no significant gaps. Think of it like wrapping a present – you want complete coverage with a slight overlap to create a strong seam. For enhanced durability, you can apply a second thin layer of wool, oriented perpendicular to the first layer, which helps the fibers interlock from all directions.
Step 3: Add Decorative Colors and Designs (Optional)
This is your chance to get creative! If you desire a marbled, striped, or rainbow effect, now is the time to add your secondary colors. Gently pull off small, thin pieces of different colored wool roving and lay them delicately over your base layer. You can create intricate patterns, simple stripes, or random splashes of color. Remember, the felting process will cause these designs to soften and blend, so don’t get too attached to sharp lines or perfect shapes; embrace the organic beauty that felt creates!
Step 4: Dampen the Wrapped Soap Thoroughly
Carefully hold your wool-wrapped soap over your bowl of hot water. Slowly dribble or gently pour hot water over the entire surface of the wool, making sure it becomes completely saturated. Alternatively, you can briefly dip the soap into the hot water. The goal is to get the wool thoroughly wet without dislodging the fibers or causing the soap to dissolve too quickly. Repeat this step until the entire wool casing is soaked through, from all angles.
Step 5: Begin Gentle Felting and Shaping
With the soap and wool fully wet, begin the initial felting process. Hold the wrapped soap in your hands and gently press and massage the wool. Use soft, circular motions, almost as if you are molding clay. The heat and moisture will cause the wool fibers to start shrinking and bonding together. Ensure your hands and the soap remain wet throughout this stage; you can periodically dip the soap back into the hot water or dribble more water over it if it starts to dry out. Continue this gentle shaping for about 5-10 minutes, or until the wool starts to hold its shape around the soap and is no longer easily disturbed.
Step 6: Introduce Lather and Increase Friction
Once the wool has started to bind, it’s time to let the soap itself assist in the felting. Submerge the soap quickly in hot water, then begin to gently rub and lather the soap bar. The soapy water, combined with continued gentle circular motions and increasing pressure, will encourage the wool fibers to interlock more tightly. You’ll notice the wool beginning to shrink and become denser, forming a smooth, firm layer. This stage is crucial for creating a robust felted cover. Continue to massage and roll the soap between your hands for about 10-15 minutes, or until you can no longer easily shift the wool around on the soap.
Step 7: Rinse and Refine (Optional Check)
If you want to check your progress or remove excess soap, you can briefly rinse the felted bar under warm water. This allows you to see the true texture of the felt. If the wool still feels loose or bumpy, re-wet it with hot water and return to the lathering and massaging stage, applying more friction. A well-felted soap will have a smooth, firm, and integrated wool layer that doesn’t ripple or separate from the soap.
Step 8: Final Felting and Tightening
Once your wool is no longer rippled and has formed a smooth and sturdy layer over the soap, continue with more vigorous circular motions and gentle squeezing. The goal is to achieve a really tight, durable layer of felt. A good test is to try washing your hands with the felted soap – if the wool feels secure and doesn’t shift, it’s likely finished. The combination of heat, friction, and the lubricating effect of the soapy water causes the wool fibers to shrink and lock together permanently.
Step 9: Rinse Thoroughly
After the felting is complete, rinse the felted soap thoroughly under cool running water. This will remove any remaining soap residue from the wool and help the fibers to “set” in their new, felted state. Keep rinsing until the water runs clear and no more suds appear.
Step 10: Dry the Felted Soap Completely
Gently squeeze out any excess water from the felted soap. Then, pat the soap firmly with a clean towel to absorb as much moisture as possible. Place the felted soap on a well-draining soap dish or a dry towel in a spot with good air circulation. Allow it to air dry completely, which can take anywhere from one to two days, depending on the humidity and temperature of your environment. Ensuring it is fully dry before use or storage is crucial to prevent mildew and ensure the longevity of both the soap and the felt. Flipping it occasionally can help speed up the drying process.
Step 11: Finishing Touches (Optional)
Once completely dry, your felted soap is ready for use or gifting! If you’re giving it as a present, you can wrap it with an elegant twine or ribbon, adding a personalized tag for a truly charming touch.
DIY Felted Soap
5 from 6 votes
30 mins
30 mins
Equipment
-
Scissors
-
Medium bowl
Materials
- 1 soap bar (natural, unscented)
- Wool roving in assorted colors of choice
- Hot water
- Towel
- Dish/extra bowl to catch water
Instructions
-
Cut or gently pull a thin strand of wool roving that is long and wide enough to fold over and fully cover your bar of soap.
-
Place the soap bar in the center of the wool. Spread and fold the wool to completely encase all areas of the soap, ensuring an even layer with slight overlap.
-
(Optional) Cut smaller pieces of other colored wool and lay them over the base layer to create a design or texture. Remember these will blend during felting.
-
Dribble or gently pour hot water over the wool-wrapped soap until it is completely saturated.
-
Begin squeezing and gently massaging the soap, molding the wool to the contours of the soap with circular motions, similar to shaping clay. Keep your hands and the soap wet throughout this process.
-
Continue forming the wool until it begins to felt and hold its shape around the soap. This initial stage may take about 5-10 minutes.
-
Once the wool is somewhat formed, quickly submerge the soap in hot water, then start to gently lather and massage the bar. The soap and increased friction will help the wool fibers interlock.
-
Continue gently smoothing the wool with small circular motions for several minutes, increasing pressure slightly, to achieve a really tight and sturdy felted layer. The process is complete when the wool doesn’t shift on the soap.
-
Rinse the felted soap thoroughly under cool water to remove all soap residue.
-
Gently pat the soap with a towel to get rid of excess water, then allow it to air dry thoroughly before use or storage.

Benefits of Using Felted Soap
Beyond its aesthetic appeal and the joy of crafting, felted soap offers a multitude of practical advantages that make it a superior choice for your daily hygiene and skincare routine:
- Gentle Yet Effective Exfoliation: The wool fibers naturally provide a mild exfoliating scrub, gently sloughing away dead skin cells without being abrasive. This promotes smoother, softer skin and can help improve circulation.
- Extended Soap Life: The felted wool acts as a protective barrier, preventing the soap from becoming mushy and dissolving too quickly, especially in humid environments. It allows the soap to dry more efficiently between uses, significantly prolonging its lifespan.
- Built-in Washcloth: Say goodbye to separate plastic loofahs or cotton washcloths! Felted soap offers an all-in-one solution, integrating a soft and scrubby washcloth directly onto the soap for ultimate convenience.
- Natural Antibacterial Properties: Wool is naturally resistant to bacteria, mold, and mildew. This means your felted soap stays cleaner and more hygienic than synthetic sponges or traditional washcloths, reducing the need for frequent washing.
- Luxurious Lather: The texture of the wool helps to create a rich, creamy, and abundant lather with minimal effort, enhancing the sensory experience of your bath or shower.
- Eco-Friendly and Sustainable: By using natural wool and extending the life of your soap, felted soap contributes to a more sustainable lifestyle. It reduces waste from disposable sponges and plastic packaging, aligning with eco-conscious values.
- Beautiful and Unique: Each felted soap bar is a unique piece of art. With endless possibilities for color combinations and patterns, they add a touch of handmade elegance to any bathroom.
- Perfect for Gifting: Due to their beauty, practicality, and handmade charm, felted soaps make exceptional and thoughtful gifts for any occasion.
Caring for Your Felted Soap
To ensure your beautiful felted soap lasts as long as possible and remains a joy to use, proper care is essential. Fortunately, maintaining felted soap is quite simple:
- Allow to Dry Completely: The most important rule for any soap, especially felted soap, is to allow it to dry thoroughly between uses. Store your felted soap on a well-draining soap dish or hang it using a piece of twine (if you added one) in a spot where it can air dry completely. This prevents the soap from getting mushy and prolongs both the soap’s life and the integrity of the felt.
- Rinse After Each Use: After each use, give your felted soap a quick rinse under running water to wash away any excess suds and ensure the felt stays clean.
- When the Soap is Gone: One of the wonderful aspects of felted soap is its versatility. Once the soap inside has completely dissolved, you’re left with a durable felted pouch. This wool pouch can be repurposed as a gentle scrubby for cleaning, a natural pot scrubber, or even composted, returning natural fibers to the earth.
Creative Variations and Tips
The world of felted soap is ripe for creativity! Here are some ideas and tips to enhance your crafting experience and inspire unique designs:
- Layering Colors: Experiment with intricate patterns by layering very thin strips or shapes of different colored wool. You can create geometric designs, abstract swirls, or even try to mimic natural elements like flowers or leaves. Remember that the felting process will soften these lines, giving a watercolor-like effect.
- Using Different Wool Types: While Merino and Alpaca are excellent for softness, you can explore other wools. For a slightly more textured scrub, you might incorporate a small amount of coarser wool, though be mindful that it may not felt as smoothly.
- Adding Essential Oils: If you use an unscented soap bar, you can add a few drops of your favorite essential oils to the *dried* felted soap after the felting process is complete. This allows you to customize the scent without interfering with the felting. Apply them sparingly and allow them to absorb before use.
- Travel-Sized Soaps: Felt small, hotel-sized soap bars for convenient and eco-friendly travel options. They make great gifts for adventurers!
- Troubleshooting – Not Felting?: If your wool isn’t felting, consider these points:
- Not enough friction: Increase your massage and rubbing motions.
- Water temperature: Ensure the water is consistently hot.
- Wool type: Some wools felt more easily than others. Superwash wool, for example, is treated to resist felting. Always use non-superwash wool roving.
- Too much wool: Excessively thick layers can make it harder for the fibers to bond initially.
- Adding a Hanging Loop: Before wrapping your soap, you can insert a piece of string or ribbon into the center of the wool layer, ensuring the ends protrude from one side. This will become a convenient hanging loop once felted.
Conclusion: Embrace the Felted Soap Lifestyle
Crafting DIY felted soap is more than just a hobby; it’s an enjoyable, sustainable, and rewarding venture that blends artistry with everyday practicality. From the soothing process of transforming wool fibers into a beautiful, functional covering to the luxurious experience of using a naturally exfoliating, long-lasting soap, felted soap offers benefits for both the maker and the user. You’ve now gained the knowledge and steps to create your own unique bars, reducing waste, enhancing your skincare routine, and crafting thoughtful handmade gifts. So gather your materials, unleash your creativity, and dive into the delightful world of felted soap – your skin, and the planet, will thank you!